How to repair a digital camera? What equipment is needed to repair digital cameras?
Camera repair, how to check the functionality of the optocoupler
Optocoupler malfunctions in cameras are not just rare, but very rare. Nevertheless, at the request of visitors to our site, we are publishing a short material “how to test an optocoupler”...
Canon ixus cameras, lens malfunctions and repairs
The lens in a digital camera is a complex optical-mechanical device that combines elements of precision mechanics and optics. In cameras it is most at risk of failure. Suffice it to say that about 70% of camera malfunctions are due to lens defects...
Camera repair, malfunctions and repair of compact flash connectors
One of the common faults in digital cameras that use compact flash as a storage medium, a memory card (see photo on the left), is bent or broken contacts of the connector where the memory card is actually inserted. The occurrence of a malfunction, in the vast majority of cases...
Canon powershot s2is camera lens repair, shutter malfunction
One of the common problems in Canon cameras power shot s2is - malfunction of the lens shutter mechanism. Most often, shutter curtains...
Repair of Sony cameras, model: DSC M1, malfunction and repair of the rotating mechanism
One of the most common malfunctions encountered during the repair of Sony dsc - m1 cameras is the fastening of the rotating mechanism...
Repair of flash in cameras, principle of operation and flash repair
A digital camera without a flash is of little use, and in low light conditions there is no point in using it. Therefore, repairing cameras with such a malfunction does not, as a rule, raise questions among users...
Sony DSC R1 camera repair - lens repair, disassembly sequence
The Sony DSC R1 digital camera can compete with SLR cameras in many respects. It quickly gained popularity among amateur photographers and was in great demand in photographic equipment stores. Often such a camera could only be purchased on order....
Error codes for Sony cameras and their interpretation | Sony code error
The main codes and their decoding, causes of malfunctions, search paths and solutions are considered.
The material may be useful for camera repair engineers, and is also recommended for review by owners of Sony cameras.
Malfunctions of Sony cameras, solutions according to the operating instructions
The article discusses malfunctions that users can fix themselves, without resorting to the services of camera repair shops. Descriptions of these faults can be found in the operating instructions, which users often lose. On top of that, the translation of operating instructions is often not done properly, to put it mildly. We have included in the material the most interesting and useful recommendations for troubleshooting problems with Sony cameras. It is planned to make changes and additions to the article...
Camera hot shoe - circuit diagram
When starting to repair a camera with a malfunctioning hot shoe, at first glance it may seem that there should not be any special problems in troubleshooting the problem. But, this is only if the hot shoe malfunction is “on the surface” and does not require an in-depth analysis of the circuit diagram...
The recently published article “Replacing CCD matrices in cameras” discusses in detail the defects and the reasons for their occurrence. The article begins with a definition of what a CCD matrix is and ends with a photo gallery of images taken with cameras with faulty CCD sensors, where you can clearly see the variety of manifestations of defects. On the article page in the “interesting to know” website Bar, material was published about the largest CCD matrix in the world.....
Article “Camera Canon PowerShot A510, A520, A521. Lens repair and replacement."
Prices for camera repairs. A list of cameras divided by category.
Repair of photographic equipment, secrets of professional craftsmen - part 1
Malfunctions - replacing the camera display
The manifestation of a malfunction of damaged displays can be the display of part of the information on the display, while cracks and spreading of liquid crystals are usually visible. There is no information on the display, there are no visual cracks on the display. When liquid crystals spread, the pictures on the display are varied, and sometimes impressive...
In our workshop, camera display replacement is carried out in as soon as possible, in the vast majority of cases, repairs are carried out on the day of the call... .
Repair of waterproof, shockproof digital cameras
When buying a waterproof, shockproof digital camera, the consumer is unlikely to think about repairing it, and this is quite logical. After all, he is buying a shockproof, waterproof, and therefore indestructible camera. He will have to upset the owners a little, or rather, warn them. Like any digital technology, shockproof cameras require careful handling. I can say that waterproof cameras arrive at our workshop not so rarely...
Repair of photographic equipment, secrets of professional craftsmen - part 2
General rules for operating and caring for a camera with a touch screen.
Use protective film. We recommend using a film with an anti-reflective surface since most touch screens “glare” in the light. Store your camera in a special case or bag. To clean the camera display, use special lint-free wipes. As the most practical napkins, in our opinion, these are microfiber napkins for the care of optics... .
Cleaning the camera matrix.
In the article, you will find not only answers to questions related to the cost of matrix cleaning services, but also tips on how to minimize the likelihood of dust getting inside the SLR camera, under what circumstances dust gets on the matrix, etc. Read completely.
Repair of semi-professional and professional Nikon cameras.
Remtelevid-service repairs professional and semi-professional Nikon SLR cameras.
Repair of Nikon SLR cameras in our workshop is performed by professional craftsmen whose knowledge and experience meets all the requirements...
Nikon Sendai, production of SLR cameras - a look from the inside.
Error codes for Canon PowerShot cameras and their interpretation.
The article discusses error codes for several models of Canon PowerShot cameras. Despite the fact that the material contains codes for outdated models, their decoding is also relevant for modern Canon digital cameras, both the IXUS and PowerShot lines, since the operating principle of the self-diagnosis system has changed little. With the development of photographic technology, the introduction of new components and circuits into digital cameras has practically led to an increase in error code values.
Professional repair of Canon G7, G9, G10, G11, G12 cameras.
Canon PowerShot G7, G9, G10, G11, G12 series cameras bring a new level of performance and ease of use. With each new model Canon consistently raises the bar for digital camera quality. The Remtelevid-service photo workshop repairs Canon G7, G9, G10, G11, G12 cameras with a guarantee. The page shows common faults, prices according to the price list, deadlines for completing work... >>>
FAQ on lenses, malfunctions, questions and answers. Letters to the Remtelevid-service workshop
The Remtelevid-service photo workshop repairs lenses for SLR cameras from standard kits to telephoto lenses inclusive, at a professional level. By e-mail, anyone can ask questions about the repair and maintenance of lenses and receive a qualified answer. We publish the most interesting questions and answers to them on the pages of our website. We publish questions and answers “as is”, i.e. without any editing or changes... >>>
ERR 01 on SLR cameras Canon EOS, description of the malfunction and general recommendations for elimination.
Error ERR 99 on Canon EOS SLR cameras, description of the problem and general recommendations for troubleshooting.
How to repair a camera yourselfHere’s a quote that caught my eye (from a dialogue between a client and a workshop master):
- “How much does it cost to repair or replace the lens of a Power Shot SX 10IS camera (minimum and maximum cost) - post-warranty camera.
The camera did not fall. It just gave me a lens error. What is the repair time?"
-"Good afternoon, Marina.
The cost of repairing the SX10 lens is 4800 rubles; lens replacement is most likely not required. The period is usually 1-2 weeks, depending on the complexity of the problem. All this is preliminary information; the final answer to your questions will be given by diagnostics, which we offer free of charge.
Regards, Alexey..."
But here is the material that I found on the Internet... Maybe it’s not worth shelling out money right away? Need to try....
Lens failure - This has to be the most common failure of digital cameras. Some common error messages that may appear on the display of cameras with this problem include “E18 lens” (“E18 lens error” in older Canon models), “ACCESS” (Sony), “Zoom Error” zoom) (Fuji), "LensObstructed" (Kodak), “lens>error, restartcamera” or simply “lens error” (almost all camera manufacturers have been using this option lately). Some cameras may not show anything on the display at all, but only emit a beep, the lens retracts and the camera turns off. Sometimes the lens won't even extend.
The problem is actually quite common in all models of digital cameras. This is usually sand or other small particles that get into the lens extension mechanism and autofocus mechanism. Or the camera was dropped with the lens extended. Perhaps the camera was turned on, but the lens was prevented from extending (for example, accidentally turned on in a bag). It happens that after extending the lens, the batteries are discharged and the camera turns off with the lens extended. Believe it or not, one of the causes of lens malfunctions is the use of cases and bags. Sand, dirt, fibers, etc. accumulate in the lower part of the body. These materials like to cling to the camera body due to electrostatic charge during friction (especially in cases where the case is soft and fleecy). Once these particles find their way inside the lens mechanism, malfunction messages occur. I have many Canon cameras and I never use cases for this very reason.
For the owner of a camera with this problem, there may be no point in contacting the warranty workshop. Many camera manufacturers will not fix this problem under warranty. According to them, this is due to damage to the camera due to an impact or sand or debris getting into the lens extension mechanism (neither case is covered by the warranty). The repair cost is usually close to or more than what the camera is actually worth. Since warranty workshops in most cases replace a faulty lens with a new one, the cost of which as a spare part is high.
Fortunately, about half of the cameras that suffer from this problem can be easily fixed using one of the following methods. None of these methods require disassembling the camera, although some of them can cause other damage if overdone and careless. If your camera is still under warranty, before applying any of these, please visit your camera manufacturer's warranty shop to find out whether the repair will be covered under warranty or to determine how much they will charge for a paid repair. Who knows, maybe you'll get lucky. But if they quote an amount that is higher than the cost of your camera, you may want to consider following methods. Here is a video description of each method for resolving the problem, followed by a detailed description of them.
The methods are listed in order of risk of damaging your camera. Therefore, you should try them in the order listed. And remember that these methods (in particular, No. 6 and 7) should only be considered for cameras for which the warranty has expired; the indicated repair costs would be excessive. If these methods do not correct the error, you can contact a paid service, the cost of repairs in which is lower than under warranty.
Method 1: Remove the batteries from the camera, wait a few minutes. Insert a fresh set of batteries (preferably rechargeable NiMH 2500 mAh or higher) and turn on the camera. If you have been using batteries for more than a year, consider purchasing new batteries as they may not provide enough power to run the camera.
Method 1a: If new batteries do not work, try pressing and holding the Menu, Function, Set, or OK button while turning on the camera. This along with Method 1 and Method 2 sometimes works to clear up lens errors that occur due to batteries being drained when the lens is extended.
Method 1b: For those of you who were able to access the camera menu with this error, try searching for and selecting "reset" to reset the camera to its original position. On some Canon cameras, this requires holding down the menu button with the power button for up to 10 seconds. However, please note that a lens error may sometimes prevent the reset option, and thus the option may not be displayed.
Method 2: If the camera's batteries are completely drained and its lens was still open, the camera may show a lens error or may not start up correctly when new batteries are installed. Remove the memory card from the camera and then install new batteries. When you turn on the camera without a card it may come back to life as this causes a reset on some models. Error E30 (for old Canons) means that you do not have a card installed, so you should turn off the camera, insert the card and turn it on again.
Method 3: Insert the camera's audio/video (AV) cable and turn on the camera. Connecting the cable ensures that the camera's LCD screen remains off while the process is starting. This will ensure that additional battery power is available to the camera lens motor during startup. This extra power can be helpful in overcoming dust or sand that may interfere with the lens. If the AV cable does not correct the lens error on its own, I consider keeping this cable installed useful when attempting fixes 4, 5, and 7 as a means to provide additional power to aid in the process of those attempts. But note that I do not recommend keeping the cable installed during the Fix 6 process as this may damage the AV port when trying to turn on the camera.
Method 4: Place the camera supine on a table with the lens pointing toward the ceiling. Press and hold the shutter button and at the same time press the power button. The idea is that the camera will attempt to autofocus while the lens is extending. We hope that while the lens extends and the autofocus lens moves, the guide pins will fall into place.
Method 5: Using a rubber blower, blow compressed air into the gaps between the lens cups. The idea is to blow out sand or other debris stuck in the lens mechanism. Other blowing options are using a hair dryer on low heat or sucking air out of the lens gaps (be careful with this!). Some people use a vacuum cleaner for this.
We are now entering the realm of potentially dangerous methods for rescuing a camera. There is, of course, some risk, so be careful when doing the following:
Method 5a: If you actually notice sand particles in the cavity around the lens barrel and airflow is not helping to dislodge them, consider using tissue paper or a sewing needle to help remove them. Pay special attention to avoid scratching the lens barrel with the needle. Also, I don't recommend probing too deeply around the lens barrel with paper (don't go deeper than 1cm). I especially don't recommend deep probing around the outermost (largest) part of the lens barrel, as you may dislodge the anti-dust gasket, which is located just inside this gap.
Method 6: Repeatedly tap the rubber USB socket cap to dislodge any particles that may be interfering with the lens. It is also possible to tap the camera body with your palm. Many people report success with this method. However, there are also some obvious possibilities for internal components being damaged or dislodged using this method, such as cables falling out of connectors, or the LCD screen cracking.
Method 6a: This is a variation of Method 6, and is applicable if the lens barrels are straight (not bent by impact). In other words, try this unless there is obvious mechanical damage to the barrels that is causing the problem itself. With the lens pointing down, try tapping the lens "softly" on all sides with a small object such as a pen or pencil. The idea is to try to dislodge sand particles that may be interfering with the movement of the lens barrels. At the same time, try turning the camera on and off while you do this.
1.
Method 7a: Please note that this correction method is only intended for cameras in which the lens extends, then stops part of the way, and then returns to its original position. Try to grab and hold the smallest front lens cup at its most extended position without allowing the lens to return. Inspect and clean the area around the lens cups from dust and sand. Turn the camera off and on again. If the lens extends further, grab the front glass again, preventing it from returning. Repeat cleaning again. Turn off the camera and turn it on again to see if the problem goes away.
Method 7b: the most extreme way to fix it. Just keep in mind that this is the absolute last resort before throwing away your camera, and there is an obvious potential for further damage to the camera using this method. You may consider this technique if the lens is noticeably and obviously damaged, bent, or bent, such as from being dropped. In this case, try to think of the lens as a dislocated shoulder. Try to force the lens to straighten and return to its place. In this case, the pins of the lens cups will fit into their guides. Your goal is to try to replant them by straightening the lens. Listen for a “click” to confirm that the pins have jumped into the guides and immediately stop further efforts at that point. More and more people are reporting success with this method compared to any other method.
Variations on Method 7b: Gently pull, rotate, and/or twist the lens barrel while pressing the power button. Check the lens for any hint of tilt or unevenness. Again, the goal is to try to straighten or straighten the barrels if they are warped or twisted. Another option is to look for uneven gaps around the lens barrel and then push down on the side of the lens barrel that has the most gap (note that pushing the lens barrel all the way down is not recommended as it can get stuck there). Again, with all of the above, you should listen for a “click”, which means the pins of the glasses have fallen into the guide grooves. If you hear this sound, stop immediately and try turning on the camera.
The most common causes of breakdowns of digital cameras are: moisture or sand getting inside, mechanical damage, failure software. In any of the above cases, you should contact service center rather than trying to produce it yourself camera repair. Trying to fix the problem yourself may increase the cost later. camera repair, because unqualified intervention often leads to additional costs.To determine the exact camera breakdown It will take not only time, but also the professional skills of a camera repairman. After diagnostics, a professional technician will know exactly what broke and why it happened. Well, now we will tell you about the main breakdowns of cameras.
Main types of camera breakdowns
Moisture gets on the camera
Many repairs occur due to a problem such as moisture getting inside the camera. If such a problem occurs and you accidentally drop the camera into water or get it wet, you should immediately remove the batteries and take it to a service center. If moisture gets inside, it threatens to oxidize almost all parts, and if it has also been in sea water, then the salt can corrode small connections or other mechanical damage, as a result of which the lens mechanism almost always fails. In most cases, the lens can be repaired without costly replacement.
Problems with the memory card in the camera
The most common malfunction in which it may not turn on is the memory card. More precisely, not in the card itself, but in the camera socket into which it is inserted. Be careful how you insert and remove your flash media. You should not use force - perhaps you are simply inserting the memory card incorrectly.
The camera does not turn on or does not respond to control buttons for a long time  hangs
hangs
There are problems controlling camera functions. Often the camera simply does not turn on or does not respond to control buttons. The cause of such problems may be a defective control board. In some cases, repairs are possible, but much more often it is necessary to replace the board.
The camera's Zoom function does not work
There is poor focusing. The problem was related to moisture getting inside the camera, due to which some elements of the lens became unusable. These elements needed to be replaced. The same can be said about the problem with “blurry” images. Most likely, the reason for the lack of focus was an incorrectly set option in the camera mode itself. IN winter time When shooting outdoors, the lenses may become coated with moisture. The appearance of condensation is a common occurrence. Turn off the camera and leave it in a warm place for a couple of hours.
 Display damage
You can understand that the screen has failed by the following signs: it does not light up, there are cracks, the display is leaking, it does not react at all when turned on, it shows an image that is too dark, or there is no image at all. It is impossible to restore the screen; in most cases, the display needs to be replaced.
Damage to the matrix of digital cameras is a common case requiring camera repair.
Internal damage to cameras occurs, in most cases, as a result of improper use, be it moisture or dust, shock or direct sunlight. The matrix of a digital camera or video camera suffers the most and needs repair.
The main signs of failure of the CCD matrix there are uneven stripes and a blurred image - if this appears, take the camera for repair. It also happens that in shooting mode the image is completely absent, although previously captured frames are viewed normally. In all these cases, qualified and high-quality repairs are required with the replacement or restoration of the damaged matrix. Due to the complex structure and operating principle, you should not entrust the repair of a camera or video camera to amateurs in working with electronics.
The camera does not turn on 
In this case, there can be a lot of reasons: a power problem, with the controller, board, battery, cables, etc. With such a breakdown, you need to carry out diagnostics and then you can understand the cause of the malfunction.
Flash doesn't work
It should be taken into account that in the vast majority of models, technical wear of the lamp occurs after 2-3 thousand flashes. Remedy: replacing the lamp or flash unit.
Almost all modern cameras are equipped with a built-in flash that can illuminate the foreground. Flash malfunctions are among the most common problems with photographic and video equipment, without causing any particular difficulties during the repair process.

Photos blurry when shooting at night
When shooting at night or in a dark place, the camera’s automation sets a long shutter speed. In this case, to take a clear picture, you need to firmly fix the camera; (use a tripod) the picture comes out blurry due to the vibration of your hands. You can turn on the forced flash (if there is a stabilizer) or install the camera on any other stable surface.
Often the retractable lens mechanism in digital cameras breaks down. This problem very often appears after a trip to the sea. For the retractable mechanism, a few grains of sand are enough to jam it. The lens begins to move out poorly, an extraneous crunch may appear, it may move out and jam. Only cleaning this mechanism will help, and this should not be delayed in order to avoid more serious consequences.

Repairing external damage to the camera body
As a result of physical impact, including accidental falls,
impacts on a hard surface; harm caused by children and animals, as well as a whole list of other incredible stories, scratches and abrasions appear on the visible surface of the camera or video camera. The plastic body of an amateur camera may even crack. Problems with external damage to the device body are not insoluble if the internal components of the digital camera or video camera are not damaged.
Microphone not working
Most cameras of different models, manufacturers and price categories today have a built-in microphone, which, like other electronic and mechanical elements of the camera, tends to break. To prevent such a malfunction, it is enough to replace the faulty element (repair the camera microphone), in our case it is the camera microphone, and enjoy the happy moments of life.

Overheating in the sun can also lead to the need for digital camera repair.
Violation thermal regime operation may seriously affect the performance of your digital camera. The internal elements of the camera overheat, and at very high temperatures They even melt, so repairs due to overheating cannot be avoided. So, as a result of careless handling of the camera (forgotten on the beach, left in direct sunlight), you get a completely non-functional camera that requires serious repairs, professional equipment and a qualified specialist. Please keep in mind that moisture, dust, or
overheating, and as a result of the need for repairs, you can be protected by simply following the instructions for use.
Malfunction of the power supply circuit or power connectors of the camera and its repair
Most modern digital cameras are equipped with reusable batteries, allowing you to use the device for a long time without additional power. Over time, they either wear out or become unusable as a result of the owner's carelessness. As a result, the camera's power system may require technical diagnostics.
Caring for your camera
In addition to visible damage, the camera may need basic cleaning. The thing is that during the “life” of the camera, dust, grease, etc. get under the body, which leads to a deterioration in its performance. Dust on the surface of the matrix in SLR cameras leads to the appearance of spots and black dots on photographs, usually in the most important areas of the frame. If there are a lot of pictures, editing (removing defects) photographs using special programs will be quite a difficult and expensive task.
If you follow simple recommendations, your camera will live much longer:
- Be careful, protect against falls, sand and moisture getting inside, and you should also pay special attention to the lens;
- There is no need to wipe the lens too often; only do this if the lens is really dirty. First try to blow away dust or dirt from the glass surface and only if this does not work, wipe with a special cleaning agent strictly following the instructions on the package;
- Wipe in one motion, pressing lightly on the fabric. Remember that even a small speck of dust on the surface can make a scratch, which will then significantly affect the quality of the pictures.
Review of typical camera problems, their causes, diagnostics and solutions
A SLR camera is one of the most reliable devices due to high-class electronics, rigorous testing, and camera rejection at the factory. But breakdowns still happen.
The most common horrors for a photographer are:
The camera does not turn on - reasons:
- Deep battery discharge.
- Battery failure.
- Memory card malfunction (with a broken memory card, the camera will not turn on).
How to check where the problem is?
1. At a minimum, it is worth checking the battery. First, measure the charge level with a tester.
If the voltage is lower than the rating indicated on the battery, the camera will not turn on.
3. Didn't help? We change the memory card to a known working one. Sometimes a non-working memory card prevents the camera from turning on.
4. We do the same with the lens - we set it to be working.
If after this the camera does not turn on, only deep.
Features of camera repair and diagnostics that are not included:
During diagnostics, we determine not only the breakdown, but also the delivery time of components, the complexity of resolving the issue, and the price of the components themselves.
The price of repair depends on the price of the block or element that needs to be replaced and the complexity of the work.
Using an oscilloscope, the master analyzes the camera pulses.
Finds out the nuances of signal transmission and determines the cause of the breakdown.
Next, we analyze the deadline and price, and we agree on these points with you.
For popular brands (Canon, Nikon, Olympus) the period is from one day to two weeks.
For the rare ones in Ukraine (“Leica” (Panasonic), newfangled Fujifilm (the price of cameras is such that in principle there cannot be many of them) – longer.
The shutter does not fire - reasons
- The shutter motor breaks down.
- The driver (the microcircuit that controls the operation of the shutter) has “flyed”.
Making rivets that hold the lamellas (curtains) together.
In this case, we replace the lamellas
Most often the issue is in the lamellas.
Such damage rarely occurs from an impact: equipment is expensive in every sense and therefore they are rarely dropped “seriously.”
Signs that the problem is in the shutter:
Dark photo, the matrix did not light up.
How to check:
Without a lens, press the “Shutter” button in manual mode.
If the mirror rises, but the shutter does not fire and you do not see the matrix, it means the shutter is jammed.
Features of SLR shutter repair:
The older the camera, the more difficult and time consuming it is to find the shutter part.
Not everything is available in Ukraine.
In such cases, we import original parts to the USA, Thailand, and China.
If available, replacement takes three to four days.
You cannot fix such a malfunction on your own: you need to carefully disassemble the bolt part.
Repairing a Kodak cx7300 digital camera step by step instructions.
If water gets into your camera, you need to disassemble it as quickly as possible and wash the places where the water got in with alcohol.
We disassemble the camera in the following sequence:


3. Open the flash card compartment cover;

4. Take out the flash card;

5. Unscrew the three lower screws;

6. Unscrew the two screws in the flash card compartment. Note that they are longer than the bottom screws;

7. Unscrew two screws from the left side of the camera;
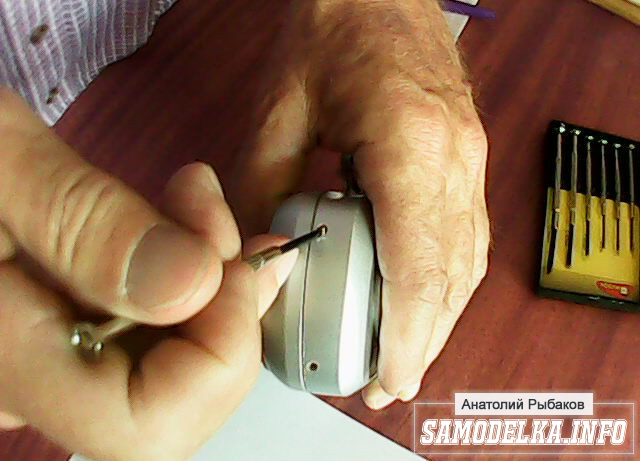
8. Slightly push both halves of the camera body at the bottom and...

9. ... separating them using a plastic card;

10. Remove the front half of the camera body;

11. Unscrew the bottom screw securing the rear half of the case to the board;

12. Unscrew the top screw securing the rear half of the case to the board. Please note that both screws are in recesses and are therefore difficult to notice;

13. Use a screwdriver to pry up the protrusion of the rear half of the case and...
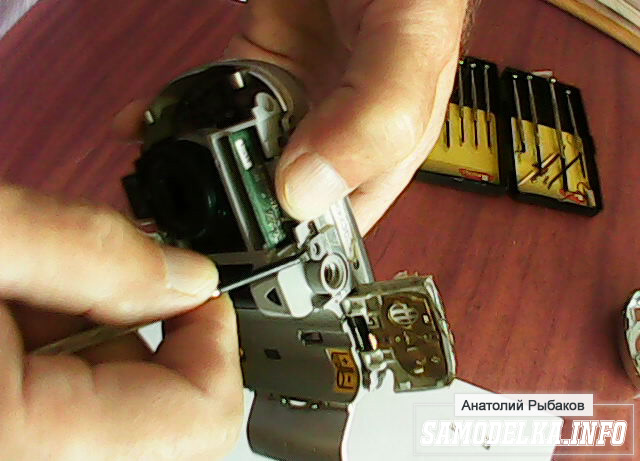
14. Remove it;

15. Unscrew the screw securing the start button board;

16. We remove the fee. It is connected to the large board using a plug that can be easily disconnected.
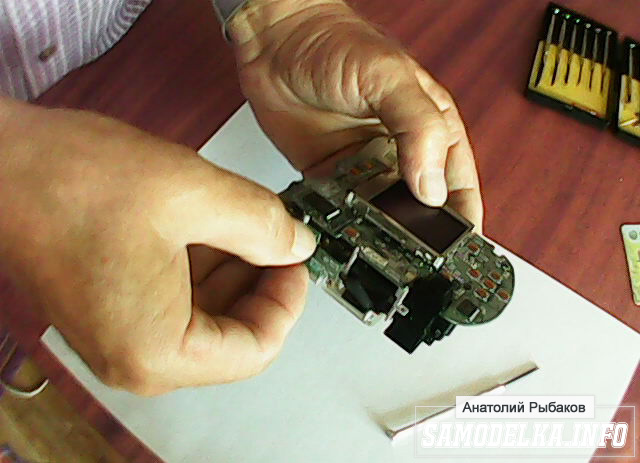
After I disassembled the camera, I discovered that some of the tracks on this small board had been eaten away by sea water (the camera fell into the sea, which is why it became necessary to disassemble it). Very carefully, using a soldering iron and thin wire, I managed to restore these tracks. This is the look this board took (soldering spots are visible);

Due to the fact that the part was small, and there was no camera to photograph it, a computer technician I knew helped me photograph it. That's why she's so pale. My camera (and I used a video recorder in photo mode) turned out like this (top view);

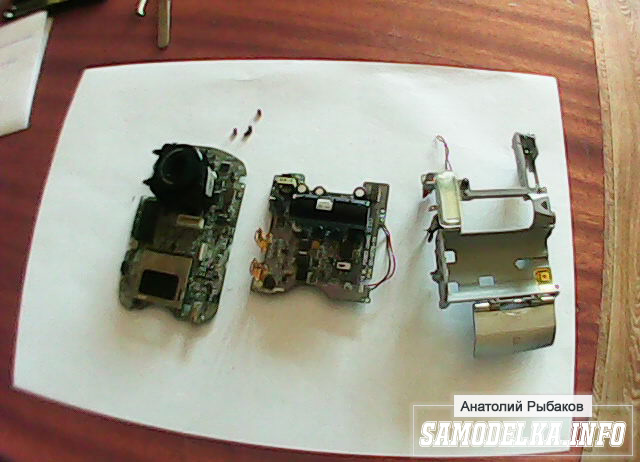
17. Remove the power compartment cover. It goes towards the display;

18. Unscrew the two screws securing the diagnostic block;

19. Remove the block. It is connected to both boards with plugs that are disconnected with some effort;

20. Carefully unsolder two wires (red and black) from the display. I used a regular 25 W soldering iron and an alcohol solution of rosin (as a flux). Wires must be marked before soldering to prevent confusion later;

21. Unscrew the screw securing the display;

22. Lift the display (it fits into the board with pinches) and move it to the left. Below it is a cable with which it connects to the board;

23. Raise the bar and..

24. Disconnect the cable;

25. Remove the display;

26. Unscrew the three screws securing the viewfinder;

27. Remove the viewfinder. To do this, you need to slightly tilt and lift it;

28. Unsolder the two wires (red and black) going to the descent delay warning lamp. These wires also need to be marked first. They, like the display wiring, do not need to be unsoldered, but you need to constantly monitor the disconnected parts. But this is inconvenient and, moreover, they can be damaged.

29. Remove the board with the lens. The wires that go from the lens to the board do not need to be soldered;

30. Remove the protective film on the flash lamp;

31. Unsolder the two wires going to the flash lamp;

32. Unsolder the third terminal of the flash lamp from the transformer;

33. Lifting the bottom edge of the board...

... squeezing out the contacts and ...

... by drowning the capacitor, ...

...separate the board from the case;

34. The camera is disassembled.
Assembly is carried out in reverse order.
