How print buttons are created in 1s. Publications
Consider how documents are printed from 1C applications operating in service mode (via the Internet).
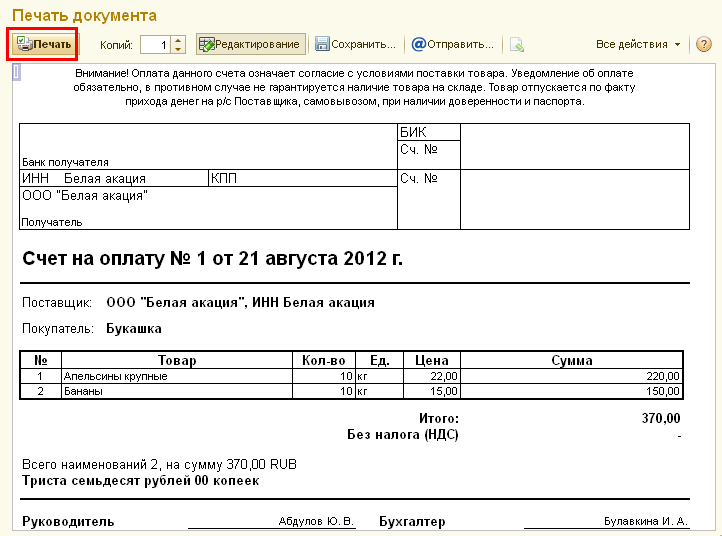
Both in the local version of the application and in the service, the same document can be printed in different versions. For example, an invoice can be printed both in the form of a regulated consignment note (TORG-12) and, in fact, in the form of an invoice (for the internal needs of the organization). Therefore, before printing a document, in the form of a document, you must select the desired type of printing. This can be done from the drop down menu. Seal(as shown in Fig.1 for an example application "1C: Managing our company").
Rice. one.
Start printing
In some applications (for example, "1C: Accounting 8"), if only one printable form is provided for the document, then you can start printing in one click (in this case, instead of the menu Seal a button with the name of the only one is displayed printed form).

Rice. 2. Printing documents with a single printable
Since printing of documents in service mode starts in a browser window, you should pay attention to the following printing features.
- Print confirmation usually needs to be done twice: first in the 1C: Enterprise print form, and then in the corresponding browser form (Fig. 3).
- Possibilities of editing printable layouts by the user in the service mode are limited. If you want to use your own printable (for example, with your company logo on it), you can do this by uploading a standard printable from the service, editing it in the local version of the application, and uploading it back to the service (for more information on using custom printables forms you will find).
Rice. 3.
The printed form of the document
The interface of document printing forms is different in different browsers. Therefore, if you use not one, but several browsers to work in the service, be prepared for the fact that the usual workflow when printing will differ slightly, depending on the browser used and its version. For example, the Google Chrome browser offers in an additional dialog box issued immediately before printing, to preview and set print settings (Fig. 4).

Rice. 4. Printing a Document in the Google Chrome Browser
If you want to use your own printable (for example, with a logo placed on it), then you can do this by downloading a standard printable from the service, editing it in the local version of the application and uploading it back to the service (for more information about using custom printables, see find ).
Print order
Let's give a general sequence of actions when printing documents (Fig. 5).
- Start printing by clicking the appropriate button on the document toolbar and selecting the desired print form from the menu (see Figure 1).
- In the printed form that opens, define the available options (for example, the number of copies).
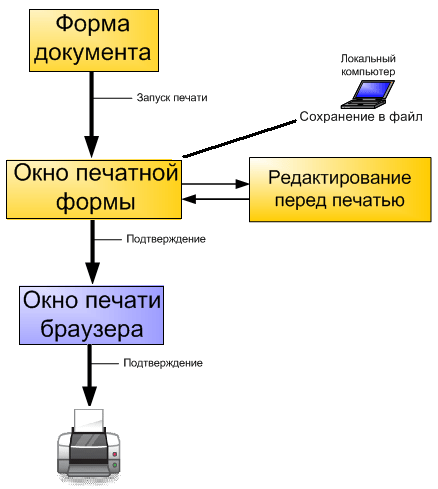
Rice. 5. Printing sequence
- If necessary, edit the text in the printed form. To do this, double-click on the desired form cell and change the text in it (Fig. 6).

Rice. 6.
Editing a printable
- If you want to save the finished printed form of the document to a file on your local computer, click the button Save in printed form (see Fig. 3), select in the dialog box that opens Saving a printable desired file format by checking the box next to it, and click the button Save c (Fig. 7).
Note: You can set several formats at the same time - in this case, several files with the appropriate extensions will be created.

Rice. 7.
If desired, save the file in the desired format
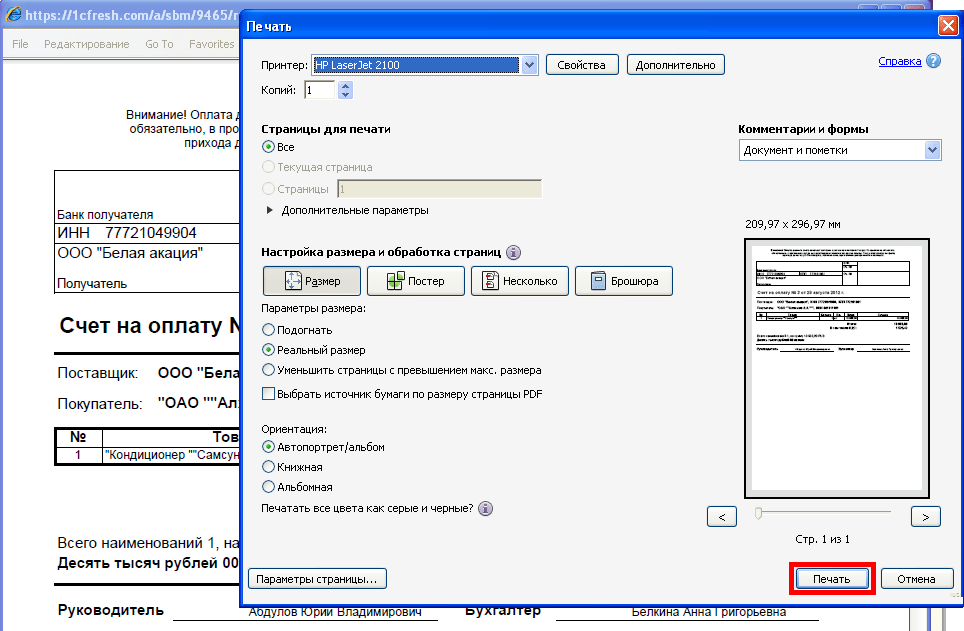
- Click the button Seal in the printable window (see Fig. 3).
- In the browser print window that opens, if necessary, select the print options (printer, etc.) and click the button Seal again (Fig. 8).
As a result, the document will be printed on the printer.
Rice. eight.
Starting Printing Using the Browser System Dialog (Using Internet Explorer)
FAQ
1. What is the printing method? What is the best printing method?
The printing method is selected in the 1C:Enterprise settings available on command Main menu / Tools / Options(Fig. 9).

Rice. nine. Main menu 1C
Parameter Print method(Fig. 10) determines the degree of user influence on the layout of the document:
- PDF- printing without changing margins and scale;
- HTML- when printing, changes in margins and scale are possible.
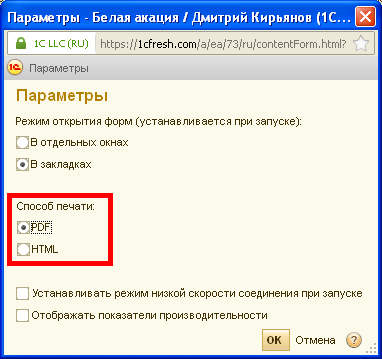
Rice. ten. Selecting a Print Method (recommended) PDF )
2. How to configure print settings?
1C:Enterprise print settings are available in the form of a document using the command (Fig. 11).

Rice. eleven. Choosing page options
Since web browsers have their own print settings, they need to match the spreadsheet document breakdown page settings mentioned. Browser print page settings are edited in the dialog Page settings(Fig. 12), which in Microsoft Internet Explorer, Mozilla Firefox and Apple Safari is invoked by the browser menu command: File / Page Setup...(File / Page Setup...). There is no such setting for the Google Chrome web browser.

Rice. 12. Selecting page options in the browser
3. Can I preview a document before printing?
To make sure that the spreadsheet document will be printed correctly, you can use the print preview.
- When using the web browsers Microsoft Internet Explorer, Apple Safari and Mozilla Firefox (in most versions), the preview is opened by the browser menu command: File / Preview(File / Print Preview).
- For the Google Chrome web browser, a preview is performed by default immediately before printing (see Figure 4 above).
Common Printing Mistakes
1. What should I do if a page is output to the printer with errors when printing?
Check that as Printing Method(Main Menu / Tools / Page Options) option selected PDF. Then, if the errors persist, check that the 1C:Enterprise print settings are correct ( Main menu / File / Page setup- these settings should be called from the window with the printed form of the document, as shown in Fig. 11) and browser print settings (Fig. 12), which are available when you select the command File / Page Setup.
2. What should I do if I am prompted to save to a PDF file instead of printing to a printer?
In some browsers, if there are no connected printers, the default mode is to print to a PDF file. If this happens, check that the printer is connected and correctly installed in the operating system.
For more information about printing, see the article on the ITS website.
We wish you pleasant work!
It's no secret that, although in our time an increasing number of companies are switching to electronic document turnover, the old saying “Without a piece of paper you ...” does not lose its relevance. It so happened that for some reason the inspection bodies are primarily interested in paper documents. Therefore, if you actively use the 1C: Accounting or Enterprise program for financial control, it is important to know how to print an electronic document created using the program.
Printable forms in 1C allow you to transform an electronic document into a printed version.
To do this, the developer has provided an excellent tool - Print Constructor. With it, you can create documents in which you can specify any data you need, and not just a few standard forms. This is especially true for those documents that do not have a strictly regulated form, which in no case can be changed. This, in particular, includes an act of work performed, some invoices or payments.
In this guide, we propose to understand the capabilities of the Print Designer, consider what types of printing forms can be and how they differ from each other. We will also show with an example how to print the created form.
To begin with, it’s worth figuring out what, in general, is a printable in 1C 8. This is a 1C spreadsheet template (like Excel), in which some variable lines are indicated that are filled in with data from the program when drawing up a document.
There are two types of printables:
- Internal (built-in). They are stored in the program configuration, so it's better not to change them, as problems may arise during the update later.
- External - stored separately from the program settings. And with their help, you can create and prepare for printing a document of almost any complexity without affecting the configuration of the 1C 8 program.
How to choose already prepared layouts? After you carry out an income or expense operation, for example, write out an act of completion, you click the "Print" button to print the documents. The list displays a list of forms for printing, which are already filled in with the entered data about the transaction and your company. By clicking on the type of document you need, you open a preview window so that you can make sure that the data filled in is correct. The print button outputs the document to the printer.

With the basics out of the way, let's figure out where all your printables are stored. Let's move on to the next question.
Where are printables stored?
You can view the built-in printables both in the configurator mode and in the normal enterprise mode. In the first case, you need to press the corresponding button in the start window when starting the program. You will see the program menu, find the “Realization of Goods and Services” branch, which contains the “Layouts” item. It often contains only two items - "Invoice" and "Act". Where, then, is everyone else, because the list is much more extensive? They are just hiding somewhere else. You need to open the “General” - “General Layouts” branch, almost all layouts are stored in it.
In the second case, you need to go to the menu section "Administration" - "Print forms, reports and processing" - "Print forms layouts". It will display all document layouts. It is noteworthy that in the same menu they can be edited.

Concerning external forms, then you first need to either create them through the configurator mode, or by downloading a ready-made file, and then connect them in the "Administration" - "Print forms, reports and processing" - "Additional reports and processing" menu. We will talk about this a little later.
Creating a simple form through the built-in Print Constructor
Such a printable does not imply the possibility of deep editing, since this will entail a change in the configuration of the program, as well as further difficulties when updating it. However, if you are completely satisfied with the standard form, or if you want to delve into the intricacies of creating an external form, this method is completely suitable for you.
- First of all, start in the Configurator mode, find the document you need, for example, Realization of Goods and Services, in the document properties, go to Actions - Constructors - Print Designer.
- When prompted for a job option, select Common Forms.
- Give the new layout a name, such as "Invoice Print".
- Select the details that you would like to see in the header of the document. Moreover, they must be selected in the order in which they will be displayed. To select, you need to highlight the item in the left column with the cursor and press the arrow in the middle of the screen so that the attribute is displayed in the right column.
- Mark the details to be displayed in the tabular section. The choice of details follows the same principle as in the previous paragraph.
- In the same way, select the details of the bottom of the document.
- On the final stage create, select whether you want to print immediately without previewing, whether you need table protection, and then confirm the creation of the form with the OK button.

Creating an External Printable
Forms created through the Print Designer can be compared to a visual program editor, when you do not enter all the code manually, but only compose it from the proposed elements. The external form is a file with manually written program code, which describes the procedure for displaying data on the screen. This is what allows you to edit the printed form, as you like, specifying absolutely any data in any sequence.
An additional advantage is that, even if you do not understand or simply do not want to understand the intricacies of 1C 8 programming, you can entrust this procedure to professionals. They can prepare for you desired shape, will provide it to you in the form of a ready-made file, which you only activate with a few button clicks.
Now more about the procedure itself. Consider the example of creating an "Account" layout for the document "Implementation (acts, invoices)".
- Open the 1C 8 program in the Configurator mode.
- Click File - New - External processing, give it a name (it must not include spaces), then click the Actions - Open Object Module button.
- In the input field that opens, enter the following code (values that can be changed to your own are highlighted in yellow):
Function DetailOnExternalProcessing() Export
RegistrationParameters = New Struct;
AssignmentArray = New Array;
Array of Assignments. Add("Document. Realization of Goods of Services"); //Specify the document to which we make an external print. form
RegistrationParameters.Insert("View", "PrintForm"); //may be - PrintingForm, Filling in an Object, Additional Report, Creating Related Objects ...
RegistrationParameters.Insert("Assignment", Assignment Array);
Registration Parameters.Insert("Name", "Order for the sale of goods"); //name under which the processing will be registered in the directory of external processing
RegistrationParameters.Insert("SafeMode", FALSE);
RegistrationParameters.Insert("Version", "1.0");
RegistrationParameters.Insert("Information", "This printable form was created as a sample");
CommandTable = GetCommandTable();
AddCommand(CommandTable, "External Order", "External Order", "ServerMethod Call", True, "PrintMXL");
RegistrationParameters.Insert("Commands", CommandTable);
Return ParametersRegistration;
EndFunction // ExternalProcessing Details()
GetCommandTable() function
Commands = New ValueTable;
Commands.Columns.Add("View", New TypeDescription("String"));//how the description of the printable form will look like for the user
Commands.Columns.Add("Identifier", NewTypeDescription("String")); //print form layout name
Commands.Columns.Add("Usage", NewTypeDescription("String")); //Call ServerMethod
Commands.Columns.Add("ShowAlert", NewTypeDescription("Boolean"));
Commands.Columns.Add("Modifier", NewTypeDescription("String"));
Team return;
EndFunctions
Procedure AddCommand(CommandTable, View, Identifier, Usage, ShowAlert = False, Modifier = "")
NewCommand = CommandTable.Add();
NewCommand.View = View;
NewCommand.Identifier = Identifier;
NewCommand.Use = Use;
NewCommand.ShowAlert = ShowAlert;
NewCommand.Modifier = Modifier;
EndProcedure
- Save the layout for printing as a file to any folder on your hard drive, name it accordingly.
Insert the procedure for starting printing from the program menu into the same document (the commands highlighted in yellow must match the line):
AddCommand(CommandTable, "External Order", "External Order"):
Procedure Print(Array of Objects, Collection of Print Forms, Print Objects, Output Parameters) Export
PrintManagement.OutputSpreadsheetDocumentToCollection(
CollectionPrinted Forms,
"External Order"
"External Order"
GeneratePrintForm(ArrayObjects,PrintObjects);
EndProcedure // Print()
- Insert a printable form fill layout by clicking on the name of the external form in the lower left corner and selecting "Layouts" - "Add" - "Spreadsheet Document", give it a name. After that, fill in the spreadsheet with the required data. For example:
- Order for item No. [ReleaseNumber] from [ReleaseDate] - right-click - Properties - Layout - Filling - Template.
- Create the columns you want to appear in your document.
- Select the entered cells, click Table - Names - Assign a name - enter the name "Header".
- Copy the line with the table headers, select them, right-click - Properties - Layout - Filling - Parameter.
- Select the line, name it, for example, "String TH".
- Create a footer: write Total, the cell in which the total amount should be displayed, name SumTotal, select "Parameters" in the properties.
- Specify the person in charge, in the properties of the cell for displaying the last name, specify "Parameters".
- Select the bottom rows and name the range "Footer".
- Now, in the input window, write the function for generating a printed form:
Function GeneratePrintForm(ReferenceToDocument,PrintObjects)
SpreadsheetDocument = New SpreadsheetDocument;
SpreadsheetDocument.PrintParameterName = "PRINT_PARAMETERS_InvoiceForVRTU";
ProcessingLayout = GetLayout("InvoiceForPaymentExternal");
// fill in the header
AreaHat = LayoutProcessing.GetArea("Hat");
AreaHeader.Parameters.DocumentNumber = LinkToDocument.Number;
AreaHeader.Parameters.DocumentDate = LinkToDocument.Date;
AreaHeader.Parameters.OrganizationName = LinkToDocument.Organization.Name;
//display the header in a spreadsheet document
SpreadsheetDocument.Output(RegionHeader);
//fill in the PM lines
StringScope =ProcessingLayout.GetRegion("StringP");
For Each CurrentRow From ReferenceToDocument.Products Loop
FillPropertyValues(RowArea.Parameters, CurrentRow);
SpreadsheetDocument.Output(StringArea);
EndCycle;
//fill footer
AreaFooter = LayoutProcessing.GetArea("Footer");
AreaFooter.Parameters.QuantityTotal = LinkToDocument.Products.Total("Quantity");
AreaFooter.Parameters.AmountTotal = LinkToDocument.Products.Total("Amount");
RegionFooter.Parameters.OwnerName = LinkToDocument.Manager.Name;
//output the footer into a spreadsheet document
SpreadsheetDocument.Output(RegionFooter);
SpreadsheetDocument.AutoScale = true;
Return SpreadsheetDocument;
EndFunctions
- Save your changes to the document.
- Now you need to activate the created form. For this:
- Go to "Administration" - "Print forms, reports and processing" - "Additional reports and processing".
- Click the "Create" button, select the external form file in the explorer, confirm the entry with the "Save and close" button.
- To check, go to Sales - Implementation (acts, invoices), click the "Print" button, select your form and check that it is filled out correctly.
- Print the document if needed.

Conclusion
We reviewed with you a sample of creating a printable form through the Print Designer and through the external form creation tool. We hope that everything will work out for you. Leave your questions in the comments.
We continue to study the program 1C Enterprise. Today we will add a print button to a 1C document. In previous articles on 1C programming, I already wrote about how to create a new database, how to create this database new document we also wrote procedures that calculated the sum of the column and the grand total. Now let's create a print button for our document.
In order for our document to be printed, it is necessary to add the corresponding button to it. We will create a print button using a special constructor, I do not delve into writing procedures and functions.
And so we start, first we launch our database, open the document and go to the Layouts tab. Next, click on Constructor at the bottom and select Print Constructor.
In the window that opens, do not touch anything and click Next.

In the next window, you need to select what will be printed in the header of the document. We select all three items Number, Date, Supplier and click next.

Now you need to choose what will be printed in the middle of the document. We also mark all the items and move them to the right side and click next.

Now you need to specify what will be printed in the basement, for example, note the date.

There is nothing to change and click OK.

This will open the print layout.

Now we launch 1C and check what we got. Well, firstly, a print button should appear in the document.

After clicking on it, a preview should open.

Colleagues!
We continue the topic of reporting in 1C. Recently, our client had a problem transferring documentation from 1C 8.3.
Application additional information into a printed form, numbering of print sheets, indication of the date, time and the user who issued the report.
We covered a similar example in the 8.2 configuration in the previous release. Now we will look at the print settings that allow all this to be done in the 8.3 configuration.
Moreover, much of this is automated in 8.3.
So, how can you include the above information in print? What should be done in this case?
We offer our overview of options, perhaps it will also be useful to you.
Option 1. Directly from the printed form of the generated report or document:
You form a printed form of the invoice for payment and call it through Ch. menu - Table - Printing preferences - Headers and footers and set up as needed.
This is done one-time for any FORMATED printing form.

Setting up header fields

Pay attention to the icons in the upper left corner of the form:
![]()
This is in order: page number, number of pages, date and time. Move the mouse to the desired location in the header or footer and click on the desired icon. After clicking on the OK, when printed, this data will be displayed in the printed form where you specified.
Option 2. Configured for any printing (reports, documents, certificates) from the program
If you do not want to set up headers and footers manually each time, then you can set up general form headers and footers for printing.
It looks like this:

Here more possibilities to display information in printed forms: the data “Report name” and “User” are added. This is just our case.
The selection of data in the headers and footers is carried out as described in option 1, only instead of icons we select the text buttons “Time”, “Date”, “Report Name”, etc. But the essence of this does not change. After Specifying the necessary information in the right places of the form, the setting is saved.
When printing a form, all the specified data will be displayed in it.
Option 3: Editing the Layout in User Mode
Why am I considering this method here, which has its own functionality and which, strictly speaking, does not apply to the topic under consideration.
Because it often happens that you have to use a combination of this method and print settings to achieve the desired result. Editing printable layouts allows us to draw some things we need right in the layout of this printable.
Layouts are changed in the section Administration - Print forms, reports, processing - Print forms layouts.
Here is an example of editing the Invoice-Order layout (invoice for payment to the buyer document):

We select the layout, indicating at the entrance that we will edit it and add some text information to the end.
For example, like this:

We save the changes and form the printed form.
And we print with changes.
But the possibilities for such editing are limited.)

So option 3 is convenient to use for entering information permanent, unchanged, everything else will require the completion of the printed form by the programmer.
But often this is enough. 🙂
Most of the training materials on programming in the 1C system when describing the formation of printing forms based on an object "Spreadsheet Document" are limited to displaying the finished form on the screen. For users, what is much more important is how the document will look when printed. Here, in addition to a well-designed layout, print settings also play a role.
Almost all parameters available in the print settings dialogs (printer settings, page properties) can be specified directly when creating a spreadsheet document.
Let's consider the properties and methods of a spreadsheet document related to print settings (in the examples given, "TabDoc" is an object of the "Spreadsheet Document" type).
Property "PrinterName" allows you to specify a printer other than the default for printing. The name must match the printer name set on the system:
TabDoc. PrinterName = "HP LaserJet 3050 Series PCL 6";
When printing a batch of documents, you can save time by setting the collation flag:
TabDoc. CollateCopy = true;
The number of copies can be specified like this:
TabDoc. Number of Instances= 5 ;
Of course, you can set the fields:
TabDoc. MarginLeft = 20 ; // Left margin 20mm, other margins 10mm (default)
A few more page properties:
TabDoc. OrientationPage=
OrientationPage. landscape;
TabDoc. InstancesOnPage=
2
;
//sheet will have 2 pages
TabDoc. Autoscale = true; //similar to the scale settings "according to the width of the page"
If necessary, you can specify a specific scaling value in percent (property "Print Scale").
Property "Page Size" allows you to set standard formats pages - " A3”, “A4”, “A 5” (a full list of options is available in 1C Help).
TabDoc. PageSize = "A3" ; // letter A must be English
For custom paper size (Custom), you can specify page height and page width (in mm):
TabDoc. PageSize = "Custom" ; //custom size
TabDoc. PageHeight = 350 ;
TabDoc. PageWidth = 350 ;
Also in the spreadsheet document, you can control the output of headers and footers and their contents. For this, the properties "Page header" and "Footer". For example:
TabDoc. Page header. Output = true; //header will be printed
TabDoc. Header SizeTop=
7
;
//footer size 7mm (default 10mm)
TabDoc. Page header.
vertical position=
vertical position. Top ;
TabDoc. Page header.
Home page=
2
;
//footer is displayed from the second page
FontHeader and Footer=New Font("Courier New" , 8 ,True);
TabDoc. Page header. Font = FontHeader and Footer;
// italic font
TabDoc. Page header. TextInCenter = "Page header";
TabDoc. Page header. TextRight = "Page[&PageNumber] of [&PagesTotal]";
//pagination
TabDoc. Page header. TextLeft = "[&Date]" ; //The current date
The generated document is sent for printing using the method "Type()". There are two call options.
1) Directly to the printer:
TabDoc. Print(.Don'tUse);
TabDoc. print(true);
2) Before printing, a print dialog will be displayed:
TabDoc. Print ( ModeUseDialogPrint. Use );
TabDoc. print(false);
In addition, you can control the pagination of the document. You can estimate the number of pages in a document using the current printer settings as follows:
TabDoc. Number of pages();
With methods "CheckOutput()" and "Check Attach()" you can determine whether a spreadsheet document or an array of spreadsheet document areas fit on the page in both height and width at the current printer settings.
Keep in mind that the work of the last three methods depends on the installed printer. If the method cannot find it, an exception is thrown.
Forced insertion of page breaks allow methods"Output VerticalPage Separator()" and "OutputHorizontalPageSeparator()".
Thus, it is possible to control page output for printing and control page filling:
If Not TabDoc. CheckOutput( Array Of OutputRegions) Then
TabDoc. OutputHorizontalPage Separator();
EndIf;
An important characteristic of the 1C:Enterprise 8.2 platform is the strict separation of properties and methods according to the execution context. If all of the above properties are available in any context, then the listed methods are not available on the thin client. The exception is the "Print()" method, the availability of which, for obvious reasons, is limited to the client side. This means that the formation of a spreadsheet document must occur on the server, and it should be sent for printing in the client procedure.
