Rules for storing and caring for a digital camera. Stopping time
The most important criterion for the quality of any photograph is the sharpness of the image. Sharpness is even more important than flaws in the composition and tonality of the photo. It is sharpness that is the main expressive means by which the author of the photograph concentrates the viewer’s attention on those details that he considers necessary. But, unfortunately, with sharpness, especially those who have recently picked up a camera, very often have problems. Let's talk about this - about sharpness - today. We will tell you about ten, perhaps the most basic, typical reasons why photographs turn out blurry. We strongly recommend that you take note of them.
Reason one. Very long shutter speed
Too long time opening the camera shutter, that is, a long shutter speed is perhaps the most common reason for blurry and blurry photographs. Many novice photographers think that holding the camera without hesitation for “some” half a second is not at all difficult. But they are deeply mistaken. This is precisely the reason for the blurry photos. Long exposures require shooting from a tripod. If you work without it, then you should adhere to one simple rule, which states: the shutter speed at which you shoot should be equivalent to the focal length of the lens that is installed in your camera. For example, when shooting with a lens whose focal length is 60 mm, the shutter speed should be no longer than 1/60 of a second. And if you shoot with a long-focus lens, or zoom your usual lens to 200 mm, then, naturally, you need to shoot at a shutter speed of 1/200 second. Neither and so on. The longer the focal length, the shorter the shutter speed should be in order to prevent blurring of the image.
Some cameras and lenses are equipped with image stabilization. Image stabilization allows you to reduce the minimum shutter speed by approximately three stops. What is stop? This is a conventional exposure value, which means reducing or increasing the amount of light that enters the camera matrix by approximately two times. One thing you need to keep in mind is that the slower your camera's shutter speed, the more light enters the sensor. Well, naturally, the higher the speed, the less light gets in. A shutter speed of 1/200 second, or simply 200, is exactly half as fast as a shutter speed of 1/100 second, or simply 100.
If your camera lens is equipped with an image stabilization mechanism, then with a focal length of 60 mm, you can safely shoot at a shutter speed of even 1/8 second.
And one more factor needs to be taken into account. Every photographer needs to know what the minimum shutter speed is for him or her. Tremor of the hands, and indeed the whole body, is inevitable for any person. It’s just that in some it is more pronounced, in others less. In order to find out the limit of “shake” when shooting, you can conduct a simple experiment. Set your camera to shutter priority mode and start shooting something, starting with a shutter speed of, say, 1/500 second. With each subsequent frame, make the shutter speed longer and longer. And then, looking at the pictures taken on the monitor screen, you can easily determine at what shutter speed the shaking of your hands becomes critical and unacceptable for high-quality work.
Reason two. No tripod
A tripod helps to cope with the movement. Today there are two types of tripods - a monopod and a classic tripod.
When and in what cases should this tool be used?
- If working conditions allow the use of a tripod.
- If when shooting it is not possible to work at a faster shutter speed (for example, if you are photographing in a dimly lit room).
- If, as planned, you want to take a frame in which a moving object will be blurred.
If you are shooting on a tripod, the image stabilization mechanism must be turned off. Stabilization in this case may interfere. Just don't forget to turn on the stabilization mechanism after you finish shooting with a tripod!
Reason three. Pay attention to the posture in which you work
The pose in which the photographer is during shooting should be firm and stable. If you don’t stand firmly, then your pictures will turn out blurry and out of focus. It’s not far from a complete waste, an irretrievable loss of sometimes rare, unique personnel. You also need to learn how to stand correctly when shooting. Don't ignore this moment! Don't consider it insignificant!
In order for the camera to rest firmly in your hands, you first need to learn to stand firmly on your feet. For a more stable posture, we recommend placing one leg slightly forward, as if you are about to take a step. Being in this position, you can freely, without leaving your place, move your body in any direction: both to the right and to the left, both forward and backward.
It is best to hold the camera in your right hand, with your left hand supporting it slightly by the lens from below. The hands themselves, or rather the elbows, should be pressed as tightly as possible to the chest when releasing the shutter.
When shooting, it is better to use the viewfinder rather than the LCD display. In this case, the photographer’s face serves as an additional support point for the camera and, naturally, will reduce the “shaking”.
These rules should never be forgotten when shooting. This is the base. But some experienced photography experts offer a few more tips. For example, it would be nice if you learned to regulate your breathing when shooting. What is it for? And in order to press the release button at the moment between inhalation and exhalation. This is exactly what a short time The camera becomes more stable in your hands and the risk of blurring is significantly reduced.
Reason four. Shooting wide open
The sharpness of a photographic image is also affected by the diameter of the aperture. The depth of the imaged space also depends on the size of the aperture.
What is the depth of field of the imaged space, or, as photographers sometimes say more simply, depth of field? This is the distance that, within the boundaries of the frame, is conveyed sharply on the photographic plane.
Let's explain this in a little more detail. When focusing the lens, or in other words, when focusing it, we bring its moving elements to a position in which an image is created on the matrix, sharp in a certain plane. For example, if we focus the lens at a distance of 4.5 meters, then all objects located at this distance from it will be rendered as sharply as possible in the image. And what is closer or further than this distance will be blurred to one degree or another. But how unsharp it is depends on the diameter of the aperture hole.
With an aperture of F/2.8 (and this is considered large, that is, wide), the depth of field is quite small. This is especially noticeable when shooting with long focal length lenses (long focal length lenses with a focal length of 100 millimeters or more are also called telephoto lenses). For example, when shooting with a lens with a focal length of 400 mm, at an aperture of F/2.8, the depth of field of image is no more than 2-3 centimeters. In this case, only one thing can increase the depth of field: shooting at a narrow aperture: F/11 or even F/18.
Wide-angle, or short-focus lenses as they are called, have a much greater depth of field.
How to choose the correct aperture value when shooting? It all depends on what you ultimately want to get in the photo. If, for example, you are shooting a landscape and want to sharply highlight the entire beautiful landscape unfolding in front of you, then you need to shoot with a narrow aperture. If you shoot at an aperture of F/11 or F/18 or smaller, then both the bushes in the foreground and the horizon, sometimes several kilometers away from you, will be sharp in the picture. Well, in order to compensate for the lack of light, you need to increase the exposure time, that is, the shutter speed. In this case, we refer you to the first point of our article today. But if you are shooting a portrait in which you want to convey only the model’s eyes as sharp, and want to make other parts of the face blurry, then open the aperture to the maximum.
Reason five. Shooting with Auto Focus

What should you do if your eyesight is not very good and you wear glasses? In this case, autofocus will be your faithful friend and assistant. How good it is that almost all modern ones are equipped with it. digital cameras! And in more advanced devices this function works just fine, and with various parameters, which we will discuss a little later. But just recently, in the days of film cameras, autofocus seemed simply fantastic and photographers had to focus manually. Today, many people don’t even think about focusing, completely trusting automation. Well, in order to adjust your camera to your own vision, the designers equipped it with a device called a diopter. You can usually adjust it using a small gear wheel located near the viewfinder. If desired, those who wear glasses can adjust the diopter so that they can shoot without wearing glasses.
Reason six. Incorrect focusing
Let's imagine this situation. Your camera is mounted on a reliable tripod, its lens is adjusted correctly, the shooting is taking place on a nice sunny day, the aperture is small and the shutter speed is short, and you have set the ISO value to low. But when you take a photo, you are surprised to discover that it turned out blurry. What is the reason? What didn't work right? It's simple. The reason is most likely that you did not focus the lens correctly. This happens especially often when shooting at a wide open aperture, when the depth of field of the imaged space is very small and sometimes amounts to only a few millimeters. Even a small error in focusing in such a situation can bring the desired area out of focus. For example, if you take a picture of an apple, one side of the picture will be sharp, and the other will be completely blurry.
Usually photographers, especially beginners, set the option to automatically select the AF area in their cameras. In this case, the smart automation of a modern camera decides itself which part, which zone of the image should be conveyed sharply in the frame. Most often, automation does this very well. Especially when the subject occupies quite a large space in the frame. But if you want to take a photo with a more complex composition, if you need to focus on a specific point, you can turn off autofocus and adjust the sharpness manually. You can also switch autofocus to single-point focusing mode.
If we look closely through the viewfinder of a modern digital camera, we will see several small dots. These are the so-called focus points (they are depicted as squares on the liquid crystal display). These are the points that your camera focuses on. If you put the camera in single-point focusing mode, you can use the camera control buttons to focus exactly on the point you need.
As you know, in order to focus the camera, you need to press the shutter button halfway. After the photographer is convinced that the automation has focused on the object he needs, the button can be pressed all the way. All. The photo is taken. It would seem like a very good design solution. But the problem here lies in the fact that very often the shutter button of modern cameras is extremely sensitive. Simply put, if you don't press it hard enough, autofocus may not work and you'll have to refocus again. And if you press a little harder, the shutter will fire before the autofocus mechanism finishes its work. Moreover, if you shoot several frames in a row, the automation may try to focus the lens before each shutter release. It is for this reason that some photographers prefer to focus the lens using the focus button, which is located on the back of the camera.
Back-button focusing - back-button focusing is a camera control function in which the autofocus system is activated not by the shutter release button, but by a special button on the back of the camera.
This button is usually called AF-ON or simply Fn. Most often it is activated by default. In some cases, this can be done by entering the camera menu. Once you press this button, your camera lens will focus on the point you want and will not refocus until then. Until you click on this button again. The advantage of this focusing method is that it allows the photographer to freely change the composition of the image and take several shots of the same object from different shooting points. In this case, the camera will not lose the already adjusted focus each time you press the shutter button.
Reason seven. Wrong focus mode selected
Most often, modern digital cameras are equipped with three main automatic lens focusing modes. This:
- AF-S - focusing one frame. This mode is used when the subject you are photographing is stationary.
- AF-C - long-term autofocus. A mode that is designed to track movement across a frame. This mode is used when shooting moving objects.
- AF-A - completely auto mode autofocus. In this mode, the camera independently, without any intervention from the photographer, determines which of the two modes described above to turn on. The camera is usually set to this mode by default.
Reason eight. Inability to focus the camera manually
The advantages of autofocus are obvious, no one disputes them. But despite this, in some cases the photographer has to shoot with manual focus. For example, when shooting at a wide open aperture in order to achieve a minimum depth of field. In this case, you cannot do without a tripod. And in order to make sure that the necessary areas of the image are in the sharpness zone, autofocus must be turned off and shot with manual focusing. To more accurately adjust the sharpness of the image, you can use the zoom to enlarge the image 5-10 times.
Reason nine. Dirt on filters and front lens elements
Good sharpness and generally high-quality images cannot be achieved if you put a spot on the front lens of the lens. Inexpensive plastic filters also noticeably worsen sharpness. Many people prefer to shoot with an ultraviolet (uv) filter. You can easily evaluate the quality of your filter by taking a few shots without it. Very often, such filters only have a negative effect on the quality of the image.
Reason ten. Low-quality photographic lenses
Novice photographers especially often blame their own shortcomings in their work on the poor quality of lenses. But, oddly enough, the quality of lenses is one of the last places among the reasons for blurriness. However, despite good quality Modern optics, different lenses differ greatly from each other.
What components make up this concept - “quality of a photographic lens”? These are, first of all, the materials from which it is made and its internal design. The basis of the lens is a precisely selected set of lenses, which allows you to focus the image created on the light receiver (matrix or film) and make it better by correcting various types of aberrations (this is the topic of a separate article).
It's true that some lenses produce sharper images than others. As the old masters say, they “paint” more harshly or more softly. Some lenses give a sharper image at the edges of the frame, in its corners, others emphasize quality in the center, and others create high quality image at any aperture, the fourth gives beautiful light highlights around point light sources that fall into the frame, and so on. These cannot even be called disadvantages or advantages of different lenses. It's just theirs individual characteristics. Each lens has its own, unique character. Even two lenses of the same model, from the same company, assembled in the same workshop can be different. There are a million nuances in this matter.
It should also be noted here that lenses with a fixed focal length (primes, as they are called), in contrast to lenses with variable focal length (zooms), usually work better. That's why, even though it adds significant weight to a photographer's bag, seasoned photographers prefer to carry multiple lenses. Even the simplest and most inexpensive prime lens can “draw” much better than an expensive zoom.
If you bought a camera more serious than a regular point-and-shoot camera, then most likely you will want to master manual settings (although they are also available on point-and-shoot cameras). And I would even advise you to do this as soon as possible, so that even if you shoot in automatic mode, you understand what is happening.
There are few main parameters on the camera that you will control, but they are all closely interconnected: shutter speed, aperture, ISO, white balance. There is also such a parameter as depth of field (depth of field), which itself cannot be set in any way, but is obtained due to other parameters. I’m afraid for the first reading all this will seem too complicated and scary, but here I can only advise you to try as much as possible at first. Shoot the same frame with different settings and then see what happens, look for relationships, analyze. And don’t forget about the instructions for the camera, it’s practically desk book at first time.
The main settings of a digital camera are shutter speed and aperture, their ratio is called exposure. Therefore, when they say you need to select exposure, they mean you need to set these two values.
Excerpt
It changes in seconds (1/4000, 1/125, 1/13, 1, 10, etc.) and means the time for which the camera curtain opens when the shutter is released. It is logical that the longer it is open, the more light will fall on the matrix. Therefore, depending on the time of day, the sun, and the level of illumination, there will be a different shutter speed parameter. If you use automatic mode, the camera itself will measure the light level and select a value.
But not only the illumination is affected by shutter speed, but also the blur of a moving object. The faster it moves, the shorter the shutter speed should be. Although in some cases, you can, on the contrary, make it longer in order to get an “artistic” blur. In the same way, smearing can result from trembling of your hands (movement), so you should always choose a value that will level out this problem, and also train so that there is less tremors. A good lens stabilizer can also help you with this; it allows you to use longer shutter speeds and prevents camera shake.
Rules for selecting shutter speed:
- To prevent blur from hand shake, always try to set your shutter speed to no longer than 1/mm, where mm is the millimeters of your current focal length. Because the greater the focal length, the greater the likelihood of blur, and the more you need to shorten the shutter speed. For example, the boundary value for 50 mm would be a shutter speed of 1/50, and it would be even better to set it even shorter, somewhere around 1/80, just to be sure.
- If you are photographing a walking person, the shutter speed should be no longer than 1/100.
- For moving children, it is better to set the shutter speed no longer than 1/200.
- Very fast objects (for example, when shooting from a bus window) require very short shutter speeds of 1/500 or less.
- In the dark, to shoot static objects, it is better not to raise the ISO too much (especially above the working value), but to use long shutter speeds (1s, 2s, etc.) and a tripod.
- If you want to shoot beautifully flowing water (with blur), then you need shutter speeds of 2-3 seconds (I don’t like the results any longer). And if splashes and sharpness are needed, then 1/500 - 1/1000.
The values are all taken from the head and do not pretend to be axioms; it is best to select them yourself based on personal experience, so this is just for reference.

Shutter speed 1/80 is too long for such movements, it turns out blurry

Exposure 3 sec - water like milk
Diaphragm
Denoted as f22, f10, f5.6, f1.4 and means how open the lens aperture is when the shutter is released. Moreover, the smaller the number, the larger the diameter of the hole, that is, as if vice versa. It is logical that the larger this hole, the more light falls on the matrix. In automatic mode, the camera itself selects this value according to the program built into it.
The aperture also affects the depth of field (depth of field):
- If you are shooting a landscape during the day, then feel free to close the aperture down to f8-f13 (no longer necessary) so that everything is sharp. In the dark, if you don’t have a tripod, you’ll have to open it and raise the ISO.
- If you are shooting a portrait and want the most blurred background, you can open the aperture to maximum, but keep in mind that if your lens is fast, then f1.2-f1.8 may be too much and only the person’s nose will be in focus, and the rest of the face blurred.
- There is a dependence of the depth of field on the aperture and focal length, therefore, in order for the main object to be sharp, it makes sense to use the f3-f7 values, increasing it depending on the increase in focal length.

Aperture f9 - everything is sharp

105 mm, f5.6 - the background is very blurry
ISO sensitivity
Designated ISO 100, ISO 400, ISO 1200, etc. If you shot on film, you will remember that films were sold in different speeds, which meant the film was sensitive to light. The same is true for a digital camera; you can set the sensitivity of the matrix. What this actually means is that your shot will be lighter as you increase your ISO at the same shutter speed and aperture (same exposure).
A feature of good and expensive cameras is a higher working ISO, reaching up to 12800. Now this figure doesn’t tell you anything, but it’s really cool. Because at ISO 100 you can only shoot in daylight, and at 1200 and higher, even twilight is no problem. Budget DSLRs have a maximum working ISO of about 400-800. Next comes color noise. Raise your ISO to maximum and take a photo at dusk and you'll see what we're talking about. Soap dishes have very bad performance with this parameter.

ISO 12800 - noticeable noise, but it can be partially removed during processing

ISO 800 with the same settings, the photo is much darker
White balance
Surely you have seen photographs where there is too much yellow or blue? This one is precisely due to incorrect white balance. The fact is that depending on the light source (sun, incandescent light bulb, white light lamp, etc.) the color scheme of the photograph depends. Roughly speaking, imagine that we will shine a special blue lamp on a chair and then the entire photograph of this chair will be bluish. If this is a special artistic effect, then everything is fine, but if we need normal shades, then setting the white balance will save us. All cameras have presets (automatic, sun, cloudy, incandescent, manual, etc.).
To my shame, I must admit that I always shoot on automatic. It’s easier for me to correct everything in the program later than to set the white balance. Perhaps someone will consider this blasphemy, but I’m happy with everything, and I think the majority will be happy with it too, so I won’t talk about manually setting white balance.
Selecting a Focus Point
As a rule, all good cameras have the ability to select the focus point, as well as their automatic selection (when the camera itself selects objects and uses them to decide what to focus on and how). I rarely use the automatic mode, mainly when there is little time and objects are moving, for example in a crowd of people, when there is no time to think. In all other cases, I use the center point. I pressed the button, focused without releasing the button, moved it to the side, and pressed it to the end, taking the shot.

The center point is usually the most accurate, which is why it should be used. But you need to look at the specific model of the camera, for example, now on my current camera all the points are working. I also wanted to say that if your camera is slow and doesn’t focus well (twilight, backlight), then you need to look for the border between light and dark and focus on it.

Depth of field DOF
Depth of field is the range of distances at which all objects will be sharp. Let's imagine that you are photographing a person and there is a straight line: camera - person - background. The focusing point is on the person, then everything will be sharp in the range from this person to you by a certain number of meters and from this person towards the background, also by a certain number of meters. This range is the depth of field. In each specific case it will be different, because it depends on several parameters: aperture, focal length, distance to the object, and the model of your camera. There are special depth of field calculators where you can enter your values and find out what distance you will get. For landscapes, you need a large depth of field to keep everything sharp, and for portraits or highlighting objects by blurring the background, you need a shallow depth of field.
You can play around with the calculator to understand a little the relationship between these parameters. But in the field you will not have it at hand, so if you are not a professional photographer, then it will be enough to remember some values that are convenient for you, and also look at the display each time (zooming the photo closer) what you got and whether it is necessary rephoto.

First of all, you need to remember that:
— The wider the aperture is open, the shallower the depth of field.
— The longer the focal length, the shallower the depth of field.
— The closer the object, the shallower the depth of field.
That is, when shooting at a close distance, for example, a person’s face at 100 mm and aperture 2.8, you risk getting only the nose sharp, while everything else will be blurry.

73mm, f5.6, shot as close as possible so only your finger is in focus
You will need to experience this “triple” dependence of depth of field on focal length, aperture and distance to the subject. For example:
- When photographing landscapes or other objects at a wide angle, you can always use f8-f13 and everything will be sharp. In fact, the calculator says you can open the aperture much wider, but these are the values I like. As a rule, I always set it to f10 (during the day).
- For a beautiful blurry background, you don’t need to have an expensive fast lens with a wide aperture, a regular zoom with a standard aperture is enough, you just need to move further away and zoom the person closer (for example, 100 mm) and then even f5.6 is enough for you to blur the background.
- The distance from the photographed subject to the background plays a role. If they are very close, then it may not be possible to blur the background normally; you will have to use a long focal length and a very open aperture. But if the background is very far away, it will almost always turn out blurry.
- If you are photographing a flower at close range, and for some reason you need to make the mountains on the horizon sharp, then you will have to clamp the aperture to the maximum to f22 or more. True, in this case there is a chance to still get a not sharp image due to other features.
Alternatively, you can just remember a couple of things. We shoot landscapes and similar plans at f10, people and highlighting objects at f2.5 (50 mm) or f5.6 (105 mm).
Relationship between shutter speed, aperture, ISO and semi-automatic modes
We have reached the most difficult part, the interconnection of all these parameters. I’ll try to explain what’s what, but you still can’t do without samples. First of all, I would like to advise you to use at the very beginning not the full manual mode (called M), but the semi-automatic mode (Av and Tv for Canon, or A and S for Nikon), because it is much easier to think about one parameter, rather than two at once .
So, I have already given some connections above. And if depth of field is quite difficult to figure out at first, then choosing shutter speed and aperture without reference to the depth of field will be easier. It all comes down to ensuring that your frame is moderately light/dark, because even if you shoot in RAW, it is not a fact that you will be able to pull out a photo with too erroneous values. And that's why I'm all for semi-automatic modes.
Aperture priority (Av or A)
Let's say you're photographing a landscape in Av mode and your focal length is 24 mm. Set it to f10, and the camera will select the shutter speed for you. And all you have to do is make sure that it is no longer than the critical value of 1/mm (I wrote about this above in the Exposure section). What to do next?
- If the shutter speed is faster than 1/24, such as 1/30 or 1/50, then everything is fine.
- If the shutter speed is longer than 1/24, then you will have to set more ISO.
- Next, if the ISO is not enough, then you can start opening the aperture. In principle, you can initially immediately open it at f5.6-f8, and then increase the ISO.
- If the maximum working ISO has already been set and there is nowhere to open the aperture, then either “put your hands on your hips” to somehow reduce the shake, or look for a surface where you can place or press the carcass, or take out a tripod. Alternatively, you can raise the ISO even higher, but then the photo will be very noisy.
Shutter priority (Tv or S)
It is better to shoot moving objects or people in TV mode to avoid blurring of the subject. Naturally, the shorter the shutter speed, the better, but if there is not much light, then you can rely on the values that I gave in the paragraph on shutter speed. That is, we set the shutter speed and control what aperture the camera will choose. It is better that it is not completely open, especially on fast lenses. If there is not enough light, then we also increase the ISO; if there is still not enough light, then we try to lengthen the shutter speed.

ISO 1600 f2.8 1/50 sec - the parameters are at the limit, because it’s dark and we’re moving
Exposure compensation
Av and Tv are also convenient for this reason. Since the camera measures exposure based on the focus point, and it may be in the shadows, or, on the contrary, too lit, the aperture or shutter speed it selects may not correspond to the required ones. And the easiest way to correct them is with the help of exposure correction, just turn the wheel 1-3 steps in the desired direction and that’s it, that is, if you need to make the entire frame darker, then minus, if lighter, then plus. When there is insufficient light, I always immediately shoot at -2/3 minus in order to have more margin in the settings.
P.S. I hope the article was not too complicated and readable. There are many nuances, but it is difficult to place them here, given that I myself do not know many things. If you find a mistake, write in the comments.
Shutter speed affects exposure, but is also one of the most powerful creative tools in photography. She can convey motion by freezing or tracking it, highlighting objects, and smoothing water, among other things. This article describes how to achieve these effects and also aims to encourage creative use of shutter speed in everyday photography. The basics of how shutter speed affects exposure are outlined in the article “Exposure: Aperture, ISO and Shutter Speed.”
Basics
The camera shutter is like a curtain* that opens to allow light exposure to begin, and then closes to finish it. As a consequence, the photograph does not reflect a moment, but a certain interval of time. The term “dwell time” (exposure duration) is used to describe this interval.
Whenever there are moving objects in the frame, the choice of shutter speed determines whether the motion will be frozen or cause blur. However, it is not possible to change the shutter speed itself without affecting the exposure or image quality:
**only if the f-stop is raised enough to cause noticeable diffraction
Manipulating ISO sensitivity and f-stop (aperture) allows you to use an amazingly wide range of shutter speeds. Regardless of the selected parameters, the lower the illumination, the longer the shutter speed should be.
*Technical Note: At very fast shutter speeds (typically 1/500th of a second or less), the shutter operates more like a rolling slit than a curtain. In this case, the shutter speed reflects the duration of exposure to each area of the sensor, and not the sensor as a whole.
Motion transmission
Some may find the stillness of a photograph to be a limitation, but many, on the contrary, find it an advantage, since the immediacy of the photograph provides almost complete control over the transfer of movement. For example, should a moving object turn into an unidentifiable streak or simply blur? Or maybe the subject should be sharp, and everything else should be blurry? All this can be controlled.
However, achieving the desired blur can be a challenge. At a given shutter speed, the nature of the blur is determined by three* factors:
- Speed. Objects that move faster will appear blurrier. This is perhaps the most obvious factor of all three, but no less important.
- Direction of movement. Objects that move towards or away from the camera will usually appear less blurry than objects that move laterally - even if the speed of movement is the same.
- Increase. The subject will appear more blurry if it occupies most frame. This is probably the least obvious factor, but it is completely under control since the magnification of the subject is a consequence of the focal length used and the distance to the subject. The longer the focal length, the greater the magnification at a given distance, but also increases the likelihood of blur due to camera shake.
*Although apparent size is not a characteristic of the item itself, it can also be important. For example, blur that looks acceptable at a small screen size may become excessive in a large print.
| Excerpt: | 1/2 | 1/10 | 1/30 | 1/400 |
In any case, developing an intuition regarding the endurance required in different cases is not an easy task, but through experimentation you will get the hang of it.
A separate and at the same time common application of shutter speed control is shooting moving water. Exposures of half a second or more can make waterfalls look silky and waves turn into surreal drifting mist.
Hover over the different exposures on the right to see this effect. Since this is a wide-angle shot, when shooting with a telephoto lens, faster shutter speeds will be enough to achieve similar blur. Note that it took a shutter speed of 1/400th of a second to freeze the movement of the water spray.
A slow shutter speed can also be used to highlight a stationary subject against movement, such as a person standing among a bustling crowd. Likewise, unique portraits can be achieved by using moving trains as a background and setting the shutter speed to around 1/10 or 1/2 second:
Movement parallel to the object and wiring
Instead of blurring the subject, you can blur the background. This will require either placing the camera on the moving subject itself, or controlling it so that it follows the subject (this is called "wiring").
Try taking a photo from a moving car, in an amusement park (just remember to be safe!) or from another moving object, and you'll get an interesting effect. As in previous cases, the required exposure time will depend on the speed as well as the stability of the movement. In any case, it's a good idea to start with a shutter speed of about 1/30 of a second and adjust it later, assessing the results on the camera screen.

shooting with wiring at 1/45 and 110 mm
Shooting with tracking does not necessarily imply moving the camera at the speed of the subject being photographed - it is enough that the frame moves at the selected speed. Luckily, even fast-moving subjects can be captured by slowly panning the camera, especially if the subject is far away and you're using a telephoto lens.
You need to ensure that the frame moves smoothly along with the subject while pressing the shutter button - all in one continuous motion.
Panning photography requires a shutter speed that is fast enough to blur the background into streaks, but fast enough to keep the subject sharp. Achieving this can be challenging, so it's a good idea to experiment and take many more pictures than would otherwise be necessary. Either way, longer stripes create a more dramatic effect; Lenses with a stabilizer that can be switched to single-axis* stabilization mode, or a tripod with a panoramic head can help in obtaining them.
In addition, wiring requires a background texture that will not be out of focus. A background that is closer will create more pronounced fringes for a given exposure time and sweep speed.
*Lens wiring mode. Canon lenses IS will allow you to stabilize the wiring if equipped with a mode switch (for wiring you need mode 2); Nikon lenses Vibration Reducer (VR) automatically switches to drive mode if they detect lens movement in one direction.
An added benefit is that wiring allows you to use longer shutter speeds than would otherwise be required to get a sharp photo. For example, the lighting may allow a shutter speed of at least 1/50 of a second, which would not be enough to get a sharp shot of a moving subject, but using panning, this shutter speed will allow you to get a sharp shot.
Freeze moment and fast movement
High-speed photography allows us to create new and exciting displays of objects in motion that we, due to limited reaction speed, are unable to track. Examples include water drops, birds in flight, and sports moments, among many others.
However, shooting fast-moving objects can be a real challenge. The key skill is to anticipate the moment at which the object will be in in the right position , since shutter speeds shorter than 1/5 second exceed our reaction speed. Just by pressing the shutter button, you can miss the moment.
To complicate matters even further, many cameras also introduce a delay between pressing the shutter button and the start of the exposure, called shutter lag. For SLR cameras Typical lag is between 1/10 and 1/20 of a second, and compact cameras can lag by as much as half a second. In addition, it may take another half a second or a second (or even more) for the camera’s autofocus to work. As a result, pre-focusing at or near the point where the subject is expected to appear can significantly reduce shooting lag.
Sharp, high-speed shots will also require you to pay attention to variations in the subject's movement, as well as potentially timing the shot to coincide with a relative pause in movement. For example, when photographing jumps or races, choose to photograph the moment when you pass the highest point or change direction (where the speed is slowest). Even with the right timing, it makes sense to put the camera in continuous shooting mode (or a similarly named mode). The camera will take a series of photos while you hold the shutter button - and hopefully one of the shots will capture the moment you want.
In any case, an understanding of the required exposure time is also developed in practice. The following calculator will allow you to estimate the maximum shutter speed required to capture a sharp shot of a moving subject on a 20x25 cm print:
The calculator results are only a rough estimate. In general, shutter speeds of about 1/250 - 1/500 are sufficient to capture human movement, but for close or extremely fast subjects, 1/1000 or 1/4000 of a second may be required.
Notes on object speed. The very fact that an object is moving at a given speed does not mean that its individual parts will not move even faster. For example, a runner's arms and legs can move much faster than their torso. Further, the movement speed parameter in the calculator takes into account movement across the frame; For subjects that are moving closer or further away, the shutter speed can usually be quadrupled, and for subjects that move at an angle, the shutter speed can be doubled.
Don't forget that most cameras don't allow shutter speeds faster than 1/2000 - 1/8000 second. If the calculation shows that a shutter speed will be required that exceeds the capabilities of your camera, the only thing left to do is try to shoot with wiring to partially compensate for the movement of the subject, or use a flash.
Zoom blur
Another interesting technique is changing the focal length during exposure, often called a zoom burst. You can get this view by mounting the camera on a tripod (1), choosing a shutter speed of about 1/15 - 1/2 second (2) and turning the lens zoom ring (3), trying to avoid camera movement. You can also try fitting the focal length change into a fraction of the exposure time to reduce the effect.
This technique causes increasing radial blur at the edges of the frame, leaving the center of the exposure more or less sharp. This effect can be used to draw attention to a central subject or to give the viewer a sense of rapid movement.
The zoom jerk technique is usually only available for DSLR cameras, but is potentially possible for compact cameras, on which manual zooming (changing the focal length) is possible. On the other hand, this effect can often be perfectly reproduced using post-processing of regular photos, for example, using the Radial Blur filter (Photoshop).
Abstract and artistic effects
Sometimes photographers deliberately add blur caused by camera movement to create unique artistic effects:
Typically, a shutter speed of about 1/30 - 1/2 second (or more) is required, as this is slightly longer than you can hold when shooting handheld, but not so long that the subject is completely blurred. It can be difficult to predict the end result, so shooting something like this will require many attempts (probably at different shutter speeds) before you achieve the look you want. Also keep in mind that brush painting effects are often easier to achieve programmatically in post-production.
Conclusions and additional information
We've looked at some creative approaches to using shutter speed, but what if the lighting doesn't allow you to use the shutter speed you want - even after every ISO and aperture combination has been tried?
To get a faster shutter speed, you can try using a lens with a wider maximum aperture, or add light to the scene by changing your location or using flash. If you need to lengthen the shutter speed, you can partially block the light using a neutral density or polarizing filter, or use image averaging to get a longer shutter speed. final exposure. In any case, it's worth making sure that the photo hasn't been accidentally over- or underexposed - thereby potentially shifting the available shutter speed range.
Other important notes and clarifications are listed below.
- Shutter priority mode can be a useful tool when conveying motion is more important than depth of field, or can help you understand whether it is possible to achieve the desired shutter speed in the available lighting. It will also allow you to select the desired shutter speed, after which the camera's metering system will try to select the appropriate aperture (and possibly ISO sensitivity) to achieve the correct exposure.
- Camera shake. The above analysis implies that the main cause of blur is subject movement, but in many cases camera shake can have a greater impact - especially when using a telephoto lens in unsteady hands.
Related topics are discussed in the following articles:
- Camera exposure: aperture, ISO and shutter speed
Considers the effect of shutter speed on exposure as a whole. - Reduces camera shake when shooting handheld
Tips for minimizing camera shake at slow shutter speeds.


by Thomas Larsen
Many photographers, especially beginners, neglect the possibilities that shutter speed control provides. Most often, the aperture is set, and the shutter speed is used only for compensation in order to obtain a normal exposure. In this short photography tutorial, we'll look at how shutter speed can be used creatively and some of the mistakes photographers make when choosing shutter speed.
You should always know what you are shooting, why you are doing it and what results you can expect.
Five classic camera shutter speeds

1. Freeze motion, or shoot 1/250 s or faster
Using a fast shutter speed helps to get a fairly balanced shot, but makes the photo too static. Any movement in the frame will be frozen. You can fix this by trying to slightly change the camera's tilt to get a more dynamic photo composition. But the best option- use the technique of shooting with wiring, which we will write about later.
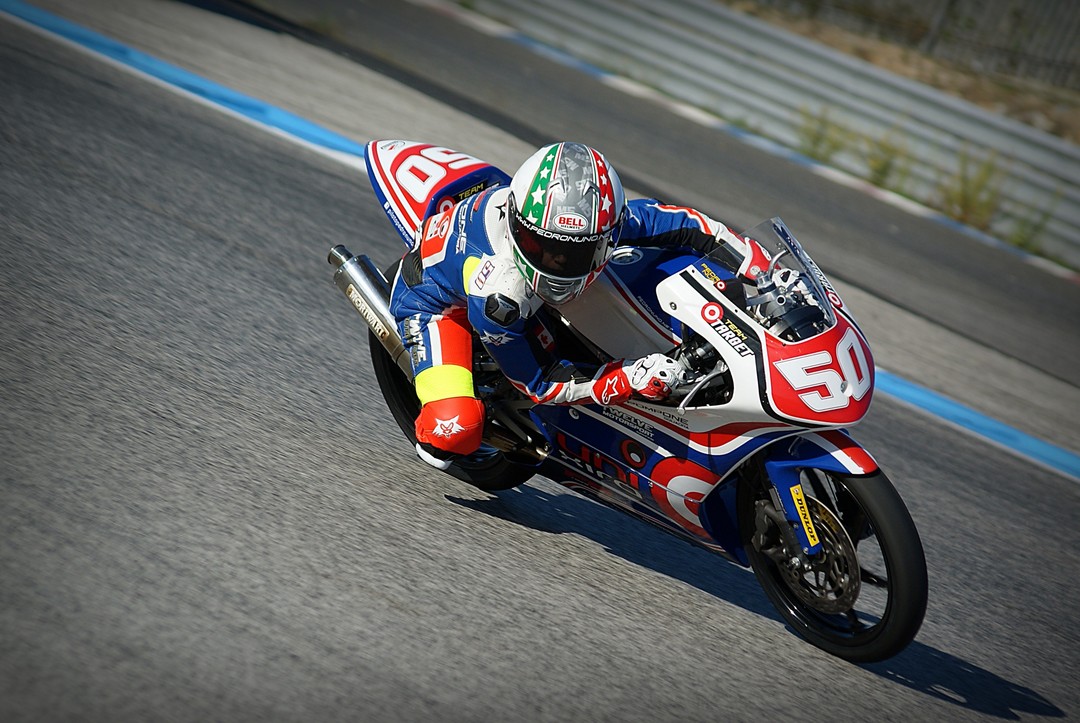
The faster the subject moves, the shorter the shutter speed should be. For example:
- fast moving cars or animals: 1/1000 s;
- mountain bikes or running people: 1/500 s;
- waves: 1/250 s.
It should be remembered that individual parts of the object can move very quickly. A striking example similar to a helicopter. The fuselage itself can be frozen at a shutter speed of 1/250, but for the blades even 1/2000 may not be enough. Or, for example, when photographing a girl fluttering her hair in order to freeze the ends of her hair, it is also necessary to use shutter speeds of the order of 1/1000 or even less, while the model itself is moving relatively slowly.
How do you solve the problem of “lubrication”?
You can take a lot of shots, but knowing the laws of physics and the peculiarities of recording frames on a memory card, they do it differently. First, about physics: if you throw a ball up, when will it have the highest speed, and at what point the lowest? That's right - the largest one is when the ball just comes off the hand, and the smallest one is at the point where it stops to fly down, i.e. at the peak of its movement along the top-down flight path.
When filming competitions, where, say, motorcyclists take off on a springboard, the most interesting point is the dive, which is also the “slowest” in terms of movement. Shooting as many frames as possible is not the best approach to solving the problem. At some point, the camera will simply stop to record everything on the flash drive, and at sporting events such a delay can lead to the loss of the best shot.
Use a series of 2-3 frames instead, but while your main subject is at the peak of his or her movement. This approach provides the photographer with optimal chances of receiving best images due to the fact that the camera will have enough time to record the frame onto the memory card without blocking.
2. Shooting with wiring
When shooting with tracking, when using a camera to track the movement of an object, shutter speed plays a very important role. It must be in the range from 1/15 to 1/250 s.

If you have a lot of time, you can make calculations - what shutter speed will be needed to photograph cars moving in a certain area, but in reality everything is a little simpler. If everything in the frame is too blurry, then you need to make the shutter speed shorter.

If the frame freezes the movement of the car, then an increase in exposure time is required. And don’t forget that 1/125 is a longer period of time than 1/250

For example, some quantities that photographers most often use:
- fast moving cars, motorcycles or birds: 1/125 s;
- mountain bikes close to camera: 1/60 sec;
- mountain bikes, animal movement or human work: 1/30 sec.

by Jamey Price 1/60
3. How to use slow shutter speed
It is also called creative blur - 1/15 s to 1 s.

Here it is necessary to make a small technical digression and remind you what a camera is. This is an image capture tool that allows you to somewhat imitate the human eye, the human gaze. But having created this instrument, man began to obtain unusual effects that are difficult to see in life. Our vision conventionally “takes 25 frames” per second in normal lighting, and we are accustomed to seeing the world as we see it. But the camera, due to the fact that it is different, can show us the world differently.
In particular, make a frame overlay () or with a slightly longer shutter speed show the blur of moving objects, turning them into a line.

A similar effect can be observed with your eyes if you quickly turn a flashlight in complete darkness. An eye adapted to darkness will perceive a moving spotlight as a line.
A slow shutter speed is used to photograph, for example, a waterfall. In this case, specialists, of course, use manual settings and , but you can simply set the camera to shutter priority mode (Tv).

by Roland Maria, 3"
Here are some shutter speeds for motion blur:
- fast waterfall: 1/8 s;
- people walking near the shooting point; waves; slow water movement: 1/4 sec.
In bright light conditions (on a sunny day), it may be difficult to obtain the required shutter speed (below 1/8 sec.), even by changing the aperture or low values ISO. To reduce the amount of light, use a neutral gray (ND) filter, which is designed for just this. In ours you can find neutral gray filters of variable density, which allow you to reduce the amount of light passing through the lens to almost zero and can even turn a sunny day into night. Well, and of course, when using long exposures, it becomes mandatory to use or.
4. Photography with shutter speed from 1 s to 30 s
There are processes that take a long time, and a shutter speed of up to 1 second is no longer enough. These processes differ not only in time, they differ in perception. At shutter speeds from 1 to 30 seconds, all processes that occur quickly in the frame are erased, leaving only static... soft static. There is a feeling that the world has frozen. The movement disappears again. Only if at shutter speeds of 1/1000 the movement disappears, but a person sees an object that could move, then at a 30 second shutter speed there is no movement left.

This effect can only be achieved if you use a tripod. At the same time, it can no longer be light and portable, but a stable and heavy model is needed, since even a slight wind will affect image acquisition. Photographers often use a simple technique - they hang additional weight on a tripod, and most often this weight in hiking conditions is a working photo backpack. On most tripods you can see a hook at the bottom for hanging the load and, accordingly, giving it greater stability. Additionally, we recommend that you familiarize yourself with some other working techniques -.
Excerpts that photographers use to create photos like this:
- the movement of the wind in the leaves of the trees: 30 s;
- smooth movement of the sea surface: 15 s;
- fast moving clouds: 8 sec;
- waves with some details preserved: 1 s.
If you plan to shoot before sunrise or after sunset, be prepared for the light to change very quickly, so you'll need to change your aperture (or use a faster or slower shutter speed).
5. Shooting at night - shutter speed over 30 s
Shooting at night means there is very little light. Accordingly, many photographers want to increase the value, which most often leads to an increase in noise when individual pixels begin to appear much brighter than others.

If you leave the ISO minimal and just set a long shutter speed, this will lead to some reduction in image noise.
Most often, astrophotographers—that is, people who photograph the starry sky—face such problems. In addition, with long exposures, due to the rotation of the Earth, an effect occurs when the stars line up in a round dance.

In order to avoid this, special equatorial mounts (tripods for telescopes) are used, which allow them to compensate for the movement of the Earth.
For example, to photograph the night sky you may need next time excerpts:
- individual stars or full moon landscapes: 2 min.;
- star tracks: 10 min.
Global bug fixes
Hand trembling
In addition to the fact that the selected shutter speed should depend on the speed of the object and the amount of light, we remind you that the shutter speed is also affected by such a phenomenon as blur from natural hand trembling. The longer the focal length of the lens, the shorter the shutter speed should be. You can roughly calculate it as follows - the focal length in mm corresponds to the shutter speed in fractions of a second. That is, with a 50 mm lens, you can shoot handheld at a shutter speed of at least 1/50 sec without fear of blurring (unless, of course, you are dancing at this time or riding a tour bus), and for 200 mm you will already need 1/200 sec.

Even a simple monopod allows you to increase shutter speed by 1-2 times. The photographer has the opportunity to shoot with longer shutter speeds. A good tripod allows you to take photographs at any shutter speed.
The exposure time is a quality indicator even at . According to the observations of professional portrait photographers, at a shutter speed of 1/50, portraits turn out “alive.” With longer shutter speeds, blur appears, and with shorter shutter speeds, portraits turn out too frozen.
Failure to correctly use the camera's shutter speed will lead a novice photographer to stagnation. creative development. There is no need to be afraid to master what is initially difficult to perceive. Ask questions, together we will look for answers from advanced and professional photographers.
