Scrapbooking best ideas for cards. “Happy Birthday” cards in shabby style
Evgenia Smirnova
To send light into the depths of the human heart - this is the purpose of the artist
Content
Scrapbooking is the art of making and designing photo albums, photo and picture frames, booklets, postcards, and gift wrapping. Scrapbooking for beginners will give everyone a chance to learn how to create original things with their own hands. The art of scrapbooking has several different directions and techniques - distressing (aging album pages), stamping (creating original effects using ink, stamps and applicators), embossing (creating raised paintings) and other styles used to design albums and paintings.
Scrapbooking – what is it and where to start
Scrapbooking for beginners is a type of manual creativity, which is based on the design and production of photo albums, original storage family photos, personal stories in the form of photographs, drawings, newspaper clippings, notes. An original wedding and New Year's album, personal diary, invitation card, gift box, picture, book, binding, envelope for money will be very beautiful. Scrapbooking is also suitable for beginners, it’s worth picking up simple options, having mastered which it will be possible to move on to complex schemes.

At its core, scrapbooking acts as a unique way of storing stories, using tactile and visual techniques that replace the story. The photo album must be decorated in a special way and consist of separate leaves, each of which will express a complete thought (collage). Such original albums should cover one topic - the birth of a child, a wedding. For beginning craftsmen, there are ready-made diagrams (sketches).

In Russia, demobilization albums are widely popular, containing not only photographs, but also drawings, collages, interesting caricatures, wishes, and addresses of colleagues. The production of such original albums is carried out by soldiers who are novice craftsmen, and everything necessary can be collected during the service.
It simply doesn’t make sense to arrange all the photographs in the house in scrapbooking style, so a specific theme must be chosen, after which photos will be selected to match it. Beginner scrapbookers long time creating a masterpiece can be tiring, but after completing a few elements, you will have the desire to continue practicing this art.

What you need for scrapbooking
Scrapbooking for beginners requires patience and preparation of materials. You will immediately want to buy a lot of things for work, but you should not buy too expensive tools. For beginning scrapbooking masters, you need to choose a starter set of tools that do not have very high cost, and every interested beginner can purchase them. It is not necessary to buy professional tools that experienced scrapbookers use.

Materials
If you have decided to engage in this type of art, beginning scrapbooking craftsmen will need the following materials:
- scissors (several types);
- Double-sided tape;
- glue;
- paper and pencil;
- sewing machine;
- figured hole punch;
- buttons, ribbons, rhinestones;
- cardboard or cutting mat;
- rubber stamps;
- ruler and scissors.
Tools
Beginner scrapbookers should have the following tools:
- You need to take several types of scissors (small and large).
- Double-sided bulk tape, special adhesive tape for photos.
- Simple PVA is ideal for gluing paper.
- You will need special shaped hole punches, but there is no need for beginning scrapbookers to buy more than 2 pieces.

- For a beautiful and original decoration of a notebook or photo frame, ribbons of various thicknesses, rhinestones, buttons or other decorative materials that are at hand can be used.
- For cutting parts, simple cardboard or thick old magazines are suitable.
- Scrapbooking for beginners does not require too many tools, so it is not necessary to purchase sewing machine, it is not always needed. Instead, take a simple thick needle or thin awl.
- You will only need a few rubber stamps, which come with stamp pads. Wet wipes can be used to clean dies, but only those that do not contain alcohol; beginner scrapbookers can wash them with warm water and soap.
- Experienced scrapbookers use eyelet installers, and beginners can buy kits for their installation in specialized sewing stores.
- The ruler with scissors will be replaced by a special cutter (a simple metal ruler, a stationery knife).
Sketches
Scrapbooking sketches for beginners will help make cards, postcards, and notebooks much easier. For beginning craftsmen, sketches will be a real lifesaver, because they can give new ideas and inspiration when creating an original photo album, frame, or notepad. If you can’t make a scrap page yourself, you should pay attention to ready-made templates(blanks) for scrapbooking.


Master class on scrapbooking a photo album for a child
A step-by-step scrapbooking master class for beginners will help you easily make a beautiful, original album for a child. Possessing creative and unconventional thinking, you can easily create a real work of art, but if you lack imagination, there is a way out - check out the master classes and choose a more suitable option for beginning craftsmen.

In this case, you will need the following materials:
- 3-5 sheets of paper with any design;
- 4 sheets of cardboard (white), size 12.5x12.5 cm;
- 2 sheets of thick cardboard measuring 13x13 cm (special paper for scrapbooking).

Step-by-step instructions for scrapbooking a photo album for beginners.
- First, the original album cover is created. 2 squares are cut out of paper, the dimensions of which are 15x15 cm. 6 square sheets (12.5x12.5 cm) will be used as the inner sheets of the album.
- Paper is glued to the cardboard squares, all protruding corners are cut off. The left and right corners are cut straight, and the bottom and top at an angle.

- Carefully paste it over.
- Next, take a thin tape (about 50 cm long) and glue it to the inside of the square. The end of the tape “A” (as indicated in the photo) should be slightly longer.
- 2 pieces of tape are glued to the square (tape length 5 cm, in the lower and upper parts of the square).

- Following the example shown in the photo below, all parts of the future album are connected.
- White sheets of paper are glued on top, directly onto the tape, and for the cover you will need to take colored paper (various colors - black, red, blue, pink).

- All pages of the album are covered with squares of paper; any other decorations can be used according to your own taste.

How to make scrapbooking frames with your own hands
To make an original photo frame with your own hands, novice scrapbookers will need the following materials:
- scrap paper (1 sheet);
- pencil;
- ruler;
- scissors;
- non-writing pen or stick;
- photo;
- stationery knife;
- glue;
- scotch.

A step-by-step plan will help you avoid mistakes and do all the work correctly, and a stencil will help you make a beautiful inscription, which will be simply irreplaceable in the initial stages. To create an original and unusual photo frame, you should use a variety of stencils that help you make various drawings, which will be important for people who do not know how to draw beautifully. Scrapbooking video tutorials for beginners will become an indispensable assistant in creating a real masterpiece.
- At the initial stage, the sheet of cardboard is divided according to the pattern shown in the photo.
- With help stationery knife Carefully cut out the middle. On reverse side scrap paper is glued to a cardboard frame.
- Inside the frame, carefully cut the paper crosswise and use a non-writing pen to make the sides of the bends.

- The corners are cut off, approximately 5 cm is removed from the edge of the cardboard. The upper and lower parts of the future frame are determined. Not very large cuts are made at the top, which should be slightly more photos. Scotch tape is glued around the perimeter of the frame, with the exception of the top part.
- A piece of cardboard is glued to the back to prevent the photo from falling out. The corners of the frame are bent on all sides; it is necessary to cut out all excess.
- A footrest is made from the remaining cardboard and attached to the frame.

- Almost any decoration can be used to decorate a photo frame - flowers, letters, beads, rhinestones, any available material. Digital camera will help to do beautiful photos for the whole exhibition hall original photo frames.
Notepad scrapbooking technique
To make a beautiful notebook with your own hands, a novice crafter will need the following materials:
- Super glue;
- thin felt;
- scissors;
- double-sided tape (sticky film);
- Notebook and paint;
- decorative elements for decoration.

- Thin felt is laid out on the table, after which a notepad is laid out in the center, about 10 cm is left for hemming the material around the perimeter, all excess is cut off (it is necessary to cut out the shape of the notebook).
- Double-sided tape is glued to the inside of the cover, the notebook is folded together with the felt, and all the lines are carefully smoothed by hand (the binding should be evenly covered with the material). Corners need to be cut.
- All edges of the felt cover are glued, each bend is pressed well so that the glue has time to set. The notepad is closed and pressed down on top with any hard object.
- At the very end, the notebook cover is decorated - a pre-prepared blank or template and colored paint are used (colors can be very diverse - black, scarlet, gold, green, yellow, blue). The most important thing is that the paint is completely dry.
Video tutorials for scrapbooking postcards
Things that were made with your own hands, and this is scrapbooking for beginners, are in a real trend and are becoming more and more popular every day. It is possible to buy ready-made exclusive items or be patient to create a work of art. Having done just one
Let's try to make a postcard using scrapbooking technique. Despite the obviously foreign origin of the tricky term, there is nothing complicated here. This is just a sheet of paper decorated with decorative elements, various small details and all kinds of cutouts. To make such a card, you need to have imagination and suitable materials and tools. That's all, and the rest is a matter of technology, which we will study now.
Before mastering the cardmaking technique, let’s stock up necessary materials, which are sold in craft stores.
- Paper for scrapbooking or set for scrapbooking: cadstock (cardboard), design paper, designer paper.
- Holographic foil.
- Watercolor paper.
- Self-adhesive paper.
- Set of colored paper.
- Pieces of different fabrics.
- Beads.
- Beads.
- Paper clips.
- Rhinestones.
- Buttons.
- Ribbons.
- Lace.
We will also need tools: either special scrapbooking kits, or ordinary ones, from those that every home has.
- Double-sided tape.
- PVA glue.
- Scissors are simple and with curly edges.
- Hole puncher.
- Stapler.
- Ballpoint pens.
- Markers.
- Ruler.
- Pencil.
- Decorative metal carnations.
- Strong threads.
So, let's begin the creative process and start creating a card.

Our postcard, like any other, made using the scrapbooking technique, will consist of five main elements: a photo, a background for the photo, decorative elements, journaling (another tricky word) and a title. Let's look at what each element is made up of:
- photo - an ordinary photograph or drawing that you will consider the main one for the postcard.
- The backing is thick paper under the photo, the edges of which will protrude beyond the photo by two centimeters.
- Decorative elements - rhinestones, beads, artificial flowers, in general, all postcard decorations.
- Journaling is a small card under the photo on which information about the photo, explanations, and notes will be written.
Before we begin directly making the postcard, we need to draw a scrap composition. Otherwise, it is called layout and is needed in order to beautifully arrange the elements of the composition.


As you can see, if you have patience, add perseverance and a little imagination, you can create a masterpiece postcard. And no one will have such a postcard, believe me.
Based on this postcard, you can make similar ones. Here are a few ideas, perhaps some of them you will take into account:


It is in more and more demand, and products made using this technique are now the most common and widespread. You can make a bunch of different souvenirs and gifts for absolutely any occasion: a birthday is a card, box or envelope for money, the birth of a baby is a box, postcard or casket of mother’s treasures, a wedding is an album, postcard, envelope, wish book, and so on can be listed endlessly. Moreover, if you judge logically, you can do not just, but very necessary things and objects for yourself and your family. Scrapbooking is a whole handicraft dynasty that has its own characteristics and styles. For example, here are the most ancient style scrapbooking called “shabby” is still popular today. And products made in the shabby chic style have such a feature as an old fashioned one, which emanates comfort and home environment. There are a lot of styles, but we’ll still focus on shabby chic and look at a very gentle and interesting master class that will teach us how to make birthday cards. This is always a necessary thing, so it will be interesting for everyone to read it.
So, to make shabby cards we take:
Three sheets of cardboard of different colors, take red, soft pink and blue;
Scrappaper from sets called “Shabby” and “Ukraine” from the famous designer Evgenia Kurdibanovskaya;
Colored pictures with flowers and sweets;
Cotton lace in mint, pink and dark pink;
Artificial flowers: latex roses white, pink and green, poppies red and salad green, paper hydrangea flowers white-orange, white and green;
Bouquets of complex stamens are mother-of-pearl and with glitter in white, red, orange and mint;
Die-cut paper napkins mint, pink and red;
Cut out butterflies, three large and 6-7 small;
Stamped inscription in different colors “Happy Birthday”;
Artificial branches with buds of different colors;
Metal plain brads;
Double-sided tape and scissors;
Whatman paper A4 format;
Ruler and simple pencil;
Glue stick;
Small half beads of different pearl colors;
Ink pads for tinting green and burgundy;

Let's start with the basics of postcards, for this we take cardboard of three colors and cut out three rectangles 18.5 * 20 cm.
Now we fold each one in half and get three such bases.


Now we will cut out the lower bases. To do this, we measure and cut out two 9.5*18 cm rectangles for each postcard, so there are six in total.


For the front decoration, we cut out each postcard and need three more rectangles.


We have prepared everything, now we need to scratch all the rectangles along the edges, so to speak, make them old.


We immediately glue the rectangle onto the back sides of the postcard.


Also, for internal wishes, we need to glue white sheets of whatman paper, we also cut out three rectangles 9.5 * 18 cm. We tint the edges of each and glue them inside each card. We glue one small rectangle onto the front rectangles.


We immediately estimate the design, glue a napkin on top, then two pictures at a time, shifting them a little. We do this on all three and sew each part separately, starting with a small rectangle.


Now we insert two branches onto each workpiece using brads. Now we glue these blanks onto our base. Separately sew the front and back sides of each postcard.
As a child, every person at least once had to make cards on their own. For some reason, in adulthood, few people try to do this work with their own hands. The scrapbooking technique is a unique opportunity to return to childhood, plunge headlong into the creative process and create a unique thing that gives love and warmth.
The variety of materials for scrapbooking allows you to create unique cards for any occasion - for a girl’s birthday, for a girl’s wedding, or for a grandmother’s anniversary. Small, and large, and even huge - as your imagination dictates and time allows. It’s very interesting to create a postcard step by step - choosing lessons and educational instructions is not difficult, the diagrams can be printed from the Internet.
Postcards using the scrapbooking technique turn out very beautiful.
Feature of postcards self made is that they can be both classic and very non-standard. The shape of the craft can be square, rectangular, round and curly. It is even possible to make crafts of very unusual shapes. Depending on who this gift is intended for, postcards are created in pastel colors or, on the contrary, bright, catchy products.
For a wedding event, it is recommended to use fabric and lace. Postcards in the form of a book or photo album look original. It is not at all necessary to create a template product, because scrapbooking provides a huge scope for creativity.
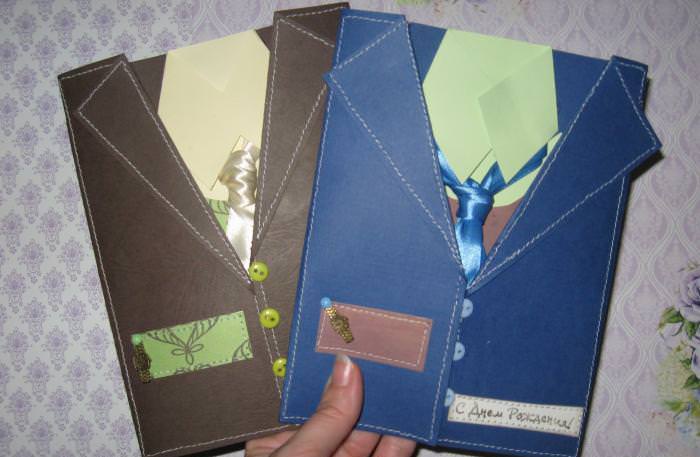
Children's crafts are often made in the form of cartoon characters and fairy tale characters. Bows, flowers, and bright designs would also be appropriate. If the gift is intended for an adult man, then you should resort to using strict tones; it is not recommended to decorate the product with lace. A postcard made in the shape of a jacket, tie or whiskey bottle will look original.
Postcards made in vintage style look beautiful and noble. This gift is ideal for a boss, colleague and a mature person.
Scrap crafts always look special and non-trivial, which is why they enjoy considerable popularity.
Gallery: postcards using scrapbooking technique (25 photos)


Scrapbooking: a simple card for beginners (video)
Happy birthday greeting card using scrapbooking technique: master class
A birthday is undoubtedly a holiday of childhood, no matter how old the birthday boy turns this year. Making cards for this celebration is an art. After all, the craft should be non-standard, bright, festive, giving only positive emotions.
What is necessary:
- paper of different colors;
- watercolor paper;
- cardboard of different colors;
- brush;
- watercolor;
- pencils;
- glue;
- Double-sided tape;
- ruler;
- bubble film;
- file;
- picture with inscription;
- buttons;
- needle;
- threads
Work progress step by step:
- Cut cardboard and watercolor paper using a knife and ruler into pieces of the required size.
- Moisten the sheet with a brush and immediately paint it with paint.
- Make streaks of paint on the file.
- Attach the painted blank to the file and press slightly.
- Take bubble wrap and paint all the bubbles with a darker shade of paint.
- Attach the film to the same workpiece and press it.
- Print bubbles on the part in several places.
- Perform all these actions with the rest of the prepared parts.
- Give the required color shade to the inscription by shading it with a pencil and shading it with a piece of fabric.
- Cut out several circles from paper and stick them on the backing.
- Using a pencil, draw lines reminiscent of a sewing machine line.
- Mark the place of the bend and glue all the prepared parts.
Sew buttons to the glued circles, thereby adding a little volume.
Postcard for a man in scrapbooking style: step-by-step instructions
It is quite difficult to please a man with a gift. But if you present him with a postcard in the form of a shirt, he will certainly appreciate this unusual and bright present. After all, these men's crafts deserve special attention.
What is necessary:
- colored cardboard;
- dark scrap paper;
- template for shirt and vest;
- ribbons;
- watch pendants;
- metal brads;
- glue;
- scissors;
- pencil;
- ruler.
It’s quite difficult to please a man with a gift.
Progress:
- Measure a rectangle with sides 14.5 and 19 centimeters for the future shirt.
- Make cuts on the sides, then carefully fold the collars.
- Cut out a vest from scrap paper and glue it to the shirt you just made.
- Form a jacket from a cardboard sheet and turn up the collar.
- Place the shirt blank inside.
- Paste a suitable inscription.
- Cut out a square piece with sides measuring fourteen centimeters from scrap paper and use a hole punch along one edge to make it shaped.
- Cut out another rectangular piece with sides of 10.5 and 15 centimeters.
- Use these elements to form pockets.
- Tie a tie from ribbon.
Place your watch in the pocket.
How to make a card for mom using scrapbooking technique
A mother, like any other woman, wants attention and love. A postcard made using the scrapbooking technique will be a manifestation of these feelings. This gift is suitable for absolutely any holiday. You just need to select the appropriate inscription.
What is necessary:
- watercolor paper;
- colored paper;
- lace;
- ribbon;
- artificial flowers;
- buttons;
- ruler;
- scissors;
- glue;
- purple marker.

Mothers, like any other woman, want attention and love.
Progress:
- Fold a white piece of paper in half.
- Cut out four blanks from colored paper.
- Glue some lilac elements onto the purple ones so that the width of the fields is the same.
- Write congratulatory words and circle this inscription with a felt-tip pen.
- Stepping back from the edge about a centimeter, glue all the rectangular elements.
- Now glue the lace and the ribbon on top of it.
- Fix all colored parts on a piece of paper.
- Form a bow from the remnants of the ribbon and also fix it on the product with glue.
- Now glue the flowers and buttons.
Draw a monogram along the edge of the product with a felt-tip pen.
Vintage card using scrapbooking technique
In this style, any craft acquires special grace and charm. The postcard looks not only unusual, but also expensive. It can be safely presented to true connoisseurs of beauty.
Master class for making birthday cards.
Instructions with step-by-step photos for making a birthday card
May your birthday bring you joy,
Smiles, warmth, kindness will warm you!
From tenderness and affection the soul blossoms,
Every dream comes true in life!
Irina Ivanovna Goncharova, teacher of the highest category, KDOU VO “OCPPMSP for children” preschool age", Ostrogozhsk, Voronezh region.
Description: The material will be interesting preschool teachers, teachers additional education, parents, as well as everyone who is interested in scrapbooking techniques. Cutting along the intended contours, working with figured hole punch, leaves using the quilling technique are performed by children of the preparatory group.
Purpose: birthday gift.
Target: making a birthday card using scrapbooking technique.
Tasks:
- contribute to the formation of practical skills in making postcards, namely:
- learn to compose three-dimensional compositions from individual elements;
- continue to develop the ability to perform quilling elements (eye shape);
- introduce a glue gun;
- improve skills in working with scissors and a hole punch;
- develop artistic and aesthetic perception;
- promote the development of fine motor skills of the fingers, accuracy, perseverance, patience;
- cultivate interest in making holiday cards.
Some interesting information:
Everyone is used to the fact that every person has his own birthday. And to the fact that on this day you need to congratulate your friends and celebrate.
But at the same time, no one thinks about where this holiday came from, and since when the history of its celebration has existed.
Birthday story.
Oddly enough, historians do not know when and why birthdays began to be celebrated, but in general, there are two versions circulating around the world, which historians, in principle, adhere to.
The first version is pagan. If you believe this version, then initially the “Birthday” holiday originated exclusively as one of the rituals of black magic. It is believed that the human spirit is most vulnerable precisely on the day and hour of its birth. It is at this moment that it is easiest to influence fate with the help of spells. However, doubt is raised by the fact that if a birthday really was a pagan holiday, then the Bible would clearly state that celebrating it is prohibited. But there is no such record in the Bible.
And in this regard, a second version of the origin of the holiday appears.
In the second version, the roots of the “birthday” go back to the worship of the cult of the ancient Iranian Sun God Mithra.
Now it is very difficult to say which theory is correct, or even if any of them is correct. However, we can say for sure that the birthday fun party, and the tradition of celebrating this day is very good, kind and cheerful.
In Russia, birthdays first began to be celebrated around the 17th century. This is the latest mention of this holiday in history.
On children's birthdays, especially in kindergartens, guests (children and teachers) arrange a round dance around the birthday boy and sing the song “Loaf” and “Let them run clumsily.” There is a custom to pull the birthday person's ears by the number of years. According to popular belief, birthday candles have the magical power to make wishes come true. Since man first began to erect altars to his gods, lit candles and sacrificial fires have always had a special mystical meaning. Birthday candles are considered to honor and pay tribute to the “newborn” and bring happiness.
A handmade postcard with a piece of your soul embedded in it will be a wonderful gift for this holiday.

Materials and tools: colored double-sided cardboard, scrapbooking paper, quilling paper, scissors, curly scissors, hole punch, ruler, pencil, quilling tool or toothpick, glue, double-sided tape, foam tape, ruler, glue gun.
Decorative decorations: green satin, openwork white and golden ribbon, flowers, dove (button), rhinestones.
Base template, “Happy Birthday” inscription, congratulatory verses.
Safety precautions when working with a glue gun:
- The work with the pistol is carried out by an adult!
- Be sure to place a ceramic, glass stand or saucer under the nozzle while warming up the gun so that the glue does not drip onto the table.
- Make sure that the gun stand is extended when you place the gun on the table after work.
- Do not grab the nozzle or heated glue with your hands.
- Do not forget to turn off the gun from the network after use and even during operation to avoid overheating of the gun.
Safety precautions when working with scissors:
- Use only working scissors.
- Do not play with scissors, do not bring them to your face, use scissors only for their intended purpose.
- Pass the scissors only to closed, rings forward.
- Do not leave the scissor blades open while working.
- When working, carefully monitor the cutting direction. Don't cut as you go.
- While working, hold the material with your left hand so that your fingers are away from the blade.

We transfer the dimensions of the template onto the cardboard (data given is for cardboard measuring 20*29 cm). The cut line is indicated in red. The solid line is the fold line.

We crease and bend at the bend points; at the incision site, we cut it with a knife (the work is done by an adult). This creates the base of the postcard.

For convenience, I put down the numbers. In this order, we will begin to decorate our base.

We glue double-sided tape to the very bottom part (1). We attach an openwork ribbon to it, and a green one on top of it (the length of the ribbons is 13.5 cm).

We will decorate the next step (2) with a wish. I picked it up from an old postcard and cut it out with curly scissors (the text of the congratulations is given at the very beginning).

We cut out the third part from scrapbooking paper (13 * 9.5 cm), process the corners with a corner hole punch (3).

We decorate the steps on the left (4, 5) with scrapbooking paper (size 6*7), punch the corners with a hole punch and cut out the edge with curly scissors.

We form a bow from a golden ribbon and secure it with a glue gun.

Add a flower on top (5).

Making leaves. From a green quilling strip (width 0.3 cm, length 30 cm) we twist the roll, unravel it (size in the circle ruler is 16), squeeze the opposite sides. Our composition required 8 pieces.

Place flowers all over the card. Let's stick them on. Let's complement the composition with rhinestones and a bird. Let's liven it up with leaves.
