Title page of the photo album. Hobby or extra income: ideas for creating a photo album with your own hands
Some are ready to take selfies at every turn, others agree to be photographed only in rare cases, but everyone, without exception, cherishes pleasant memories. True, a stack of scattered photographs somewhere in a closet drawer or several folders on a computer can hardly be compared with an original do-it-yourself photo album. It will not be a shame to brag about such a thing either to relatives, or to friends or colleagues. The only question is how to make a photo album so that it not only looks beautiful, but also carries a certain idea.
DIY photo album: design ideas
The success of any idea depends on its implementation. It is best to embody your ideas with the help of already formed styles and techniques. Also, do not forget about such basic things as composition and plot. Especially if it is a gift to the house with your own hands. Let's consider everything in order.
Plot
This element of the implementation of the idea, as a rule, goes ahead. The design of a photo album depends on the plot or theme. Albums dedicated to the family, the birth of a child, weddings, travels and other bright life events can be considered classic. You can also make a photo album as a gift for a loved one or for an anniversary for a colleague. Some options will be discussed in more detail below.
Example "To Myself" Example "Rest"
Composition
Making a photo album with your own hands is not only the selection of photos and jewelry. It is much more important to achieve visual unity. It is best to be guided by the following rules:
- determine the semantic center of the page
- make bright accents
- make sure that photos, inscriptions and decor are in harmony in shades
- balance the proportions
- choose jewelry according to the meaning of the photo
- outline the photo-title-description triangle
Style
Fans of minimalism should pay attention to the style with the speaking name "clean and simple". It involves a minimum of decorations. The minimum amount of decor is also characteristic of the "European" style. Its highlight is the unusual forms of photographs that are cropped in the form of a specific subject. If you like to dive into the past, then the ideal option is "vintage". "Shabby chic" involves the presence of ribbons, lace and scuffs. The “American” style is even more saturated with decor. Before you make a photo album with your own hands, you should look for a style that will present you or your family from the best side.
Technics
Stamping involves the use of various stamp applicators. Decoupage requires the use of drawings, pictures, ornaments. Cropping is based on working directly with photographs. They are cut so that only key elements. Photos supplemented with original descriptions are journaling. Distressing is the aging of paper. You can find at least a hundred more original techniques on the net.

How to make a photo album with your own hands: step by step scrapbooking
Step 1. Selection of material and tools for work
For work you will need:
- scrap paper
- cardboard with a density of 300 g/m²
- adhesive fabric
- cover fabric
- synthetic winterizer
- ribbon
- notebook
- dummy knife
- needle
- pencil
- ruler
Step 2: Album planning
So that the result does not disappoint, you need to clearly understand what you want to get in the end. Even before you make a photo album with your own hands, work on a template. To create a template for a future photo album, you can use a notebook of the appropriate size. In it, you can sketch the name of the pages, draw an approximate location of the photo and decor.
Step 3: Album Binding
We take the prepared cardboard, cut 3 strips 24 cm high and proportionally increasing in width. We fold the sheets in half so that proportionally increasing roots are formed. The dimensions of the roots can be drawn in advance, as indicated in the photo. The result should be a notebook with a spine. All parts are glued along the spine line. The resulting binding can be stitched with a waxed cord, then you get a durable photo album with your own hands. Scrapbooking, a master class for which is not difficult to find, will provide many options for decorating such a cord.
Step 4: Page Design
Using a set of scrap paper, we create an approximate design of the pages. Double-sided tape will help attach additional elements. The resulting backgrounds are glued to the finished binding. They can be supplemented with folding beds or substrates for photos. A variety of elements can be used as an additional decor: cutouts, appliqués, beads, ribbons, etc. It is important that the three-dimensional decor is evenly spaced and does not deform the album sheets. A previously created do-it-yourself photo album template will help to do everything right. Step by step with a photo you can easily bring the work to the desired result.
Step 5. Album Cover
The cover should be made based on the size of the binding. 2 mm bound cardboard will do.
- It is necessary to prepare 2 blanks for covers and a spine from cardboard.
- Next, cut out the appropriate pieces from the one-sided adhesive fabric.
- We place the spine between the blanks of the covers, stepping back 0.3 cm.
- We fasten everything with glue.
- Then we cut off a piece of synthetic winterizer the size of a blank and attach it from above.
- We apply the finished soft blank to the fabric chosen as a decor.
- On the sides, we should leave 2.5 cm of fabric. They are attached to the workpiece using 2-sided tape. Where there is no tape, fix with glue.

Step 6 Assemble the Photo Album
At the last stage, with your own hands, you need to alternately attach double sheets prepared binding. The first sheet is attached directly to the cover. You can proceed to the firmware of the album only after the structure has completely dried. Having opened the album in the middle, we outline the places for the holes. Next, we pierce them with an awl and stitch the album with tape. You can fix the corners with the help of special corners. Also, additional decor of the cover will not be superfluous.
DIY photo album for a newborn

A photo album for a newborn has long ceased to be a rarity, which cannot be said about the originality of its design. But this is exactly the thing that is important to do with the soul. To begin with, it is worth selecting the most characteristic photos that reflect brighter than others important points from the life of a child. The scrapbooking album must include a photo of the first ultrasound, discharge from the hospital, meeting loved ones, first smile, first steps, etc.
As decorations, you can use booties and ribbons, which used to be elements of the baby's clothing. Do not forget to supplement the children's photo album with your own hands with short descriptions of the events depicted in the photo. Over time, you can add drawings of your child to such a photo album, as well as evidence of his victories - diplomas and trophies.
DIY family photo album

One of the variations of such an album can be a family chronicle or a do-it-yourself photo book. In addition to photographs, you can add postcards, newspaper clippings and other memorabilia that are somehow connected with the history of the family. The cover of such a photo album should be supplemented with an inscription symbolizing something important for the whole family. You should not spare the time and effort to make such a photo album with your own hands. The tutorial above will make the process easier.
DIY wedding photo album

A do-it-yourself wedding photo album step by step with a photo is much easier to create than it might seem. The process itself will bring pleasure, and perhaps revive old feelings. The main thing is not to forget that each sheet of the album is a story that conveys the mood that prevailed at the holiday.
Master class video
Finally, here is a video with which the process of creating a photo album with your own hands will become easier:
If you find an error, please highlight a piece of text and click Ctrl+Enter.
1. HOW TO DESIGN AN ALBUM IN THE TECHNIQUE OF SCRAPBOOKING
Scrapbooking is a fascinating technique of original design different materials and drawings of book covers, postcards , family albums, notebooks, photo frames . In a previous publication, we told you about how you can do it yourself beautifully decorate postcards - invitation wedding, New Year's, congratulatory (from March 8, Happy Valentine's day , Happy birthday).
In this article you will find interesting master classes, ideas, tips, step-by-step photo and video tutorials for beginners, with which you can make beautifully designed children's, family, wedding scrapbooking albums at home. . And useful ideas will help you decorate an album for a newborn using scrapbooking in an original way.
To decorate children's and wedding albums you can use not only professional scrap materials with decorations, but also a variety of improvised materials - buttons, badges, accessories, remnants of different fabrics, threads, braid, zippers from old clothes, lace, feathers, small details from children's designers, home-made flowers from ribbons , clippings from newspapers and postcards, small soft toys , hair clips, dried plants and flowers, various fasteners and belt buckles, carved figurines from plastic bottles and other waste materials.
■ Popular scrapbook embellishments (pictured):
■ Shtapping. Rubber and acrylic stamps, popular scrapbooking stamping inks (pictured):
■ Popular scrapbooking tools (pictured):
Scrapbooking wedding album ideas:
For any family wedding - this is a very important and bright event, a serious stage in the relationship loving people. And of course I want to save for the hearth new family these joyful moments, touching minutes of a solemn event, beautifully decorated wedding glasses and dishes on the festive table, chic a wedding cake , loving glances of newlyweds that look irresistible in luxurious wedding dresses . One of the popular ways to do this is to fill a voluminous wedding album. the best photos related to the preparation and holding a wedding.
photo album cover decoration.
wedding album cover can be decorated with kanzashi flowers , the petals of which are made of white satin ribbons (for example, those that decorated the car for the bride and groom). Graceful hearts you can cut out of felt. You can play with the prints of the joined hands of the newlyweds in an original way - place them on the cover, decorate them colorfully, paint the wedding rings with gold paint;
"secrets" between pages.
between some pages of the album, you can place various cute memorable little things, reminiscent of bright wedding moments. For example, a fragment of a pillow from wedding rings, lace, bows and other accessories of the bride , several dried flowers from a wedding bouquet;
thematic design of the pages of the wedding album.
You can divide the pages of the album into sections that are preceded by beautifully designed inserts decorated in the scrapbooking style: in the registry office, the bride and groom next to the wedding procession, wedding bouquets in the hands of friends, dancing newlyweds, guests from the bride and groom, a feast, kisses, a wedding cake, fastening the lock of lovers to the railing of the bridge;
wedding gifts and congratulations.
Dedicate a few pages to photos of gifts from friends, relatives, and guests. Use for the design of these pages of the wedding album scanned texts from greeting cards with wishes and poems;
separate fragments in the photo.
It is interesting to look at photos in good resolution of various details of costumes, wedding accessories, jewelry;
photos of different shooting options.
You can add to the photo album not only staged photos of professional photographers , but also amateur versions of guests, as well as reportage photos;
design of the internal pages of the wedding photo album.
It is desirable to design all pages in the same style. For example, pages made in vintage style or decorated in antique look very beautiful.
How to make a newborn album using scrapbooking technique:
The birth of a baby is a wonderful and very joyful event for the whole family of a newborn baby. And we can start creating and filling a photo album about the life of a little man even before he is born! :)
♦ The base of the photo album cover can be decorated with velvet fabric. We cut out cartoon figures, a sun, a stork from felt and carefully glue it to the cover with a glue gun. Then, in the scrapbooking style, we make out the composition - carefully sew on small soft toys and graceful satin ribbon bows ;
♦ ultrasound images can be placed on the first pages of the newborn album , which capture the first photo of a boy or girl in the mother's tummy;
♦ then you can place a series of photos with the baby's leg, which rests on the inside of the mother's tummy;
♦ men often like to draw on the belly of their beloved pregnant wife different funny faces, big hearts, decorate with bright colors. Why not put pictures of these daddy arts in your newborn photo album? :)
♦ The first photo of a newborn baby.
On several pages, you can place pictures with the baby's first smile, individual photos of tiny fists and legs, weighing the crumbs, and the first feeding. Between these pages, you can place a tag from the baby's handle;
♦ at the exit from the hospital.
Let's dedicate a series of photographs in which the newborn is held by dad, mom, grandparents. Photo with a baby in an envelope , in stroller , in a car seat before leaving home;
♦ newborn photo album sections by month.
For each month of the life of the crumbs, we will allocate a separate section in the album. Here we will post photos with all the achievements of the baby . Since we are creating a scrapbooking album, we decorate separate tab pages with decorative elements and memorable accessories. These can be buttons from the first slip, a strap from sliders, knitted booties, a cap with lace, an imprint of a tiny hand (from polymer clay, for example), a bunch of cut hairs;
♦ On the last day of each month, take a photo of your baby with the same soft toy in the hands. The child in the first years of life grows very intensively and the toy will become smaller and smaller with each subsequent photo :)
How to make a children's album using scrapbooking technique:
We have already made a photo album of a newborn baby. Now we will dedicate one voluminous children's album to each year of the baby's life. . On the cover of each such scrapbooking album, you can place a beautiful stylized figure made of fabric and accessories. Around the figure, you can make a decoration of ruffles and lace with plump angels on the sides.
The pages of a children's scrapbook photo album can be divided by topic:
Our angel is sleeping.
Here we post pictures of a sleeping baby with a favorite soft toy in pens, a crib, accessories above the crib;
our little angel wakes up.
Touching photos with a sleepy face of a baby, how we yawn, dress, smile with a toothless mouth;
Our angel is eating.
Funny pictures with pug crumbs soiled with porridge, with a mug in their handles, in a high chair;
Our angel is walking.
Here is a photo of a baby in overalls, in bright hats, in booties on legs. Here he is in a wheelchair, and here he is sitting on soft grass. You can take a picture of footprints and fingers on the sand, a spatula in the handle;
our little angel is bathing.
Photos of the baby in the bath, washcloths, floating toys, an inflatable swimming ring wrapped in a fluffy towel after bathing;
our angel is playing.
Here we post pictures of a baby playing with a mobile in a crib, with a rattle, with a developing book or rug. Do not forget to design themed pages in the scrapbooking style. For example, to design this section, you can use pictures of toys cut out of packages;
our little angel is crawling.
Photo with the exploits of the crumbs in a fenced area, on a spread out blanket. Do not forget to take pictures of the changes taking place in the child's room;
the first steps of an angel.
Photos in which the baby walks with support, without support, is held by the surrounding furniture so as not to fall to the floor.
2. SCRAPBOOKING FOR BEGINNERS. WE MAKE A CHILDREN'S ALBUM OWN HANDS
How to make a children's mini-photo album with your own hands using stamps, printouts with letters, watercolor supplies:
3. IDEAS AND MASTER CLASSES ON SCRAPBOOKING. LEARNING TO MAKE PHOTO ALBUMS
Master class number 1:
HOW TO MAKE A BEAUTIFUL ALBUM FOR A NEWBORN IN THE STYLE OF SCRAPBOOKING WITH YOUR HANDS. STEP PHOTO.
Master class number 2:
LEARN TO DO.
Master class number 3:
A VERY SIMPLE WAY TO MAKE A SCRAPBOOKING ALBUM AT HOME.
Master class number 4:
Today I will tell you how to make a stylish, soft photo album out of an old unnecessary notebook. This will be a wedding album for me, but you can make an album of absolutely any subject, I think you have a lot of photos at home that are waiting in the wings.
To remake, we need the cover of an old notebook with rings. The covers of such notebooks are very dense, and split rings will allow us to add a large number of scrap pages for photos, perhaps even gradually.


Since I had a dark notebook cover, I wrap it with ordinary office paper so that the dark color does not show through the future cover. It is not necessary to glue the paper tightly, just lightly fix it with an adhesive pencil.

Then, from a thin synthetic winterizer, we cut out a rectangle exactly the size of the cover and fix it with double-sided tape.

From the fabric we like, cut out a rectangle so that there are allowances of about two centimeters from the edge of the cover.


We first fix the upper corners on double-sided tape, bending them at an angle of 45 degrees.

Then we bend and fix the top edge of the cover.


After all the sides of the cover are bent, we fix the folded corners completely with a hot gun (if there is none, then with any universal glue, for example, moment-crystal).

As a result of these simple manipulations, we have such a soft, pleasant to the touch, completely new cover.

On the inside, exactly in the middle, we fix rep tapes on adhesive tape, which will serve as the ties of the album.

Then we sew the cover on the sewing machine along the perimeter with an allowance of 0.5 cm from the edge. Let me explain: sewing machine easily takes even very thick cardboard, without harm to its mechanisms, verified by personal experience.

Here you will have a little difficulty: when you approach the places where the rings are located, they will prevent you from laying a line. To get out of this situation, I turned the cover inside out, sewed a line with a needle without thread, and then sewed the cover in hard-to-reach places with a hand stitch.


Let's move on to decor. We draw a layout of the future element on plain paper and transfer it to design paper.


We sew a decorative element to the bottom edge of the cover also using a sewing machine.

Glue a decorative napkin on top.

With help figured hole punch edges we make paper lace.

We attach a piece of rep ribbon and paper lace to double-sided tape.

Glue a decorative ribbon on top.

First, on photo paper, print out a title that matches the theme of your album. I have this wedding album, you can use any other. And on the machine we attach the title to the cover.

We attach a small metal heart to a waxed cord with a glue gun.

Add a satin bow, plaster flowers and semi-pearls (all these decorative elements are available in specialized stores for scrapbooking).


I also decided to decorate the top of the cover with small white half-beads, repeating the pattern on the fabric.

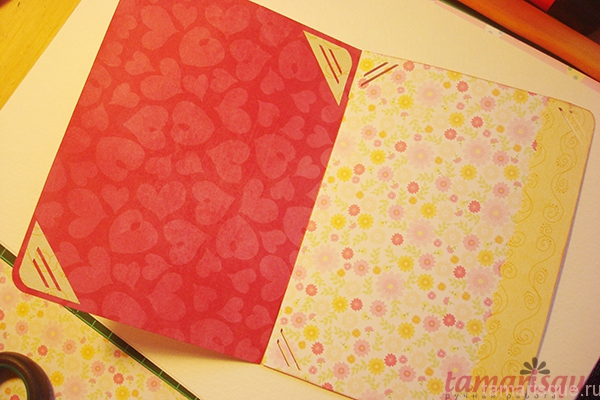
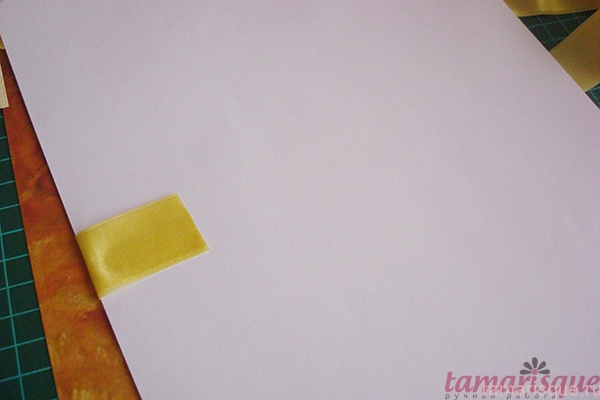
Let's get to the design of the flyers. Attach a printout with text to a rectangle of scrapbooking paper.

Glue strips of double-sided tape right along the edge of the rectangle.

And glue it to a sheet of designer beige paper, the size of one half of the cover. We also cut out a rectangle from white paper with curly scissors and glue it. Glue a piece of cotton lace with a hot gun.

On textured paper, we make holes for the photo.

We attach the rectangle to the flyleaf on a special volumetric double-sided tape.

We decorate the endpaper with a plastic heart and a satin bow.

Let's move on to the second paragraph. We also cut out a rectangle from design paper and decorate it with a strip of scrapbooking paper, cotton lace, paper cutting and a randomly folded satin ribbon.

We complete the decor with a small wooden key.

Glue double-sided tape right along the edge of the endpapers and fix them to the cover.

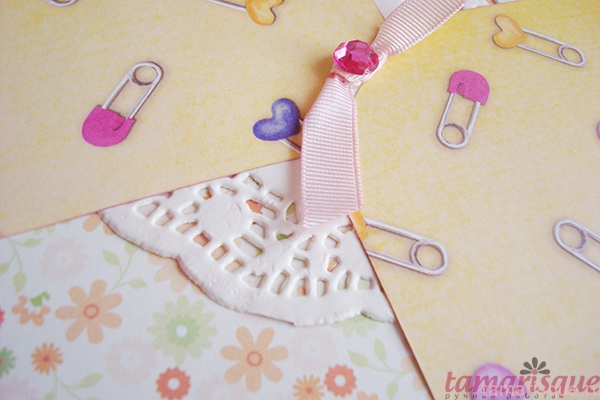
After we have made the cover, it's time to think about the contents of the album. Sheets can be made in the same way as we did endpapers. And some sheets can be done with a secret. To do this, fold the design paper in half and paste sheets with a beautiful lace edge and photo corners into the middle.

This whole secret is tied with a satin ribbon and is also decorated with a printout, stitched on a typewriter and scrapbooking paper.

You can make as many sheets as you like in this way, adding different inscriptions (journaling). Then you need to make holes in the scrap pages with a hole punch and our album is ready.


Well, hands came to prepare a master class on making a photo album from scratch)))
This is always a very inconvenient process, because. you need to have time to take a picture with one hand, and with the other, cut the paper and glue the details at the same time)))
Many operations are done so quickly and almost unconsciously that sometimes you don’t have time to fix such moments)))
Nevertheless, I made this MK! Of course, it is better to watch and repeat everything live, but many do not have the opportunity to attend a live Master class, they have to learn from photographs.
I am ready to answer your questions and help you as much as possible)
1. First, prepare the paper. For the manufacture of photo albums, special scrapbooking paper is used. It does not contain acids that can spoil your photos in the future and its quality is the so-called archival quality, that is, the paper should look perfect for at least 70 years. Many needlewomen manage to print the pattern they like on a color printer, but I recommend not experimenting. Scrapbooking is a fairly new trend in Russia, at most a dozen years old - during this time it is quite possible that the pages printed on the printer on acid-rich paper have survived. But do you hope that the album will be considered by your grandchildren, great-grandchildren and other subsequent generations? What will happen to your photographs in 40 or 70 years? It seems now - it's so long ... And time flies very quickly and you always need to remember about the future)
Also, the albums handmade very expensive and it will be very disappointing if after 20 years the photos are hopelessly damaged, and the paper simply crumbles from antiquity (for ordinary paper of non-archival quality, the shelf life and shelf life is 25 years maximum).
Before starting to create an album, decide on a theme (decide at least for whom the album will be created - for a boy or a girl, a man or a woman, a colleague or close friend) so as not to get a mixture of styles in the end.
Since this album was created for a newborn girl, the paper was chosen accordingly.
The number of sheets is selected individually, according to your idea.
To decide on the range, initially take a little more paper than you need, lay the sheets side by side and choose pairwise combinations that you like best and that look harmonious side by side.
Pair separation is necessary in order to make harmonious album spreads that will not drown out or spoil each other.

2. Preparation of tools and decor. In addition to paper, you will need scissors, double-sided scrapbooking tape (it is made on the basis of special glue), mock-up or stationery knife, hole punches, edges and corners, ribbons, lace, flowers, buttons and other decorative elements that you want to use in the album.

I usually collect everything that I would like to use, and in the process of work I sweep away the unnecessary, choosing only the most necessary parts.

I store buttons and small items (brads, anchors, etc.) in containers, sorted by color. So it is more convenient to select according to the scale.

For tapes, for example, there is such a container in which coils of tapes are stored in compartments. If necessary, pull out as much as you need, cut off and the rest of the tape remains in the container. Very comfortably.

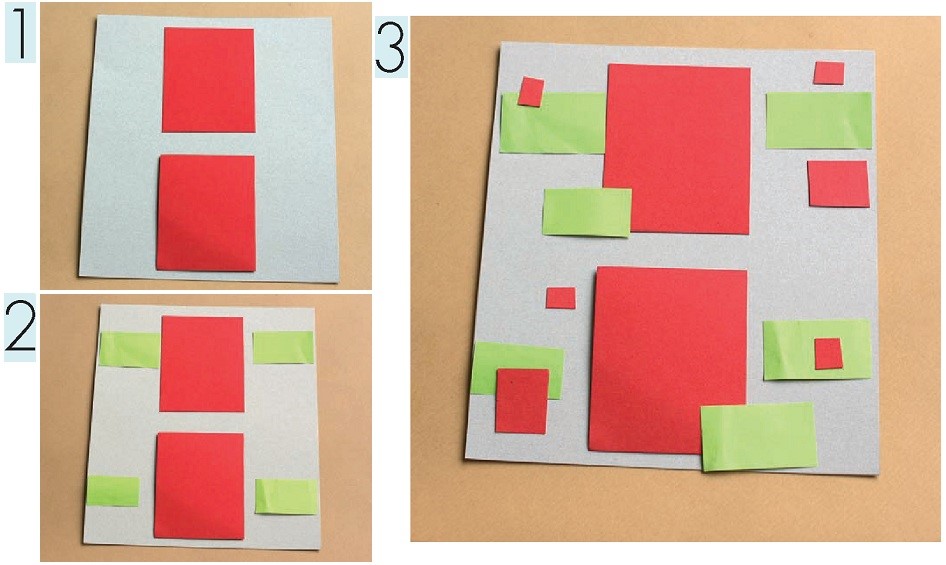
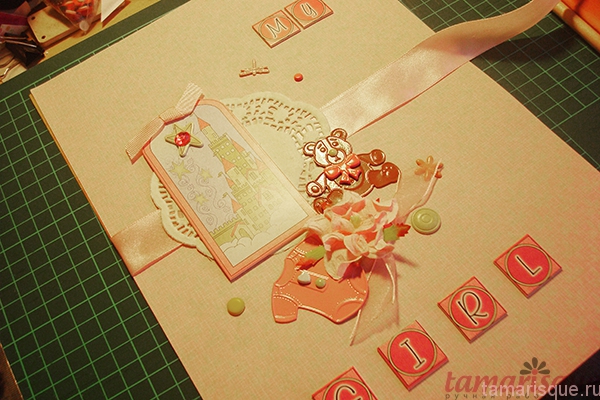
3. Compiling a composition. When I make an album, I lay out the sheets in pairs - the way they will be placed in the album. This is necessary to arrange all the elements harmoniously so that one page does not conflict with another.
We lay out the necessary elements on the pages, look, add something, remove something.
Gradually we begin to attach the decor.

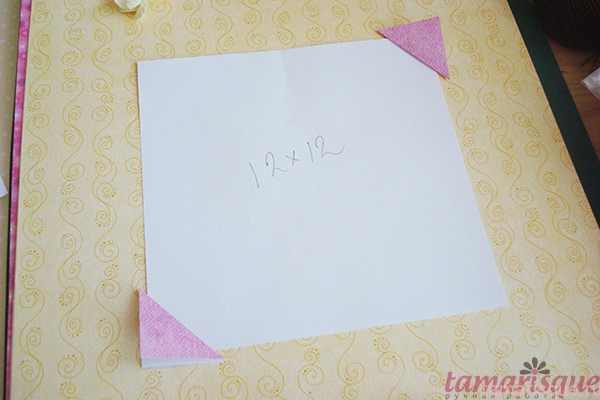
4. Making corners. When I didn’t have a hole puncher for photo corners, I made do with homemade corners. I really like them and still use them often. They are reliable and plump, I like them much more than the corners from the hole punch)))
On the reverse side draw squares on a piece of paper. I take as a basis the width of the metal ruler - the side of the square is 2.5 cm - this is enough.

Cut out, fold diagonally right side out and walk along the edge of the cut with a pad of paint. Again - use special scrapbooking materials in your work, they are developed specifically for archival paper and photographs. This pleasure, of course, is not cheap, but it is spent wisely, and for example, I don’t have crazy expenses for such consumables - everything is even.

Next, apply to the sheet. A little trick - I cut out templates from paper according to the size of photos (12x12, 10x15) and do not measure each time with a ruler - I just put the template where I need it, try on the corners and sew it on.
A few stitches on a typewriter - and your corner is ready!

After sewing, be sure to bring the threads to the wrong side, tie knots and fix with adhesive tape - this is necessary to secure so that everything holds tight.

5. Fixing frames. In this album, I used ready-made frames from the set. They are fastened to the base with small legs and these burr legs need to be cleaned with a regular nail file so as not to spoil the look.
The movements of the nail file must be done in one direction so as not to damage the paper fibers.
The edges of frames made by hand from binding cardboard are also processed.

Next, I had to not just glue the frame, but raise it to a level, add volume. This is solved with the help of voluminous double-sided tape. You can use both squares and a solid tape.
We fix the adhesive tape on 3 sides of the frame, the fourth remains so that you can insert a photo there.


I glued the other frame with wood glue. Many now very widely use hot glue guns and the popular Moment Crystal glue .... Oh... Don't do this when you're working with paper, and in particular with a photo album! You cannot guarantee yourself or your clients that after 5-10 years this glue will not crumble to dust or damage the photos! Remember - you can only work with paper with glue intended for it! Now there is a very large choice, the same thick PVA, or for example, there is a very inexpensive wood glue - it is generally ideal, dries quickly, grabs perfectly and does not spoil the paper!
6. Fixing the decor. Well, as I just wrote above - try to sew on all the decor))) HB threads will not harm the album, and the look will be unique, hand stitching will only add additional attractiveness - you must admit, it's better than hot melt drops, just like it came off the Chinese conveyor belt ?))))

First we sew a leaf, then a branch of sakura.

We fasten the seams on the reverse side.

We pin the brads. Brads is such a thing, like a beautiful bead that has legs. And these legs hold onto the paper from the back.
First, with a thick binding needle, I make a puncture in the right place.

Then I insert both legs of the brads into the puncture.

And on the back side of the legs I move apart in different directions. From above, it is also recommended to close up with tape.

This is roughly how it works.

I glue transparent glass droplets to complete the look. Terrible evening light distorts very much (((

7. Fixing the tape. I put this procedure in a separate paragraph, because you often have to work with ribbons in scrapbooking and the process must be debugged.
The tape must be ironed before use so that there are no creases. Then it will not disappear anywhere and every defect of the tape will be visible to the naked eye .. Alas.
Glue double-sided tape on the back of the tape, remove the protective layer, turn the tape over and attach it evenly to the page. When sticking the tape, make sure that the tape lies perfectly flat, otherwise the tape will fix any bend!


They put a ribbon, smoothed it, wrapped the ends on the wrong side of the page and smoothed it again. This method will help in the future to flash the pages without worrying that the tape will lie wrong. Of course, this method is not mandatory, you can only fix the edges of the tape on the wrong side, it all depends on your idea.

We stick a frame from the set on the tape with adhesive tape and a beautiful inscription on top. The inscriptions can be used ready-made, or you can do it yourself.

Glue drops.

We sew flowers, and this is what happened in the end:

8. Making a photo box. I think it's interesting to consider how to make a mini-box for several photos. It happens that you need to put a lot of pictures on the page - how to do it optimally?
For such purposes, mini-boxes are used, consisting of 3-4 mini-pages fastened together, where you can place photos. When folded, such a box takes up no more space than 1 photo - the savings are obvious!)))
So, we take two sheets of paper measuring 15x10 cm, and on one sheet along the long side we make a valve, about 1-1.5 cm wide. With a hole punch, we cut the corners for the photo on one leaf, which will be the base, and glue the cut corners to the other.
Glue the valve of the top sheet to the wrong side of the base.

To the page of the album, where we plan to attach the box, we attach a ribbon or, as in this case, two waxed cords of different colors. The length should be 3-4 times the width of the box (in our case, if the box is 10 cm wide, we choose the length of the tape 30-40 cm).

We attach our box on top in an open form, base to the album page and sew along the edge on a typewriter (or hand seam). We bring the threads to the wrong side and fasten.

Close the box and tie with cords. All. On the top of the box, you can write something or place another photo. In this example, 3 photos fit, but you can also increase the number of inner pages of the box and just put a few photos inside - the cords are tied, nothing will be lost!

I'll dwell on the details a bit. Sometimes I want to emphasize some elements on the page, for this I use bulky tape and bring the elements to a higher level.

Try and use different materials - here, for example, an ordinary paper napkin was used under a glass - you glue it where necessary, cut off the excess.

A very beautiful decor turned out using a regular picture and lace around the edges.

Tied a bow - sewn on. Very pretty and no frills. By the way, when using ribbons on a page, be sure to process the edges over a candle or a lighter so that the cuts do not crumble when used.

Tracing paper butterflies are very simple shapes, cut out the outline of the butterfly, glue a couple more wings on top and you're done!

9. Cover. Despite the fact that the cover is the very first page of your album, it is better to do it at the very end. It should reflect the general mood of the album and this is best done when you have tormented with the pages, felt them well and can easily create a unique cover!
We select a suitable sheet of paper (do not forget that there will also be a back cover, so everything should be harmonious), attach the tape.
For the cover, it is better to choose stronger and wider ribbons, as they will be constantly pulled - open-close, etc. I fix the tape with adhesive tape, I also strengthen it from the inside.

In parallel, I work with the back cover - there is no special decor, but the ribbon should be at the same level as on the first cover.
I glue the lace paper to the ribbon and attach the decor details. At this stage, you can still twist-twist, remove-add, that is, compose a composition that completely satisfies you. Next, we begin to gradually sew and glue. Somewhere I use double-sided tape, somewhere I sew it, I fix it with brads - I listed all the methods above in detail, nothing has changed, the principle is the same.
10. Connection of pages. Phew. Finally got to the end. One more push, one more try, as they say))))
Here's a little background. I'll tell you first about what materials I use and why.
When we have created the pages of the album, they need to be connected. But not just like that, but put inside, between them, something solid that will keep its shape. Many use incomprehensible cardboard, even corrugated cardboard, as far as I know, from ordinary boxes, glue it all with a thick layer of the moment, rejoice and give it to the client ...
As I wrote above, these are pathetic attempts to reduce the cost of production. Buying (or picking up in the trash) a box is much easier and cheaper than spending money on high-quality bookbinding cardboard and the right paper glue. Is it really beneficial? Let's get a look. The cardboard used in the packaging is made from such waste that you cannot even imagine ... All this waste is ground into flour, filled with glue and sheets of low-quality paper are cast, from which corrugated and other packaging cardboard is then made. I think that even without delving into the details, we can confidently say that such cardboard is not suitable for us, it is clearly not of archival quality and in general there is no quality in it.
Binding cardboard is also not all good. There are very cheap types of such cardboard, which consist of resins and acids, which can directly damage our album, even if these cardboard seals are inside the pages (believe me, a chemical reaction will occur even in this case).
Clay Moment. This is a separate song. Not only will you spoil the album with this terrible substance, you will also inhale until the green devils in your eyes ... After all, the Moment stinks terribly. Do you need it?
I could describe in detail the chemical composition of materials here, but it is very long and tedious, if you are interested, you can find information in tyrnetiks, read, think. Or just trust me as a print production technologist. No wonder I learned wisdom for many years?))))
Well, I rejected all your consumables, and what should I do now? How to be? Where to run?
There is an exit. First, you can buy quality binding board that meets all the requirements of scrapbooking. If you are too lazy to bother, you can use the second option, which I use almost always when making albums.
We will use regular watercolor paper. here the whole trick is that paper acids and resins also greatly interfere with watercolor artists, so paper is made for them that is free from such impurities. That is, ordinary watercolor paper. In terms of density, it is certainly inferior to cardboard, but in practice, albums with such a base are very popular, easy to use, much lighter in weight and lower in cost.
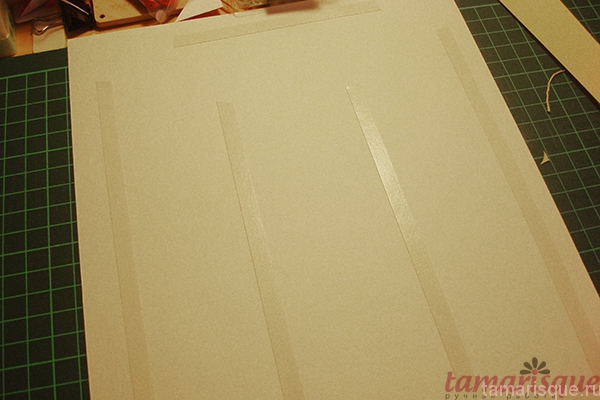
So, since our album sheets were cut into A4 format, we take watercolor paper of the same format. With double-sided tape we go a little along the edges of the sheet and in the middle. Remove the protective layer and carefully place the finished album page on top. It is very important that the edges match. small deviations are acceptable, this can be corrected later, but there should not be obvious shifts.
After we have fixed the page, we turn it over, and on the back of the watercolor sheet we do the same operation - adhesive tape, album page.
Be careful - the pages must match in serial number! Otherwise, you will be confused!
We also glue the pages that fall on the cover to the watercolor sheet, but it is better to two - to make it tighter.
After gluing the pages, you should get such a sandwich:
1. Page (face up)
2. Watercolor paper
3. Page (face down)
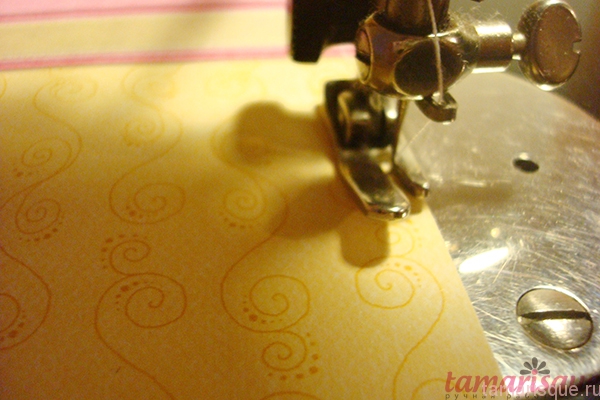
When all the pages are fastened in pairs and watercolor paper is laid between them, we begin to stitch.
We sew on a typewriter, you can use your hands, but for a long time. Do not forget that the pages already have ready-made elements that can be very voluminous, control the process, support it with your hands somewhere, align it somewhere - that is, carefully stitch all the edges.
Of course, you can not sew all the pages, but glue them with the same carpentry glue. But it seems to me that this method is not very convenient - firstly, glue is consumed in huge quantities, secondly, you need to dry each page for a long time and thoroughly (in conditions of our high humidity, this is difficult to do, the paper begins to warp if drying fails), and thirdly , if something is glued incorrectly, you will have to redo the entire page, and sometimes this is simply not possible.
On the typewriter, all edges are fixed, inside it is glued with adhesive tape - this is a “dry” method, you can be sure that the product does not deform from moisture (my clients have been using albums for quite some time, they say everything is fine), and if you made a little mistake when sewing, you can dissolve the seam and stitch again. Well, again - the line adds comfort))
After stitching, you can make holes for fastening. We punch from the side of the spine.
I do this with an ordinary clerical hole punch. For more complex holes (where you need to adjust the distance), of course, it is better to use a professional one.
Be careful - see which side you are punching with a hole punch! It's easy to get confused, but it's almost impossible to fix!

We open the ring, put the pages in order and close the ring.

To complete the rings, you can tie ribbons, lace, put on beads, if the diameter allows - in general, decorate and complete the album with such strokes.
This is roughly how it would work:

I tried to talk about the key points in the creation. Of course, you can show and tell for a very long time, I will be glad to answer your questions)))
If you want to know some points in more detail, write in the comments, I will do separate small master classes specifically for each process.
Time goes by so fast with a baby! Here is yesterday's baby, who could not even hold his head, is already taking his first steps. A children's album will help to leave this in the memory of every member of the family.
The first few months of a child's life are full of different events: the first words, smiles, uncertain steps. Also, situations often occur when a camera is simply necessary. I really want to relive those moments in a few years!
In the first few months, you will be busy with the baby, but when he is 6 months old, you can already take a little time and start making the first photo album. In addition, by this age there are already many photographs.
Children's stores offer a variety of photo albums in various sizes and thicknesses with blank cardboard sheets or sheets with magnetic film, which will make your baby's album unique and unlike any other.
What items can be pasted into a children's album?
. Tags from the hospitalGreeting Cards
Photo ultrasound
Names and Surnames of doctors and midwives
Baby's first hair (cut lock)
Labels from baby's first clothes, fruit puree or mix
1. In the album, you can enter information about the baby's horoscope, as well as a description of the animal in the year of which he was born
2. You can circle the leg and arm of the newborn and paste this sheet into the album
3. Any information that concerns the baby will be interesting - write the date and time of birth, weight and height, the weather on the baby's birthday, etc.
4. Maintain a uniform style for the design of the children's album
5. If you can draw, you can dress each photo into a unique picture
6. If drawing is a problem, borrow drawings from good quality magazines and newspapers.
7. Try to put at least a few portrait shots in the album - they are more expressive
8. It will be interesting if, along with photos of the baby, you paste photos of the first food, first clothes, favorite toys, etc.
9. Try to experiment - place photos not in chronological order, but with the same objects and people. For example, on one of the pages, place a photo of a baby with a grandmother at 1 month, at 6 months and at a year. There, you will clearly see the growth and weight gain of the child.
Poems for the design of the first album of the baby
This album brings togetherFirst (name) days and months:
How he was born, how he grew up
What toys did our baby play with?
Words and smiles - like every hour
Little (name) made us happy.

I am in the hospital, I am not sick:
I was born, I'm happy!
I'm so glad my mom is happy
Do not need anything else.
I don't understand your faces
After all, I was just born.
But I know a delicious color
There is no better color in the world.
This color is the most reliable:
It's the color of Mom's robe!
My first photo
Guess where am I?
Looked once, twice,
I covered my face with my hand.
When I saw you baby
In just one moment, the whole world turned upside down.
You seemed to smile too
Hesitantly, he raised his fists to his lips.
Even if the sprout is very small,
But already dear to me and beloved.
The moment will come soon,
When I can hold you in my arms
And, peering into the screen monitor,
Guessing your contours
I dream, be the same as your dad,
And know that we are waiting for you! Grow!
Poem about mother's belly
Why does mom
Has your belly suddenly grown?
Maybe my mom
Does he eat and drink a lot?
Maybe swallowed
Inflatable ball?
Or just joking
So is she with me?
But this morning
I found out the truth
I have her in my ear
Dad told.
He revealed today
I have a big secret.
I can secrets -
I'm already five years old!
And now I know
What is the belly for?
It's inside mom
My brother lives.
There are probably very
Boring alone.
Let it come out soon
I will be glad to him.
A poem about a tag
(Name) was born and at that moment
They gave him the first document.

Baby was born today
And she is not cuter!
The sun looks out the window
Sending her hello.
May this ray be kind
Shine for years!
The girl will be healthy
And always happy
The daughter has arrived!
Everyone around is touched:
Well, how sweet
What a beauty!
May she bring joy
For loving parents
happy growing up
And the most amazing!
Happy parents!
In honor of an important event
We want immediately, this very hour,
Congratulations on the heiress!
Let it grow for sure
Healthy, wonderful
Beautiful and sociable
Cheers to you, parents!
Eyes shine brightly and a sonorous voice is heard,
The greatest happiness is the birth of a child!
Pretty girl! The only mystery is where?
Or maybe there was such a miracle in cabbage?

We all know it for sure
There is no secret here:
A thousand sons a day
Appears...
The only interesting thing is this:
If we get around the world,
Better than your son
We can't find anyone!
A child is born!
A son was born!
A cheerful and frisky boy was born!
Let centimeters and grams grow quickly,
There is no more joy for dad and mom!
Let the stork rest a little now...
And again someone will bring you!
Your son is still in diapers
But day after day, year after year
Wonderful happy child
Let him grow up without worries.
May life give him happiness
Health, mind and long life,
So that beautiful parents
A wonderful man has grown!
Extract
Our expectations are long
The precious hour has passed.
Sweet voice loud
You made us all happy!
The child lies
I like to lie on my back
Put your foot in your mouth.
Baba, look.
Well, repeat!
I lie on my stomach, I look in all directions,
I won't say a word to you
I can't talk
just puff out your cheeks!
Placed on tummy
gotta keep your head up
I'm tired ... dissatisfied ...
better, just lie down!
Follow the pen
I'm lying in bed
and follow the pen -
whose fingers are
soft like bunnies
I barely understood, my friends,
this is my hand!!!
we sit
I'm already big!
I am sitting!
And like a girl from a fairy tale
I look far
I sat down well
and learning to pose.
Run here quickly
Take pictures of me!"
Look quickly, parents,
Look, grandmother and grandfather;
You haven't seen this yet:
I have learned to sit!
The first steps
Top with the foot, top with the other,
I'm already big
And they walk on their own
Legs straight to mom.
About legs
What are the legs? What are the legs?
You, our baby!
Neither dog nor cat
We will not give your legs.
These legs, these legs
Will run on the track
The first steps
Our girl is gone!
The room became small
Workouts every hour
Our legs are getting stronger!
I don't go yet.
I lying. Also, I'm sitting.
And I can also stand.
And one day, I'll run.
I can exercise.
If you hold your hand
I go step by step.
I'm big already - that's it!

Learning to walk
Top with the foot, top with the other,
I'm already big
And they walk on their own
Legs straight to mom!
And these are my first steps.
In a huge interesting world
Parents call that world "apartment"
I'll run, try, catch up!
I crawled to the kitchen.
I want to play here.
I ask you not to
Close all cabinets.
There are so many interesting things:
Pots, lids, bowls.
Well let's play
A little bit of your Dasha.
Leg, arm, leg again
How difficult is it to control the body
But you won't turn back time
Look mom, I'm growing
And now I'm already crawling!
I don't sit still
Even though I'm not going yet!
If something is far away
It's not easy to reach
I get on my knees
And I'm crawling towards it!
August 13, 2010, 15:26
The kid eats
Porridge boiled on the stove
Where is our big spoon?
I chew everything at home,
Everything that is even unfamiliar
Everything that is tasty and tasteless -
As long as I don't feel sad.
From an egg, like from a diaper
Little chicken came out
Here's how he look!
Feed semolina!
One - chamomile, two - chamomile!
Mom's cup is all in flowers.
And a flower on the teapot
Oh, and our delicious tea.
What's for breakfast? Porridge again!
Oh, does not love her (Name).
Fill your mouth full
And everything does not go to the stomach.
What to do? How to be?
You can't live without it:
Agility, gives strength.
So, go to your mouth!
This spoon is for my strength
This one to be beautiful
This one to be smart...
What else can I not forget?
A spoon so that it doesn't hurt
To be able to do everything.
Like I said everything.
Yes, and there was not enough porridge.
If you take it with a spoon,
She ate everything, you could say.
I eat lunch myself.
I open my mouth - and AM!
For strength to be
Soup was cooked for me.
What's for lunch today? -
Milk soup, scrambled eggs.
How big is Nikita: himself
Holds a spoon: YUM-YUM-YUM!
Chocolate smeared
Round cheeks.
And it's so delicious to kiss them
Beloved daughter!!!
Chocolate, chocolate -
I'm extremely happy for you!
Until mommy sees
Eat 5 slices in a row!!!
Our beloved toddler
Tried watermelon today
Ears, nose and cheeks
All in watermelon juice
If the day is too hot
There is ice cream in the park.
Here is a glass, here is a horn.
Take your pick, my friend!
What is juice?
Wu! And it's delicious!
Let's knock over the cup!
I won't be sad!
The cup fell to the floor.
Don't be angry mommy.
You can't scold me
I'm your paw!
The cook in the cap walks
With a cook in hand
He cooks dinner for us
Porridge, cabbage soup and vinaigrette.
Here's our watermelon -
Great tasting!
Even the nose and cheeks
All in watermelon juice...
As if smeared with honey
round cheeks
And it's so delicious to kiss them
Beloved daughter!
If you were found in a cabbage,
You have no reason to be sad
Because then you
Food provided.
You have grown up son
try carrot juice
try try don't be shy
get some vitamins!!!
In a barn where there is no light
I bravely entered!
Crow from the yard
drove away bravely!..
But suddenly I dreamed at night
what am I
completely alone.
And I cried.
So I got scared.
I am cheerful and glad.
These guests drink tea
eat marmalade.
But they don't give me marmalade...
I don't want to cry, but I have to!

Tired of being a kid.
Rattles rattle idle,
They play with me like a toy.
Kiss, pinch and tickle
I lie angry, and everyone laughs.
What attacks and manners
You need to have nerves of steel.
I don't want to endure anymore
Well, everyone, hold on, I'm screaming:
A-a-a-a-a-a-a-a-a-a…………
I was seriously offended
Tears run down the cheeks.
Will I use them all up?
What will I pay then?
Your first laugh, wow!
Faster video and photo!
Well .. late, as always -
Already sobs to hiccups.
"Amazing Child"
Everyone is talking about me.
Because I'm from the cradle
I smile at everyone.
I am a laugher, I am a merry fellow.
Everything in this life is good for me.
I open my mouth wider
I live without hassle and worries.
And today I just
Smiled for the hundredth time
fidget baby,
bright head,
pours, sings,
Just like a nightingale!
It doesn't matter that there is no skill,
A lot of joy from singing!
I sat and mourned
Mom turned on the music
Immediately hands, head
They started dancing with me!
Everyone is rolling with laughter!
Sleigh from the hill, skis from the hill,
I climb up the mountain - closer to the sun!
And without skis, and without sleds
I'll go down the hill as quickly as possible.
Funny! Funny!
I keep my balance.
And below did not resist,
He hit his head in a snowdrift.
One leg, two legs
From a snowdrift, like horns.
Here's the fun! Here's the fun!
Everyone collapses with laughter.
Such a beauty in winter!
I don't want to go home.
Fun, laughter and crowding
On an icy hill.
Mittens got wet for a long time,
But we don't freeze.
And we are in the snow
And we are in the snow
And we play snowballs!
We sit on sleds
And we quickly rush down the hill.
Snow, snow, white snow -
We run the fastest!
We'll go for a walk now
But let's not freeze.
To make us warmer
Let's wrap ourselves in a blanket!
The ribbon is bright!
The blanket is hot!
Only eyes and nose!
To walk! To the frost!
When I walk down the street with my mother,
I hold my mother tightly by the hand.
Why should she go and be afraid,
What could she be missing?
Don't let your parents get angry
That the builders will be smeared
Because the one who builds
That one is worth something!
And no matter what for now
This sand house!
And we went to the beach.
And I swam in the river.
And I ran across the sand
And don't be afraid of the sun!
swings fly up,
I hold on tight there.
Rock it dad
Up to heaven.
football player
I hit the ball with a run,
The ball lies, and I fly.
Not counted goal - in goal
Only bots turned out
Oh, the days are good
I buy from the heart!!!
I splash in the water
And try to pull it off!!!
Summer, summer is upon us!
It became dry and warm.
Straight down the track
They walk barefoot.
Noise and din on the site
Cheerful ramble!
And what's not here...
Motorcycle, bike!
Get on the rollers, ride!
Go play badminton.
Whatever you want to do.
You can do everything! But don't get bored!

The gentle sun shines from above,
Illuminates the ground, grasses and flowers.
And our sun peeped into the yard on time
And gilded the sand in the yard.
The little girl went out for a walk:
Like a lot of sand, you can play!
Curly curls and blush cheeks,
There is an embroidered flower on an elegant dress.
Golden curls, golden sand,
Golden sun, golden day!
