1c retail tax system UTII.
Dedicated to the “1C: Retail 2.1” configuration for the “1C: Enterprise 8” platform, I talked about how to enter basic information about the organization into the database. Today I will tell you how to enter information about stores into the system. In order to add information about a store to the program, you need to clearly formulate its structure for yourself.
So, what do we need to know about the store in order to enter data about it into “Retail”?
First of all, we need information about the organizations that will be added to the database. After all, it often happens that one large enterprise consists of several smaller organizations, and in some cases, along with legal entities, individual entrepreneurs can also participate in it. Information about all organizations whose work will need to be recorded in the 1C: Retail configuration must be entered into the database in exactly the same way as in the example discussed in the previous article.
Now you can start adding stores. To do this, go to the section “Regulatory reference Information" and click the "Stores" link.
Then in the window that opens, click the “Create” button.

In the first window of the store creation assistant, the first thing you need to do is specify its name and information about warehouses.

A store can have several warehouses, but one warehouse can belong to only one legal entity or individual entrepreneur.
In total, 1C:Retail supports three types of warehouses. The main ones are warehouse space and a sales area. There are also distribution warehouses from which goods are delivered to retail outlets. But in Retail they are used only if it is running a different configuration. For example, “1C: Trade Management”. It is impossible to create a warehouse of this type directly here, so we are mainly interested in the first two types of warehouses.
A warehouse is a warehouse in which goods are stored. Sales, with the exception of wholesale, are not carried out from it.
Trading floors also belong to warehouses, since they also contain goods that are subject to accounting, but from here the goods can be sold at retail. Accordingly, if a store uses only one warehouse, then it will definitely be trading floor.
If you activate the “Several warehouses” option, the system will allow you to specify warehouses for the receipt and shipment of goods.

After you fill out information about a warehouse or several warehouses, you will need to select the organization on behalf of which sales will be made by default. Then you need to indicate for which actions you want to use the order scheme.
The order scheme involves the preparation of documents on the basis of which the acceptance, shipment, movement and write-off of goods will be carried out. It makes sense to use it if different people deal with goods and documents. Otherwise, transactions with goods will be carried out without generating additional documents.
However, when transferring goods between stores, the order scheme is used in mandatory, And using standard methods This setting cannot be changed.
The next step is to specify the pricing rule responsible for pricing. We will look at this topic in detail in one of the following articles, but for now we’ll just go to the wizard for creating such a rule by clicking on the button with the ellipsis symbol.

In the window that opens, click the “Create” button.

Next, write a name for the new rule, after which you need to specify the type of prices for it. The directory of price types is still empty, so let's immediately create the first one. To do this, you need to click on the button with the ellipsis in the same way, and on the next screen, click on the “Create” button.

In the window for creating a price type, indicate its name, identifier for formulas (by default it coincides with the name), and also put a mark that the price includes VAT and this type used for sale.

We leave the rest of the settings as they are for now. We will look at them in an article on pricing. In the meantime, click “Record and close” and select the newly created price type.
Please note that if we have included VAT in the new kind prices, then in the window for creating a pricing rule there should also be a corresponding checkbox. Otherwise, you simply will not be able to apply price types with VAT here, because they will not be shown in the list and you will not be able to add them manually either.

Click “Record and close” again, and then select for our store the newly created pricing rule with the price type already assigned to it. Then click the “Next” button and move on to the next step.

On the next screen, you can enter store details such as addresses and phone numbers. In addition, you can set a couple of additional settings here. For example, view minimum prices sales.
The minimum selling price type is used if you have various discounts applied in your store. This setting allows you to set a lower limit below which the price cannot fall under any circumstances.
Here you can set the rounding of prices in favor of the buyer and its size.
None of the settings available in this step are required.

At the final stage, click the “Create” button, and if the corresponding window is checked, the form of the newly created store will open.

By specifying the new name of the warehouse at the first step of the assistant, we thereby gave the program an order to create such a warehouse. Let's go to the "Regulatory and Reference Information" section and click on the "Warehouses" link.

In the window that opens, double-click on the name of the new warehouse to see its properties.

As you can see, there is already a mark here by default indicating that the warehouse is a sales area. If necessary, we can also indicate that a single tax on imputed income is applied to this warehouse. To do this, you need to click on the link “Applications of UTII” and indicate from what moment it is valid.

Now you need to enter information about the store's cash registers into the database. Although a store may include several organizations, each individual cash register can belong to only one of them.
There are two types of cash registers: operational cash register and cash register cash register.
The operating cash desk is the main cash desk of the organization, where all revenue flows, where salaries are paid, refunds and other similar operations are carried out.
The cash register registers sales, accepting money and preparing reporting documents for customers.
At the same time, the operating cash desk is also capable of performing the functions of a cash register cash register, as is often the case in small retail outlets.

Let's create one cash register for our new store for now. This can be done both from the “Regulatory and reference information” section, and through the page of the store itself.

For the cash register, you need to specify the store and organization, after which the program itself will suggest a name, which, however, can be changed.

That's all. Basic store settings are stored in the database.
One of the important stages of the initial configuration setup of 1C:Retail for the 1C:Enterprise 8 platform is entering information about an organization or several organizations into the database, if required and if we're talking about not about basic version, in which you can maintain information only for one company or individual entrepreneur.
In this article I will talk about how this is done.
It often happens that one trade Organization consists of several companies or individual entrepreneurs, which makes it necessary to enter data for each organization. If you need to manage more than one legal entity or entrepreneur in the configuration, you will first need to go to the “Organizations and Finance” subsection of the “Administration” section and activate the “Multiple organizations” option.
If at the same time you plan to move any goods between them, then you should immediately check the box next to the “Transfer of goods between organizations” item.
All reference data, from the details of organizations to the list of goods, are available in the “Regulatory and reference information” section. In order to add a new legal entity or individual, you must enter the “Organizations” section and add a new organization to the database.

Now let's fill in the basic information. First of all, we need to indicate whether our organization is a legal entity or an individual entrepreneur. The set of details available for filling out depends on this choice.

Then you need to indicate the working, abbreviated and full official name of the organization. The working name is used only internally to identify the organization and will not be shown to anyone other than users, while the abbreviated and full names may be used on printed forms.
Here you can set a prefix for documents. This is a code of one or two characters that is added to the document number in the database. If you maintain several organizations in your configuration, the prefix allows you to determine at a glance which of them each document belongs to.
Now let’s choose a method for accounting for goods in retail. Usually it is maintained at purchase prices, but it can also be maintained at retail prices.

Next, fill in the details and go to the “Responsible Persons” tab. Here you can enter information about employees who have the right to sign documents. The list of these employees is specified in the “Individuals” directory, which does not yet contain entries.
At this stage responsible persons It's too early to enter. I'll tell you why a little later. For now I’ll just show you how it’s done.
To proceed to filling out the list, you need to click on the ellipsis symbol at the end of the line in which the employee’s last name, first name and patronymic should be indicated.

An empty list will open in front of us for now. Click “Create” to add a new individual.

Everything else is simple. We enter the necessary information, paying attention to the opportunity to indicate that this person is an employee. At first glance, this option may seem unnecessary. Why include people who do not work in the organization in the database of your enterprise? But in reality, sometimes it is really necessary.
A simple example of when this may be needed is when entering a database of discount card holders. 1C:Retail can track the volume of purchases made by such customers. This allows, for example, to provide them with additional bonuses after making purchases over a certain amount. But this is a topic for another discussion.

But it’s too early to put this mark. Otherwise, you will have to indicate which store the employee works in, and we haven’t gotten to the point of creating stores yet. That is why I said that it is too early to name responsible persons. But first add them to the list as individuals, without indicating that they are employees, is possible already at this stage. And when the stores are already entered and configured, it will be possible to reflect the corresponding changes in the settings.
In principle, we could jump into the store creation process directly from this screen in exactly the same way that we started maintaining a list of individuals. But setting up a store is a separate topic that I don't want to touch on until we're done looking at creating a new organization.
I would also like to add that for the 1C: Retail configuration, adding responsible persons is not at all mandatory for work. If you don't assign them, they simply won't be added to printed forms, that's all.
Now you need to specify the address of the organization. Go to the “Addresses, phone numbers” tab and click on the ellipsis symbol in the line “ Legal address", as we did in the section with responsible persons.

The address form can be filled out manually, but it is better to do this using an address classifier. To access it, you need to click the “All actions” button in the lower right corner of the form and select the “Load classifier” action.

There are two ways to install a classifier.
The first one is the simplest. It only requires an Internet connection and your 1C credentials. In this case, the program will install the classifier directly from the Internet.
The second method involves pre-loading the classifier onto a computer and then installing it in the 1C configuration. This method will help if the computer on which the 1C:Enterprise platform is installed does not have access to the Internet, the Internet connection speed at this workplace is very low, or there are traffic restrictions.
How to install a simplified taxation system in 1C is described in detail in the user manual, which is attached to the product at the time of purchase. With the help of this program, it is possible to organize the work of accountants and financiers in the enterprise as efficiently as possible.
The range of functions of the 1C: Enterprise program includes the following capabilities:
Maintaining reports;
Control of income and expenses;
Regulation of conditions for accepting expenses.
Setting up 1C components: Retail
For the program to function correctly on the device, the central PC must meet the service requirements. 1C 8 contains simplified functionality, which allows it to be installed on all common OS, be it Android, iOS or Windows.
After checking the equipment, you need to take time to find errors that prevent the service from working. It is logical to assume that if there are any on the PC, some glitches will appear in 1C: Retail after installation, which will contribute to incorrect functioning.
After installation comes product configuration. Despite the fact that the developers have taken care of simple default settings, you will need to enter company data, and also select 1C operating functions in accordance with the intended operating plans.
Distinctive qualities of this system:
Thanks to its simplification, the program allows you to quickly adapt to the operating principle;
Setting up the system when you turn it on for the first time does not take much time;
This version of 1C is great for tracking the payment of income taxes.
At correct setting You can set up automatic sending of the declaration to the Federal Tax Service.
Install a simplified taxation system in 1C
Before you start working with the database for any taxation system, you need to set up the organization's accounting policy. In the 1C: Accounting 8 program, this information is stored in the information register " Accounting policy organizations." You can open the register using the menu command “Enterprise” - “Accounting Policy” - “Accounting Policy of Organizations”.
In the document in the field:
“Organization” - the main organization is entered by default;
“Applicable from” - the date from which this accounting policy is applied;
“Taxation system” - set the value to “Simplified”.
In this case, the simplified tax system tab will appear on the form, on which all the accounting features for “simplified” are configured.
Goods are assets that an enterprise acquires and then sells wholesale or retail. Let’s look at how goods are sold in 1C Accounting 8 edition 2.0 from enterprises using a simplified taxation system (income minus expenses).
For enterprises using a simplified taxation system, the recognition of expenses for purchased goods has its own characteristics. In accordance with clause 2 of Article 346.17 of the Tax Code, goods are included in expenses if three conditions are met:
1. The goods were received at the buyer's warehouse.
2. Payment has been made to the supplier of goods
3. The purchased goods were sold
Payment goods sold it does not matter to the buyer.
Accounting 8
The sale of goods in 1C Accounting 8 at retail is carried out using the document “Report on retail sales" This document is located on the “Sale” tab.
When generating a document, you need to select its type: Cash register – when goods are sold through an automated outlet or NTT - when goods are sold through a non-automated retail outlet.
In our example, the sale of goods in 1C will be carried out using a cash register. In the document you need to indicate the warehouse from which the goods are sold and fill in their name, quantity and price in the tabular section.
Postings are generated according to the document

Please note that the entry for the receipt of money in the cash register is generated by the retail sales report, but this document does not generate a cash book entry, since the cash book is generated only on the basis of incoming and outgoing cash orders.
Therefore, you need to additionally make a cash receipt order with the type of operation retail revenue. This can be done on the basis of the “Retail Sales Report” document. A cash receipt order will not generate a posting, since it has already been generated, but based on it, this transaction will be reflected in the cash book.
If your company sells goods through a non-automated retail outlet, the entry for the receipt of money in the cash register will be generated by a cash receipt order, and not a retail sales report. To do this, check the manual point of sale checkbox in the document.

The first step in setting up the 1C: Retail 2.2 program will be to create Organizations. To do this, go to point Regulatory Reference Information (RNI), in the navigation panel select Organization details.
In the window that opens, select Entity or Individual entrepreneur. After this, fill in the appropriate details: Name in the program, Abbreviated name, Full name, TIN and others. 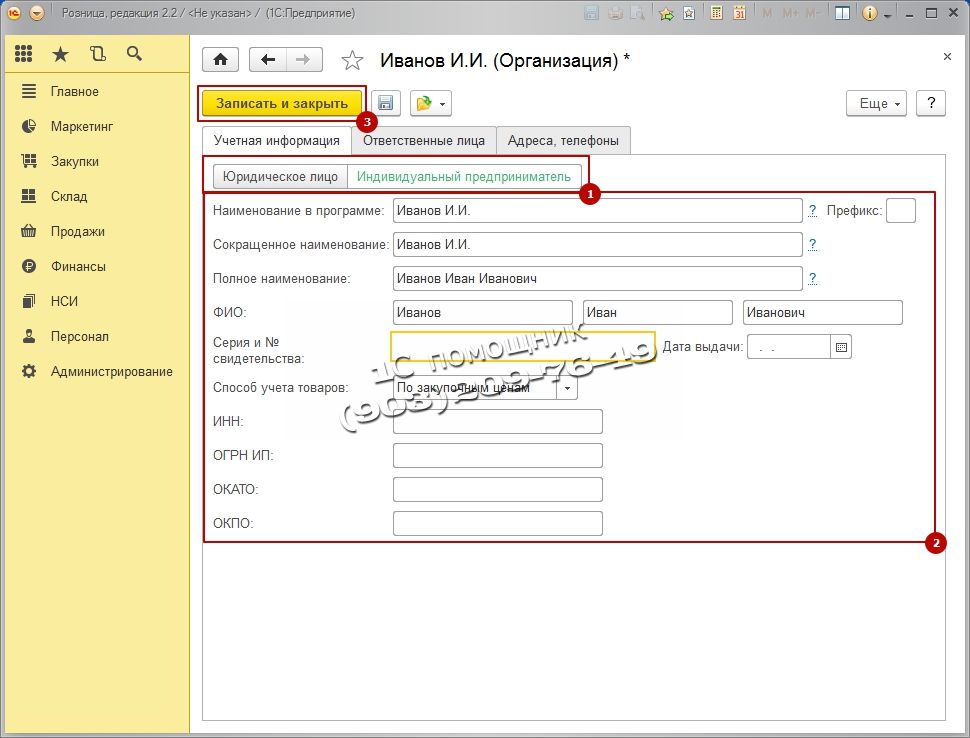
The next step is to create Types of prices. Go to the section Marketing, in the navigation panel select Types of prices and press the key Create.
We will need to create two types of prices: Purchasing And Retail.
First let's create Purchasing To do this, fill in the window that opens: Name, Method of setting the price and Data layout scheme. Purchasing the price will be filled in from the goods receipt document. 
After adding Purchase price need to be added Retail price, that is, the price at which we will sell. Fill in new price: Name, Use when selling, Method of setting price and Calculation rules. In this case, we will receive an automatic price calculation, that is, Product Receipt Price + 50% markup = Retail Price. In the future, you can change the price manually. 
The next step is to create Pricing Rules, come in Marketing Pricing Rules and press Create.
In the window that opens, fill in Name And Type of prices.
Program 1C: Retail requires creation to work Store who will release the goods. Let's go to Regulatory Reference Information (RNI), in the navigation panel select The shops and press Create. 
In the window that opens, fill in the basic details: Name, In the shop here you need to choose either to work with one warehouse or with several, Warehouse name, Sales organization this is the organization with which sales will be made, Pricing Rule, Type of minimum selling prices this is the same purchase price, it will be impossible to sell below this price, so as not to work at a loss, The procedure for rounding the check amount This item will allow you to round up the amount of the check, so as not to bother with pennies, if you think that you will already have equal prices and this is not required, then you are mistaken, because when you apply discounts, pennies will still appear in the item Rounding type choose Round the total This item will allow you to lose less money on rounding. After filling in all the details, click the button Save and close.
RMK (Cashier Workplace) cannot function without a Fiscal Registrar, so the next step is to add fiscal registrar into the system. In our case we will add emulation of a fiscal registrar. Go to the section Administration, select in the navigation menu Connected equipment.
Next, check the box Use connected equipment and go to Connected equipment.
The equipment list is empty, add new equipment. Press the key Create.
Fill out the form that opens: Type of equipment select Fiscal registrars, Hardware Driver select 1C: Fiscal registrar (emulator), check the box Device in use, click on Record button an object and go to Tune…
If the device driver is not installed on the computer, click: Functions and choose Install the driver. If the driver is installed, then setting the check parameters will appear. They can be changed at your discretion or left as default. 
The next step is to configure KKM cash registers
which will punch receipts in your Store. Go to the section Regulatory reference information (RNI), KKM cash registers and press Create.
Fill in the main points. Cash register type, Store, Name, Workplace, Connected equipment The Fiscal Registrar that we created earlier should appear in the field. Then presses Record and close.
Now we need to add rights to our user to use all the functions of the RMK. This point is very important. Let's go to Administration, Users and Rights and choose Additional user rights.  First, let's give the user all rights. Click on Button with green checkmark and press Write it down. All necessary rights will be given to the user.
Next, we need to receive the goods into the warehouse; for this we need to create a document Receipt of goods. We take the data to fill out from the supplier’s invoice. Let's go Procurement, select the item Receipts of goods.

A list of all documents will appear Receipts of goods previously created in order to create new document press Create.
We will not consider in detail how the Goods Receipts document is created; this can be found in the article
To sell goods, we must have installed Retail prices for goods. To do this, after creating and filling out the Goods Receipts document, select Create based on next we choose Setting item prices.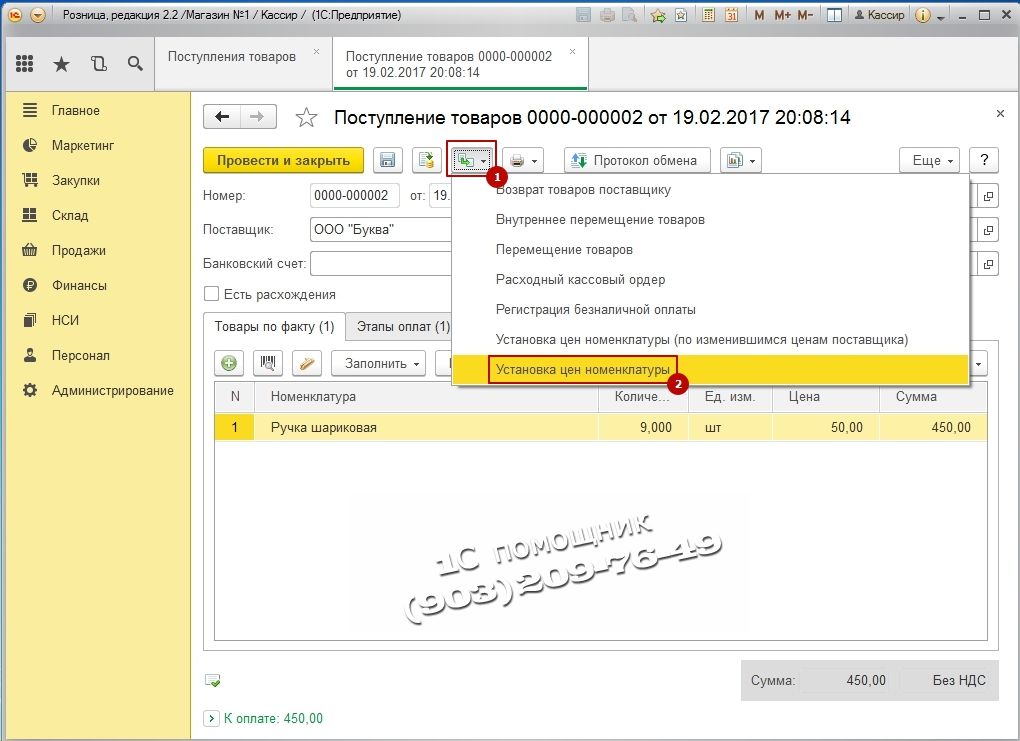
The document will open. This document forms the Purchase and Retail prices. The program itself calculates the price based on the formula we set earlier. Purchasing equal to the receipt price of 50 rubles, and Retail equal Purchasing +50% markup amounted to 75 rubles. You can change the calculated prices manually; to do this, you need to double-click in the price field and then enter your price. To save the document, click Swipe and close.
So we have made the basic settings of the RMK, now we go directly to the Cashier’s Workplace. To do this, go to the section Sales and choose RMK (controlled mode).
The RMK panel opens, initially we need to Open shift, click Opening Shift, and then press Sales registration.
In the window that opens, click the button Menu(F10) When you click on it, the bottom menu will appear, then press the button Search (F11) to select a product from the list. 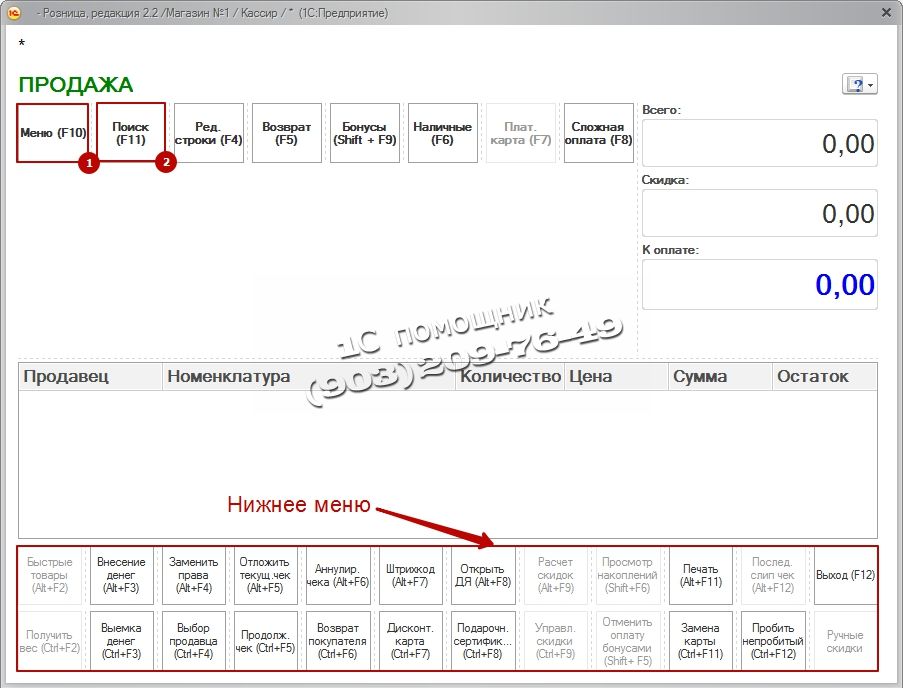
In the window that opens Search and selection of goods in RMK turn on the display additional information at prices and balances. To do this, click the button below Show Information.
In the next window, select two checkboxes Show: Remainings and Prices. The current stock balances and retail price will appear at the bottom of the selection. 
Select the product with two mouse clicks and close the product selection window. In the RMK window, enter quantity of goods sold press the button Cash (F6) to make a sale, enter the amount of money deposited, the program will calculate the change and press the button Enter.

Your sales receipt will appear at the bottom right. If you are not using an Emulator, but a real fiscal registrar, then your fiscal registrar will print a Receipt.
After you have worked a working day, you need to close the shift. To do this, exit the RMK by pressing the key Exit(F12). The RMK launch window will open. Now we need to close the cash register shift. Press the button Closing a shift.
The program will ask for confirmation of closing the shift. If you are ready to close the shift, click Yes.
If everything is in order and the sales amounts for the day coincide with sales, press the button Closing a shift.
The cash register is closed. The program will display an information window about cash register shift. If you are using a real fiscal recorder (not an emulator), it will print you Z-REPORT. 
