First Internet connection on Windows 7. Direct wired connection
On a computer, after each reinstallation of OS Windows 7, you have to reinstall all programs, drivers and connect peripherals. But in the century unlimited internet, man cannot imagine his existence without it. Therefore, the problem of connecting the world network after reinstallation operating system, is always up to date.
Internet connection through routers
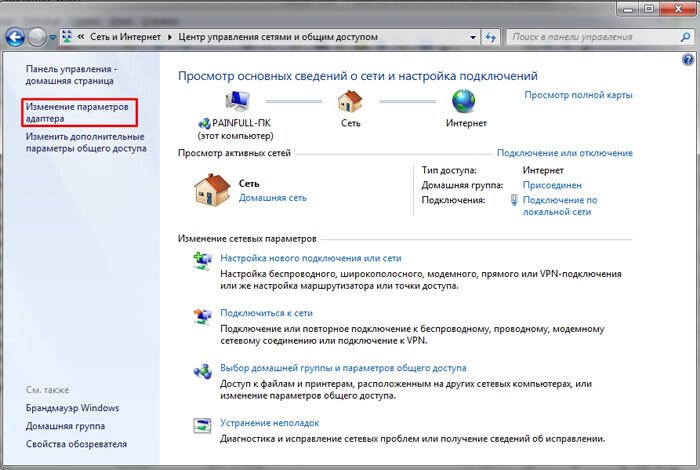
Owners of routers (routers) are more fortunate, since all settings are stored directly on a separate device, so reinstallation is not scary, and you just need to make sure correct setting network between PC and router. On Windows 7, this can be checked in the Network and Sharing Center ( Start - Control Panel - Network and Internet - Network and Sharing Center). Next, in the left menu, click on the link "Change adapter settings"
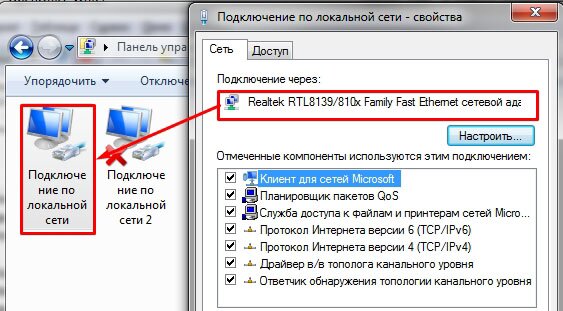
and check that the item "connection by local network”, for the main network adapter:
You can check the name of the main network card in the device manager. The easiest way to find it is to hold down the key combination WIN + Pause (the combination is supported in all versions of the OS, including Windows 7, Windows 8 and Windows 8.1).


and in the device tree you need to find the sub-item "Network adapters". Here you will see a list of all network cards (including virtual ones) installed in the computer.

Another question is when there is not a single network card here, but there are unknown devices - install drivers for your network equipment.
If this does not help, check that you are setting the appropriate software. In the worst case, the network card is not working and needs to be replaced.
When a network connection with the router is established, the Internet connection will be activated automatically.
Direct Internet connection using Windows 7 as an example
If you don't look at what is now most of providers provides Internet services without using a login and password (using MAC address binding and just inserting a cable into a PC), let's take a closer look at how to configure and connect a computer to the Internet using a login and password (PPPoE protocol).
First you need to check how the network card works (checking the network connection). Next, go to: "Start - Control Panel - Network and Sharing Center".
Here we select the item according to the picture:


In the next step, select "High-speed (with PPPoE)":

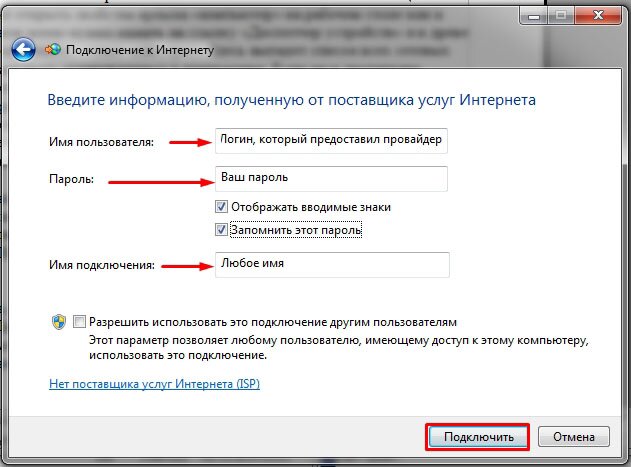
After selecting the type of connection, a window will appear with the fields that you need to fill in accordingly and click the "Connect" button:
After filling in all the fields, the computer will attempt to connect using the data entered earlier:

If no mistakes were made at the setup stage, it will be possible to connect a computer with Windows 7 to the global network immediately. If, after all the steps, the Internet does not work, you need to delete the created connection and repeat the process again.
Another way to set up a direct connection on Windows 7
Some providers for load balancing between servers work using another parameter called "Service Name". It improves the stability of the connection, but adds to the hassle for ordinary users.
Almost every user sooner or later wonders how to enable automatic connection to internet Windows 7.
This manual is intended to answer all possible questions related to this topic. We hope you find it useful.
All actions, examples and screenshots in this material are relevant for Windows 7, as it remains the most popular today. But most of the operations, with minor amendments, apply to Windows 8 and 10.
Why start the Internet automatically
This setting greatly simplifies the process of using a PC. Do not waste precious time on unnecessary actions. Plus, situations are not uncommon when a person can miss important messages or letters for a rather annoying reason - he forgot about the Internet when turning on the computer.
Of course, installing a router will solve all these problems. The advantages of such a solution are also the fact that after this not only desktop devices, but other mobile gadgets will be combined into single network. All logins, passwords and other information are recorded in the memory of the router itself. In this case, even when changing the PC, most often there is no need to change anything.
Creation methods
There are many installation options. Still, the seventh and subsequent versions of the OS have a lot of different settings that allow you to adapt them to the most popular requirements.
Which way to stop, of course, everyone decides for himself. The user proceeds from his requests and capabilities. Also, a lot depends on the version of the update and the installed software. These factors can also influence the choice of option. But in any case, any of the following methods will work for you.
Video: Setting up automatic connection
Using network connections
Before starting all the actions, check that your names are written in Latin letters. In any case, it is undesirable to use Cyrillic in everything related to network settings. It’s better to fix and rename everything right away than to wonder why something doesn’t work the way it should.
To check, open the Network and Sharing Center. Next - "Change adapter settings". To rename the desired connection, double-click on it, but with some interval.

All actions assume that you have already created a working connection.
If not yet, then the following steps will come in handy:

File extension .bat
It is quite easy and quick to set everything up using a special bat-file placed in the "Startup", which will perform all the actions for automatic connection.
For this:

Write the name of your file in any Latin letters without spaces and change its extension to ".bat". You should end up with something like "internet_autostart.bat".
If you cannot change the extension, then follow these steps:

Please note that if you search for this folder manually, then some of your names may be translated into Russian and, accordingly, look a little different.
This is where you need to move your bat file. Be sure to reboot and check if this method works. If something does not work, then just delete the file and try another option. The fact is that it does not work on all computers.
Network Control Center
Using only the "Network Control Center" you can achieve the desired result, but with one caveat. The computer in this case will join only at the moment when it is requested by some application. But, as practice shows, this suits the average user quite well.
So, go to "Change adapter settings" and open the properties of our connection. In the "Dialing Options" we put only one checkmark - "Request a name, password, certificate, etc.", the rest are removed.

Then it is desirable to make the following changes:

After some time after the reboot, a window will pop up asking you to select the desired action. Check the "Connect automatically" box here. And the problem should be solved. If you want more advanced methods, then read on.
Setting up automatic Internet connection Windows 7 with Task Scheduler
Before creating a task in the scheduler:

Actually, after that, you can proceed to the next step - open the "Task Scheduler".
You can do this in two ways:

That's basically it. Try restarting your computer. If you did everything right, the computer will connect automatically.
Autorun with Registry Editor
Alternatively, you can set Windows 7 to automatically connect to the Internet through the registry.
To start:

We hope you found the information you were looking for in this article. In fact, there is nothing complicated here, even a novice user can easily figure it out.
Do not skip a single point, read carefully all the comments and comments, and then the result of your work will delight you without errors and failures for a long time.
>How to set up internet on windows 7
Today, more and more users use the Windows 7 operating system. Compared to Windows XP, the seven is not much different and, in principle, if you know XP well, you can work in the new Windows 7 without any problems. But still, despite the fact that this OS is very similar to Windows XP, it still has some differences. In today's article, we will look at setting up an Internet connection in Windows 7 and, using an example with screenshots, we will learn how to set up the Internet on this system.
Instructions for setting up the Internet in the Windows 7 operating system
Before setting up an Internet connection, you need to install drivers for your modem, network card, or other device that you use to access the Internet. And only after the driver necessary equipment are installed, you can proceed directly to setting up an Internet connection. First you need to launch the Control Panel, to do this you need to click the Start button and select Control Panel:
You will see the Computer Settings window, in which you need to switch the view by category:

After that, in the list that appears, select "Network and Sharing Center":

In the "Network and Sharing Center" you need to select the item "Set up a new connection or network":

At the next stage of the installation, you need to be careful! Here the operating system prompts us to select the option to connect to the Internet. If you are using an ADSL connection, then you need to select the first item: "Connect to the Internet". If you use, for example, 3G Internet, then you need to select the item "Setting up a telephone connection". Select the option you need and click "Next" I chose the first option:

In the next window, we just need to click on “High-speed (with PPPoE)” (If you are setting up 3G Internet, then at this stage you will have a modem selection window):

After that, you need to enter information from the Internet service provider. Here we write the username and password. If you are setting up 3G Internet, then you will have one more additional field "Dialed number". After the data has been entered, press the connect button:

If everything is configured correctly, then you will see the inscription: “Internet connection is ready for use”:

next step internet settings on windows 7 will create a connection shortcut on the desktop. To do this, again go to the control panel -> Network and Sharing Center and click on the item "Change adapter settings":

In the window that appears, right-click on the created connection and select "Create Shortcut":

Now click on the "Yes" button, thereby confirming the placement of the shortcut on the desktop:

How to change network card settings in Windows 7
As you all know, the Internet cable today, most often, connects to a network card. The fact is that sometimes, in order to properly configure the connection, it is necessary not only to install drivers, but also to correctly configure the network card itself. To do this, you need to click on “Change adapter settings” in the “Network and Sharing Center” and in the window that opens, find “Local Area Connection”. On this connection, right-click to open the menu and select “Properties”, you the following window will open:

Here you need to highlight the Internet protocol version 4 (TCP/IPv4) and click the properties button. A window will open in which you can enter the IP address, subnet mask, default gateway and other settings.
Possible problems when setting up the Internet on the Windows 7 operating system
If you did everything correctly, but for some reason the Internet does not work on Windows 7, then you should check the following:
- Hardware drivers. Once again, you need to check the correctness of the installed hardware drivers.
- Firewall settings (often included with antiviruses). The fact is that when you create a new Internet connection, the firewall installed on your computer recognizes this as a new network and can block it. Therefore, it is necessary to check the firewall settings and, if necessary, change them.
- Also, it will not be superfluous to check your computer for viruses. It will be most effective to check your PC with 2-3 of the most popular antivirus programs.
- If none of the above points gave a positive result, then you can repeat all the Internet setup steps again.
- Check the operability of the equipment (modem, network card) on another computer or another operating system.
- You can study the article on how to set up the Internet on Windows XP. This article is located
Often, after reinstalling the operating system, users are faced with a situation where the Internet does not work on their computer. Let's find out how to fix the indicated problem on a Windows 7 PC.
The reason for this problem is rather banal: after reinstalling the system, all settings are lost, including Internet settings, and network drivers also crash. The algorithm for getting out of this unpleasant situation depends on the specific method of connecting to the World Wide Web. Below we will look at the procedure for troubleshooting this problem when using Wi-Fi and standard cable connection through the 8P8C network card connector.
Method 1: WiFi
First, let's look at the algorithm of actions when using a Wi-Fi connection. The main reason for the failure to enter the world wide web after reinstalling the OS is the lack of an appropriate driver for the adapter through which Wi-Fi interaction takes place.
- Click "Start" and go to "Control Panel".
- Next, go to the section "System and safety".
- In the opened window in the block "System" find subsection "Device Manager" and click on it.
- The interface will open "Device Manager". Click on the section name "Network adapters".
- If in the list that opens you do not find the network adapter with which you connect to Wi-Fi at all, or there is an exclamation mark next to its name, this means that the necessary driver is missing or not installed correctly.
- Try to reinstall it. To do this, select on the top panel "Action" and click on the item "Update Configuration...".
- After that, the configuration update procedure will be performed and it is likely that your network adapter will be displayed, which means that the Internet will work.

But such an outcome is also possible, in which everything will remain as before. In this case, only installing the "native" drivers of this device will help you. They can be installed from the CD that came with the adapter. If for some reason you don’t have such a carrier, then the necessary component can be downloaded from the manufacturer’s official web resource. After installing the driver and displaying the device in "Dispatcher", search for available networks and connect to one to which you have access by entering the password, as you normally would.


Method 2: Internet via cable
If you have a normal cable internet, then in this case, after reinstalling the operating system, there may not be a connection to the World Wide Web. The probability of this is even higher than in the previous case, since interaction with many providers requires special settings, which in the process of reinstalling the OS, of course, went astray.
- Left-click on the network connections shortcut in the notification area. In the list that appears, navigate to "Control center…".
- In the window that opens, navigate through the position "Setting up a new connection...".
- Then select "Internet connection" and press "Further".
- Choose one of two connection options provided by the provider:
- high speed;
- Switched.
With a high degree of probability, you will need to choose the first option, since a dial-up connection is currently rarely used due to its low speed.
- A window for entering information about the service provider will open. To connect to the provider, enter your username and password in the appropriate fields, which the service provider must give you in advance. In field "Connection Name" you can enter an arbitrary name by which you will recognize the created connection among other objects on the computer. If you do not want to repeat the authorization procedure each time you enter the network, then in this case check the checkbox "Remember this password". After all the above settings are entered, click "To plug".
- After that, the procedure for connecting to the Internet will be carried out.
- But there are times when you entered all the settings correctly, but you still can’t connect to the World Wide Web. In such a situation, open "Device Manager" In chapter "Network Devices", as in the situation with Wi-Fi. This time, the absence of the computer's built-in network card in the list should serve as a signal of trouble. Next, do all those manipulations, including updating the configuration and, if necessary, installing the drivers that have already been described above.
- After that, the built-in network card should appear in the list, and the Internet should start working.

- But this does not always help, and if after performing the above steps the problem has not disappeared, you need to check the network settings. This is relevant if your provider does not support working with automatic settings. But first you need to contact the service provider to find out exactly what data you need to enter. In particular, the IP address and DNS server address. Next go to "Control Panel" and choose "Network and Internet".
- Then open the next section "Control center…".
- Then go to position "Change settings…".
- In the window that opens, find the name of the connection through which you want to activate communication with the World Wide Web. Right click on it and select position "Properties".
- In the shell that appears in the list of components, find the name "Internet Protocol (TCP/IP4)". Make a selection and click "Properties".
- Just in the window that opens, you should enter the settings that the provider provided. But in order to be able to enter data, rearrange the radio buttons to the position "Use…". After that, enter information in the active fields and click OK.
- Network connection should appear.


After reinstalling the operating system, the Internet may disappear due to the lack of necessary drivers or the loss of installed settings. The procedure for fixing this problem depends on the type of connection to the World Wide Web.
